
Cloud vulnerability remediation can be slow and resource-intensive when handled manually. Automating this process can cut resolution times by up to 87.5% and reduce manual effort by 80%. Here's how you can streamline your approach:
- Continuous Scanning: Use real-time monitoring tools like Amazon Inspector to detect vulnerabilities immediately after changes in your cloud environment.
- Prioritise by Risk: Rank vulnerabilities based on severity, asset importance, and exploit likelihood to focus on the most critical threats.
- Standard Workflows: Set up automated playbooks for common issues, such as misconfigured storage or unpatched software, using tools like AWS Systems Manager and Lambda.
- Automated Remediation: Execute fixes programmatically, including patching, configuration updates, or isolating compromised resources.
- Verification and Metrics: Re-scan after fixes, track MTTR, and monitor metrics like vulnerability density to improve processes over time.
Automation ensures faster, more consistent remediation while freeing up security teams for higher-value tasks. Tools like AWS Security Hub, EventBridge, and Step Functions play a key role in integrating detection, prioritisation, and remediation.
For UK businesses, this approach also supports compliance with GDPR, ISO 27001, and other regulatory standards. Hokstad Consulting offers tailored solutions to simplify and improve your automation efforts.
::: @figure 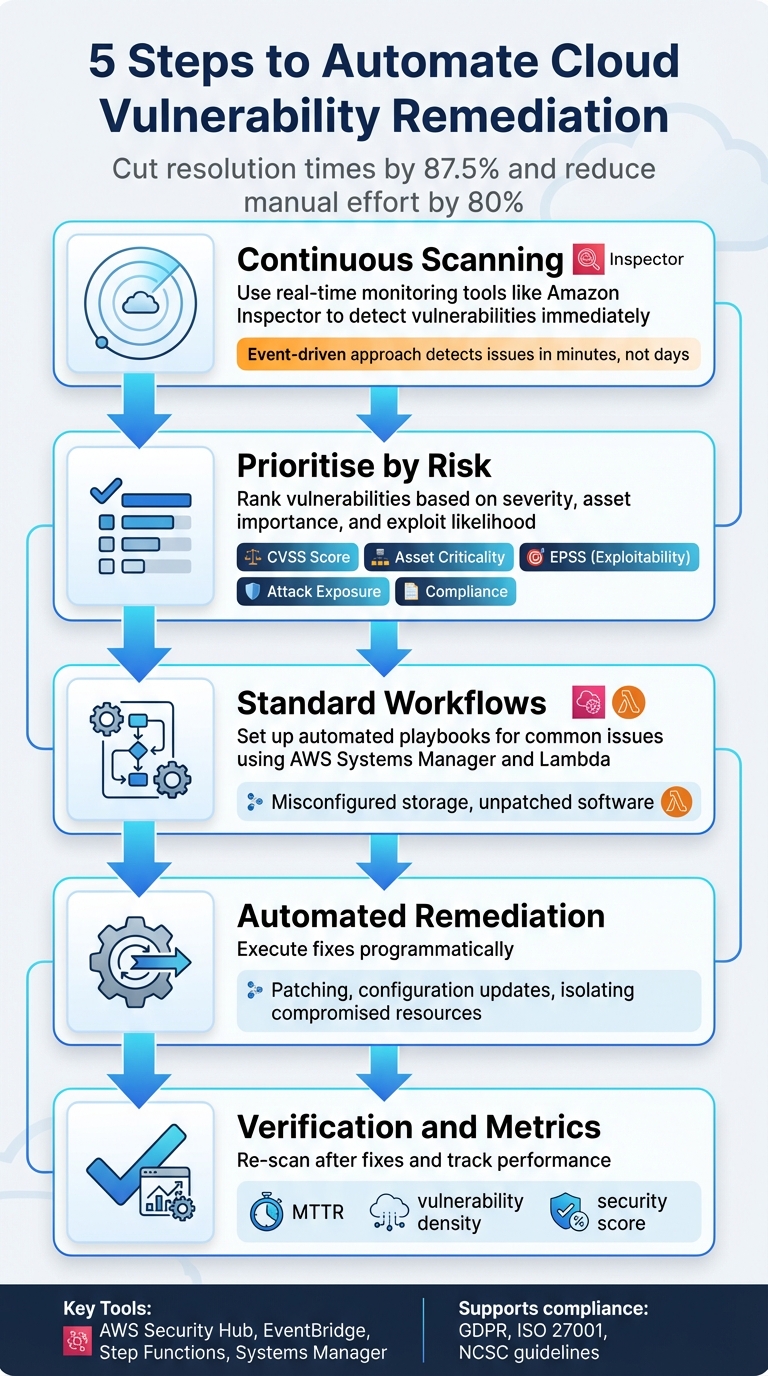 {5 Steps to Automate Cloud Vulnerability Remediation Process}
:::
{5 Steps to Automate Cloud Vulnerability Remediation Process}
:::
How To Automate Your Vulnerability Remediation Process | PurpleSec
Step 1: Scan for Vulnerabilities Continuously
Keeping an eye on vulnerabilities in real time is essential for effective automated remediation. Unlike traditional scans that might happen quarterly, cloud environments demand constant monitoring to stay on top of rapid changes. Each time a new deployment or patch is introduced, scanning tools should immediately reassess the environment. This event-driven approach ensures vulnerabilities are detected within minutes, not days, creating a solid foundation for prioritising and addressing them effectively.
Automatic discovery ensures no assets are overlooked. For example, Amazon Inspector automatically identifies EC2 instances, ECR images, and Lambda functions. On Windows instances, scans occur during discovery and then every six hours as a default setting[5].
To ensure quick detection, it's important to select a scanning method that matches your environment's flexibility. Agent-based scanning, which uses the AWS Systems Manager (SSM) agent, performs near real-time scans whenever packages are updated. On the other hand, agentless scanning, which relies on EBS snapshots, runs once daily[5]. For environments needing immediate visibility, agent-based scanning is ideal. However, agentless scanning is more suitable for legacy systems or operating systems that don't support agent installations.
Use Cloud-Native and Third-Party Scanning Tools
Cloud-native tools are designed to work seamlessly with your infrastructure. For instance, Amazon Inspector scans EC2 instances, container images, and serverless functions, while Azure Security Centre offers similar capabilities tailored for Microsoft environments[5]. These tools are particularly effective for identifying cloud-specific risks, such as misconfigured IAM roles or publicly accessible storage buckets.
Deep inspection takes vulnerability scanning a step further by analysing not just operating system packages but also dependencies within programming languages like Python and Java. This method catches vulnerabilities in third-party libraries that traditional OS-level scans might miss[5]. For container images, Inspector rescans images that were pushed within the last 30 days or pulled within the last 90 days. Auto-activation for new member accounts is also crucial to ensure no gaps in coverage as your cloud environment expands[5][7].
Build a Central Vulnerability Database
While real-time scans are essential, centralising the results is just as important. Without a unified system, scan results can become scattered, leading to an overwhelming number of findings that are impossible to sort through manually[9]. A central database, such as AWS Security Hub, brings together findings from various services - like Inspector, GuardDuty, and Macie - as well as third-party tools, presenting them in a standardised format[6][7].
A delegated administrator account... allows your security team to monitor vulnerabilities from one place rather than having to login to each account.- AWS Cloud Adoption Framework[8]
This centralised approach allows for cross-region aggregation, consolidating findings, security scores, and compliance statuses from multiple locations into a single dashboard[6][7]. It also reduces noise by merging duplicate alerts[7]. By connecting the central database to Amazon EventBridge, you can trigger automated remediation workflows, turning the database into a dynamic tool for managing vulnerabilities[2][1].
Step 2: Rank Vulnerabilities by Risk Level
After continuous scanning, the next step is to prioritise vulnerabilities, focusing on those that pose the greatest risk. Not all issues are equally dangerous - addressing high-risk vulnerabilities first ensures your automated responses are both effective and efficient.
To effectively reduce the risk of a cyberattack, you need to find and fix the vulnerabilities that expose your resources the most, that are most exploitable, or that would result in the most severe damage if they were to be exploited.- Google Cloud Documentation [11]
Static severity scores alone won’t give you the full picture. Context matters. For example, a Critical
vulnerability on a test server with no internet access is far less urgent than a Medium
vulnerability on a production database holding customer data. To assess the real risk, combine factors like technical severity, asset importance, exploitability, and threat intelligence.
Apply Severity Scores and Asset Context
CVSS scores are a good starting point - they highlight the technical severity of vulnerabilities. But they don’t account for how the issue might impact your specific environment. A CVSS score of 9.8 might look urgent on paper, but if it affects a development server with minimal impact on operations, it shouldn’t take priority over a slightly lower-scored issue on a customer-facing application. This is where asset context comes into play.
Tagging resources with metadata - such as whether they’re production or development, the business unit they support, or the type of data they handle - helps automation tools adjust priorities dynamically [4][11]. For instance, a misconfigured IAM role on a database storing payment details should rank higher than the same issue on an internal logging server. Modern cloud security tools can also identify how multiple vulnerabilities on the same resource might combine to create a high-risk attack path [11].
The Exploit Prediction Scoring System (EPSS) is another valuable tool, forecasting which vulnerabilities are likely to be exploited within the next 30 days [4][11]. By prioritising vulnerabilities with known active exploits, you focus on real-world threats rather than hypothetical risks.
| Prioritisation Factor | Description | Impact on Remediation |
|---|---|---|
| CVSS Score | Standardised score for raw vulnerability severity | Provides a baseline for technical risk |
| Asset Criticality | Business value or sensitivity of the affected resource | Ensures high-value targets are addressed first |
| Exploitability (EPSS) | Likelihood of exploitation within the next 30 days | Focuses effort on active, real-world threats |
| Attack Exposure Score | Risk from potential attack paths and toxic combinations | Highlights complex risks static scans might miss |
| Compliance Violation | Whether the issue breaches regulatory controls (e.g., CIS) | Prioritises based on legal and audit requirements |
This structured ranking ensures your automation tackles the most pressing vulnerabilities first.
Align Automation with High-Risk Issues
Once vulnerabilities are ranked, configure automation to address the highest risks. Set clear thresholds for automated remediation - automatically patching High
and Critical
vulnerabilities on production systems, for example - while requiring manual reviews for changes to mission-critical databases [4].
Start small. Focus on automating fixes for lower-risk issues to build confidence in the process and minimise disruptions [4]. As your team gains experience and trust in the system, gradually expand automation to handle higher-risk scenarios. This phased approach not only reduces the chance of errors but also helps demonstrate the value of automation to stakeholders.
Step 3: Create Standard Remediation Workflows
Once you've ranked risks in Step 2, the next step is to establish workflows that automate how issues are addressed. These workflows, often referred to as remediation playbooks, outline clear, repeatable steps to handle specific vulnerabilities. This ensures fixes are consistent and reduces the chance of human error.
When you define remediations programmatically, they are applied consistently, which reduces the risk of human error.– AWS Well-Architected Framework [10]
Here’s how the process flows: a security service like AWS Security Hub identifies a vulnerability or misconfiguration. This triggers an event through Amazon EventBridge, which matches the issue to predefined remediation logic [2]. Then, an orchestration layer - using tools like AWS Step Functions or AWS Lambda - manages the sequence of tasks. Execution documents, such as AWS Systems Manager automation documents, handle the actual fixes [12]. Post-remediation, the workflow verifies the changes and logs all actions for auditing [1]. This structure forms the basis for creating playbooks tailored to common vulnerabilities.
Write Remediation Playbooks for Common Issues
Playbooks are essentially prewritten scripts designed to address specific problems. For instance, if a scan detects an S3 bucket with public access enabled, the playbook might automatically enable the Block Public Access
setting and log the change. Similarly, if an IAM access key hasn’t been rotated for over 90 days (as required by CIS AWS Foundations), the playbook could revoke the key and notify the user [12].
Start by focusing on the most frequent vulnerabilities. AWS provides a head start with its Automated Security Response solution, offering 63 pre-built remediations for the AWS Foundational Security Best Practices standard and 65 for NIST SP 800-53 [12]. These templates cover tasks such as enabling S3 bucket encryption, removing public access from RDS instances, and activating VPC flow logs. Instead of building everything from scratch, customise these templates to suit your specific needs.
To avoid infrastructure drift, update your CloudFormation or Terraform templates alongside any live remediation fixes [2]. Either configure playbooks to update the original templates automatically or notify the DevOps team to make the necessary changes.
For more complex situations, multi-step orchestration might be required. For instance, AWS Step Functions can handle tasks like collecting logs, taking forensic snapshots, quarantining affected servers, and replacing them with hardened images [1].
Connect Tools to Your Remediation Pipeline
Integrating detection and execution tools is key to an efficient remediation pipeline. AWS Security Hub serves as a central hub, consolidating findings from various sources and triggering workflows [2]. Amazon EventBridge routes these findings to the appropriate playbook based on custom rules. For example, critical S3 misconfigurations might be sent to one workflow, while IAM-related issues go to another.
AWS Systems Manager (SSM) plays a crucial role in executing playbooks, handling tasks like patching, configuration updates, and revoking unauthorised access [12]. AWS Lambda is ideal for targeted, specific fixes, while AWS Step Functions can manage more complex, multi-service responses. To enhance functionality, you can integrate third-party tools like Splunk for anomaly detection or Rapid7 for post-remediation validation. These tools can be connected via Amazon SQS to trigger checks after fixes are applied [1].
| Component | Role in the Remediation Pipeline |
|---|---|
| AWS Security Hub | Acts as the central console for findings and triggering workflows [2] |
| Amazon EventBridge | Routes findings to the correct remediation workflow [2] |
| AWS Systems Manager | Executes playbooks for patching and configuration changes [12] |
| AWS Lambda | Runs custom code for specific remediation tasks |
| AWS Step Functions | Orchestrates complex, multi-service response sequences [1] |
Make sure to configure IAM roles with the principle of least privilege, granting only the permissions necessary for each task [2]. Additionally, store remediation configurations in a centralised database, such as DynamoDB, to allow your team the flexibility to toggle between manual and automated responses for different vulnerabilities.
With these tools and workflows in place, you're ready to move on to automating remediation actions in Step 4.
Need help optimizing your cloud costs?
Get expert advice on how to reduce your cloud expenses without sacrificing performance.
Step 4: Run Automated Remediation Actions
Once you've set up scanning and created playbooks, the next step is executing remediations automatically. By leveraging the workflows configured in Step 3, you can address vulnerabilities without manual effort. These actions can be triggered manually or automatically based on specific events. For instance, when AWS Config identifies a resource as non-compliant, it can automatically activate the appropriate remediation document. The integration of detection and execution ensures a smooth and efficient automation process. After this, focus on automating patch management and configuration updates to address vulnerabilities quickly.
Automate Patching and Configuration Changes
AWS Systems Manager Patch Manager simplifies the deployment of updates across instances by using scheduled maintenance windows [3]. Similarly, automation documents can enforce configuration changes as soon as misconfigurations are detected. For example, if a scan reveals an S3 bucket with public access enabled, the system can immediately apply the Block Public Access
setting. In another scenario, if an IAM access key hasn’t been rotated in over 90 days, the system can revoke the key and notify the user [12].
For environments using immutable infrastructure, AWS Step Functions can quarantine compromised instances and replace them with pre-hardened images [1].
To ensure smooth remediation, configure retry logic to attempt fixes up to five times within 300 seconds. Use dynamic parameters to automatically insert the relevant resource ID during runtime [13], eliminating the need for manual script updates when new resources require remediation.
However, be cautious when remediating resources initially deployed via Infrastructure as Code (e.g., CloudFormation or Terraform). Automated fixes can create drift between your live environment and the source code [2]. To avoid this, either update the original templates directly through your playbooks or alert your DevOps team to make the necessary adjustments.
Apply Temporary Controls When Needed
Sometimes, immediate remediation isn’t possible. In such cases, temporary controls can be implemented to reduce risk until a permanent solution is in place. These controls might include network hardening, updating security group rules, or revoking IAM access.
Network hardening is one of the quickest temporary measures. Automation can instantly remove overly permissive security group rules, such as those allowing traffic from 0.0.0.0/0, or close risky ports like 22 (SSH) and 3389 (RDP) [12][13].
If a compromised instance is detected, automated workflows can isolate it by moving it to a quarantine security group with no inbound or outbound access. This prevents lateral movement across your network [1].
Access revocation is another effective immediate action. Automated systems can deactivate IAM access keys, disable user credentials, or revoke active sessions if suspicious behaviour is identified [1][12]. For exposed secrets, you can trigger an immediate rotation of Secrets Manager secrets or IAM access keys [12].
Before permanently terminating instances, ensure forensic snapshots of EBS volumes are captured using AWS Step Functions [1]. These snapshots preserve evidence for analysis while allowing remediation to continue. A typical workflow might involve taking a snapshot, quarantining the instance, and notifying the security team.
Always build a manual override mechanism into your automation [3]. This allows your security team to pause automated remediations during emergencies or unique operational scenarios.
After remediation, trigger an immediate re-scan to validate the fix. For instance, you can configure a post-remediation action, such as an Amazon SQS message, to initiate a fresh vulnerability scan using tools like Rapid7 or Amazon Inspector [1][14]. This ensures the resource is secure and confirms no new vulnerabilities have been introduced. Re-scanning reinforces the continuous monitoring established in Step 1.
Step 5: Verify Fixes and Track Results
It's essential to verify every automated fix to ensure vulnerabilities are genuinely resolved. This step is as critical as the scanning and remediation processes, completing the automation cycle and maintaining a secure, compliant cloud environment.
Re-Scan After Remediation
The best way to confirm a vulnerability has been resolved is through a fresh scan of the affected resource. Set up your automation pipeline to initiate a new vulnerability scan as soon as a remediation action is completed. Tools like AWS Security Hub provide near real-time updates, and you can use Amazon SQS or EventBridge to send notifications to services like Amazon Inspector or Rapid7 after a Lambda function or Systems Manager playbook has finished [1]. Note that AWS Security Hub updates control findings either every 12 to 24 hours or immediately when a resource's state changes [6]. For AWS Config-based remediations, you can use specific CLI commands to confirm the status of the execution.
However, keep an eye out for outdated data. Automated remediation often depends on compliance snapshots, which means a resource updated between snapshots might trigger unnecessary fixes for issues that no longer exist [13]. Additionally, when working with Infrastructure as Code, automated fixes can sometimes cause drift between the live environment and your source templates. Always ensure source templates are updated to reflect these changes [2].
Monitor Metrics and Improve Automation
Once fixes are verified, it's time to measure performance and refine your automation processes. Metrics not only help improve automation but also showcase its effectiveness. Here are some key metrics to focus on:
- Mean Time to Remediate (MTTR): Tracks how quickly vulnerabilities are resolved, from discovery to closure.
- Automation success rate: Measures the percentage of successful automated fixes versus those needing manual intervention [10].
- Vulnerability density: Monitors the number of open vulnerabilities relative to your total cloud resources.
- Security score: Aggregates compliance percentages against standards like CIS or AWS Foundational Security Best Practices [6][7].
AWS Security Hub provides customised insights using Group By
filters. For instance, you can group findings by ResourceType or Account ID to monitor how critical vulnerabilities are reduced over time [6]. Automation Rules can also help prioritise tasks by suppressing low-priority findings or escalating issues for production accounts, ensuring your team focuses on the most pressing vulnerabilities [6]. Keep in mind that Security Hub administrator accounts can manage up to 100 automation rules [6].
Review and analyse these logs to assess the effectiveness of the automated processes, and identify areas of improvement.- AWS Well-Architected Framework [10]
Regularly examining CloudWatch Logs and findings is crucial for identifying patterns in failed remediation attempts. This analysis highlights areas where workflows need tweaking, ultimately reducing MTTR [10]. For larger environments, consolidating findings and compliance statuses can provide a unified view of your security posture [6][7]. You can even integrate Amazon QuickSight to visualise trends and track remediation progress over time [6].
How Hokstad Consulting Supports Automated Remediation
Automating vulnerability remediation requires workflows that fit your cloud architecture, align with compliance standards, and reflect your business priorities. Hokstad Consulting focuses on creating tailored automation solutions that integrate smoothly into existing DevOps pipelines while addressing the specific security needs of UK organisations.
Custom Automation Solutions
Hokstad Consulting crafts remediation workflows designed to automate low-risk fixes while carefully managing high-stakes changes. Using a tiered remediation model, they enable full automation for low-risk tasks, such as adding missing resource tags. Meanwhile, critical actions, like production database updates, are gated with approval processes to minimise risks, especially during peak operational times.
They embed automated vulnerability scans directly into CI/CD pipelines, catching issues early in the development cycle. Additionally, they implement Policy as Code through tools like HashiCorp Sentinel or Open Policy Agent, ensuring consistent enforcement of security controls across all cloud resources. This approach helps maintain secure and efficient operations that align with your business goals.
Security Audits and Cost Reduction
Hokstad Consulting goes beyond workflow automation by thoroughly reviewing your existing security measures. Their audits assess cloud configurations across key areas, focusing on security, efficiency, and compliance within IaaS, PaaS, and SaaS frameworks. They pay particular attention to UK-specific standards, including GDPR, ISO 27001, and guidelines from the National Cyber Security Centre (NCSC).
These audits provide actionable insights, including configuration checklists, prioritised remediation plans, and detailed reports generated by tools like Microsoft Defender for Cloud. Hokstad also integrates financial guardrails into automation workflows. For example, if a remediation action would lead to a significant cost increase (such as scaling up an instance), the system flags it for manual review instead of applying it automatically. By enforcing resource tagging, they ensure cloud expenses are accurately tracked, simplifying both budgeting and cost management. Businesses can schedule a 30-minute consultation to explore ways to optimise cloud security and reduce costs tailored to their specific needs.
Conclusion
Summary of the 5 Steps
The steps outlined above show how automating cloud vulnerability remediation shifts security operations from being reactive to taking a more proactive stance. By following this five-step method, organisations can significantly reduce remediation times - from weeks to just minutes - cutting mean time to remediation (MTTR) by as much as 80% or more [4].
This method also addresses the inefficiencies of manual processes. Programmatic workflows ensure standardisation, minimise human error, and reduce misconfigurations, all while applying security controls consistently across hybrid and multi-cloud setups.
Automated remediation is no longer a nice-to-have because manual remediation is too slow, too error-prone and too resource-intensive whilst adversaries move faster than ever[4]
Beyond just speed and accuracy, automation delivers other advantages. Automated logging supports continuous compliance with key frameworks like GDPR, ISO 27001, and NCSC guidelines. Risk-based prioritisation ensures resources focus on the most critical threats, while verification loops confirm that fixes are both effective and lasting. Organisations using advanced exposure management platforms report a 30% improvement in threat prevention and threat validation that’s 40 times faster [4].
Get Expert Help from Hokstad Consulting
While these steps provide a strong foundation, expert guidance can take your automated remediation efforts to the next level. Implementing automation requires careful planning, customised workflows, and ongoing adjustments to fit your unique cloud architecture and business goals. Hokstad Consulting specialises in crafting tailored solutions that integrate smoothly into existing DevOps pipelines. Their approach balances operational efficiency with robust risk management, ensuring automation enhances rather than disrupts your processes.
Whether you're starting small with low-risk fixes or scaling automation across your entire infrastructure, Hokstad Consulting can help you navigate complexities and avoid common challenges. Their services include security audits, aligning with compliance standards, and cost optimisation - ensuring your automated remediation efforts improve both your security posture and operational performance. Book a 30-minute consultation at hokstadconsulting.com to discover how automation can strengthen your cloud security while keeping costs in check.
FAQs
How can automating cloud vulnerability remediation help ensure compliance with regulations like GDPR?
Automating cloud vulnerability remediation plays a key role in staying compliant with regulations such as GDPR. By quickly identifying and addressing vulnerabilities, automated systems ensure that security gaps are tackled without delay. A major advantage here is continuous monitoring, which keeps an eye on security measures around the clock, reducing the chances of human error and ensuring consistent application of protocols.
Standardising workflows across teams and tying remediation efforts directly to compliance reporting makes it easier for organisations to showcase their GDPR compliance. This not only bolsters overall security but also streamlines the auditing process, making compliance reporting more accurate and efficient.
What are the main advantages of using cloud-native tools for vulnerability scanning?
Cloud-native tools for vulnerability scanning offer automated, continuous monitoring of workloads, ensuring vulnerabilities are identified quickly. By reducing the need for manual checks, they help speed up the process of addressing security issues.
Built to work effortlessly within cloud environments, these tools provide real-time insights and prioritised alerts. This allows organisations to tackle security risks proactively, all while keeping operations running smoothly.
How can organisations keep their automation workflows effective over time?
To keep automation workflows running smoothly, organisations need to regularly test and validate their processes. This ensures they continue to address any existing vulnerabilities effectively. Setting up oversight mechanisms is equally crucial, as these help monitor performance and catch potential issues before they escalate.
Workflows should also be periodically updated to accommodate new vulnerabilities, shifts in cloud environments, or changes in operational needs. Staying on top of these updates ensures workflows remain reliable and efficient in the long run.