
Zero downtime deployments ensure your applications and infrastructure remain available during updates. Terraform helps achieve this by automating resource management and avoiding service interruptions. Its default destroy-then-create behaviour can cause downtime, but with lifecycle rules like create_before_destroy, you can replace resources seamlessly.
Key methods for zero downtime include:
-
create_before_destroyRule: Ensures new resources are created before old ones are destroyed. - Blue/Green Deployments: Run two environments (current and new) and switch traffic gradually.
- Rolling Updates: Replace resources incrementally while maintaining service availability.
- Canary Deployments: Shift traffic to the new version in small increments, monitoring for issues.
Best practices include testing in a staging environment, monitoring deployments closely, and having a rollback plan ready. Terraform's lifecycle rules, combined with health checks, traffic management, and automated rollback options, make it a powerful tool for achieving zero downtime, even in complex multi-cloud setups.
5.6 Learn Terraform - Zero Downtime Deployments
How Terraform's Default Behaviour Causes Downtime
Terraform manages certain changes, like updating an AMI ID, by using a two-step approach: destroying the existing resource first, then creating a new one. This method helps avoid conflicts with resource names, as many cloud resources require unique identifiers within a specific scope. However, the gap between removing the old resource and provisioning the new one can lead to downtime. For example, in web server deployments, this can result in service interruptions lasting over 60 seconds[7]. This highlights the importance of carefully managing resource lifecycles.
Why Destroy-Then-Create Causes Problems
In production environments, even a short disruption can have serious consequences. Losing a critical resource - like a load balancer or a database instance - for just a few minutes can result in major issues such as failed transactions, broken user sessions, or even data loss. Terraform considers a resource created
as soon as the cloud provider confirms its existence, but this doesn’t guarantee the service is operational. Without proper lifecycle rules, Terraform might destroy the existing resource before the new one is fully functional, exacerbating downtime risks.
To address these challenges, Terraform provides lifecycle rules that alter this behaviour.
Using Lifecycle Rules to Prevent Downtime
Terraform’s lifecycle configuration options allow you to avoid downtime by changing the default destroy-then-create sequence. Adding the create_before_destroy = true meta-argument within a resource's lifecycle block ensures that the replacement resource is fully provisioned before the old one is removed. When running terraform plan, you can identify this setting by the +/- symbol, which indicates the resource will be created before the existing one is destroyed. By contrast, the default behaviour is marked with -/+[1].
However, enabling create_before_destroy alone isn’t enough. Fixed names need to be replaced with name_prefix to avoid conflicts when old and new resources overlap[5]. Additionally, incorporating health checks - using parameters like min_elb_capacity or wait_for_elb_capacity - ensures Terraform waits until the new resources pass load balancer health checks before removing the old ones[9]. These steps significantly reduce the risk of downtime during resource updates.
4 Methods for Zero Downtime Deployments with Terraform
::: @figure 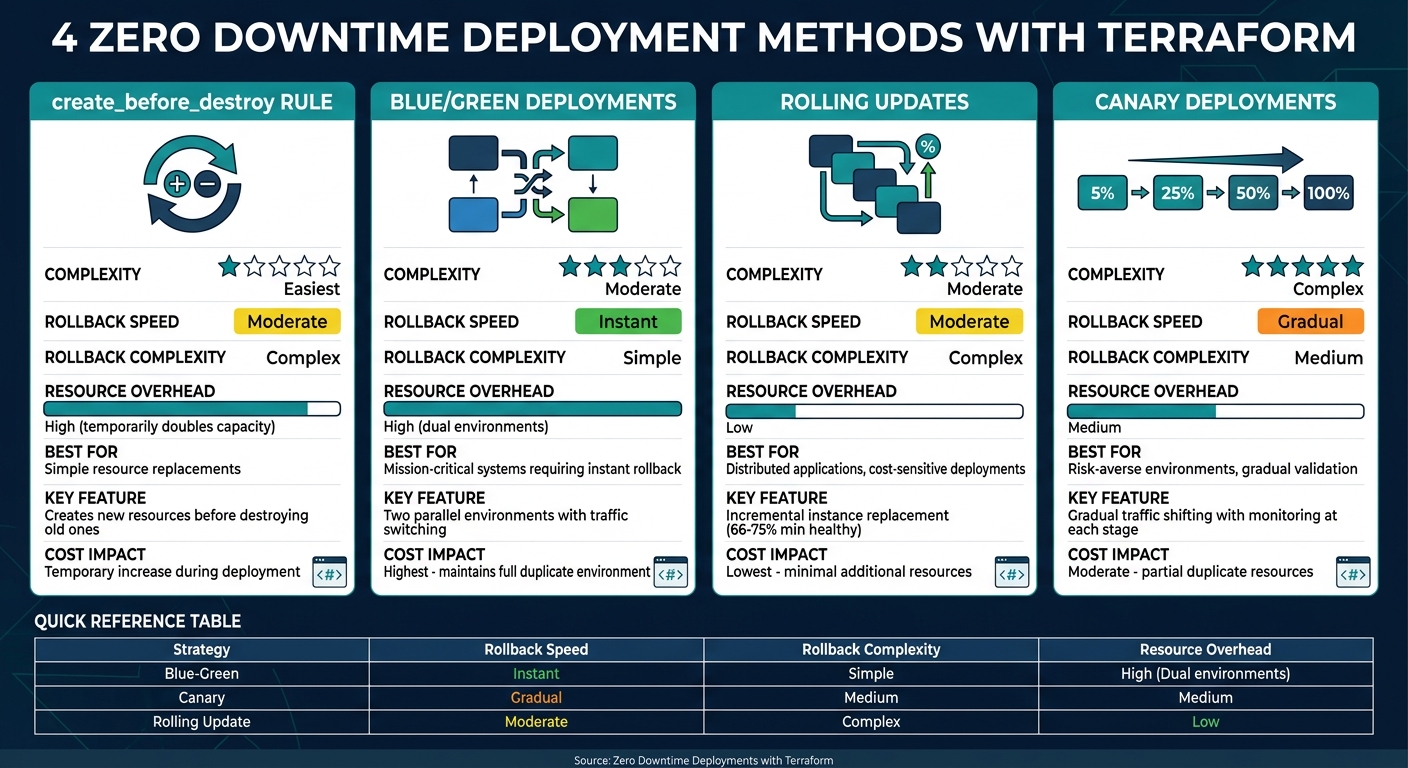 {Comparison of Zero Downtime Deployment Strategies with Terraform}
:::
{Comparison of Zero Downtime Deployment Strategies with Terraform}
:::
Terraform offers several strategies to achieve zero downtime during deployments. The right approach depends on your infrastructure, how quickly you need to roll back, and your budget. Below are four methods to consider.
Method 1: The create_before_destroy Rule
This method is one of the easiest ways to ensure zero-downtime replacements. By adding a lifecycle block to a resource, Terraform creates the new version before destroying the old one.
resource "aws_security_group" "web" {
  name_prefix = "web-"
  vpc_id      = aws_vpc.main.id

  lifecycle {
    create_before_destroy = true
  }
}
However, fixed names can cause conflicts when both old and new resources exist simultaneously. For resources like RDS instances, use identifier_prefix instead. This rule is also cascading - if Resource A has create_before_destroy enabled and Resource B depends on it, the behaviour extends to Resource B automatically.
create\_before\_destroy is your primary tool for zero-downtime resource replacements in Terraform. Enable it on resources that serve traffic or are referenced by other resources.
- Nawaz Dhandala, Author, OneUptime
For Auto Scaling Groups, pair this rule with wait_for_elb_capacity. This ensures Terraform waits for new instances to pass health checks before removing the old ones. Keep in mind, this approach temporarily doubles capacity, which can lead to higher costs.
Method 2: Blue/Green Deployments
Blue/green deployments go beyond resource replacement by creating two parallel environments. The Blue
environment runs the current production version, while the Green
environment hosts the new release. An Application Load Balancer (ALB) manages traffic between the two, enabling seamless transitions without mixed-version states.
Terraform modules can be used to create both environments. Shared infrastructure like databases and VPCs can remain in place, but ensure your database schema supports both versions during the transition.
resource "aws_lb_listener_rule" "traffic_split" {
  listener_arn = aws_lb_listener.main.arn

  action {
    type             = "forward"
    target_group_arn = aws_lb_target_group.blue.arn
    weight           = var.blue_weight
  }

  action {
    type             = "forward"
    target_group_arn = aws_lb_target_group.green.arn
    weight           = var.green_weight
  }
}
Start with 100% traffic directed to Blue and 0% to Green. Deploy Green, run health checks, and gradually shift traffic - 10% for canary testing, 50% to test stability, and finally 100% to Green. Set a deregistration_delay of around 120 seconds to allow existing requests to complete.
Blue-green deployments are the gold standard for safe releases.
- Nawaz Dhandala, Author, OneUptime
This approach ensures a fallback option is always available. After switching to Green, keep Blue running briefly to allow for a smooth rollback if needed. Like the previous method, this also temporarily increases costs due to dual environments.
Method 3: Rolling Updates with Auto Scaling Groups
Rolling updates replace instances incrementally, maintaining service availability throughout the process. Terraform’s instance_refresh block within the aws_autoscaling_group resource simplifies this approach.
resource "aws_autoscaling_group" "web" {
  name                     = "web-asg"
  min_size                 = 3
  max_size                 = 6
  health_check_type        = "ELB"
  health_check_grace_period = 300

  launch_template {
    id      = aws_launch_template.web.id
    version = aws_launch_template.web.latest_version
  }

  instance_refresh {
    strategy = "Rolling"
    preferences {
      min_healthy_percentage = 66
      instance_warmup        = 180
      auto_rollback          = true
    }
  }
}
Set min_healthy_percentage to ensure enough capacity remains during updates - typically between 66% and 75%. The instance_warmup setting allows new instances time to initialise, usually 120–300 seconds. Using health_check_type = "ELB" ensures application-level health checks are used, and configuring the load balancer’s deregistration_delay helps drain connections gracefully. Enabling auto_rollback ensures Terraform reverts to the last stable state if issues arise.
This method is ideal for maintaining continuity by updating in small, manageable segments.
Method 4: Canary Deployments
Canary deployments provide fine-grained control by gradually shifting traffic to the new version while monitoring performance. This method uses the same weighted target group mechanism as blue/green deployments, but with smaller increments and longer monitoring periods.
Deploy the new version to a separate target group. Gradually direct traffic from 5–10% to 25%, 50%, and finally 100%, closely monitoring application metrics at each step. Using a traffic_distribution variable in your Terraform code helps automate this process.
Real-time monitoring is critical for this approach. Set up alerts for application errors, response times, and key performance indicators to catch problems early. If an issue arises, roll back immediately by setting the canary weight back to 0%.
This method ensures any issues are detected before they affect the majority of users, providing a controlled and cautious rollout.
3 Best Practices for Zero Downtime Deployments
Choosing the right deployment method is just the start when aiming for zero downtime. To truly minimise disruptions, you need strategies that identify issues before they hit production, detect problems quickly, and allow for rapid recovery when something goes wrong.
Test All Deployments in Staging First
Before rolling out any deployment strategy, thoroughly test it in a staging environment. This staging setup should match your production environment as closely as possible - use the same Terraform configurations, instance types, and load balancer settings. Rehearse the exact deployment process you plan to use in production. For instance, if you're using a blue/green deployment, simulate the full traffic switch during staging tests.
Terraform alone can't confirm if your application is functioning correctly. To address this, use provisioners with local-exec to run health check scripts that ensure your application returns HTTP 200 status codes before Terraform marks the resource as created [1][3]. Additionally, automated smoke tests should follow each deployment phase to confirm that core functionality is intact [10].
Monitor Deployments Closely
During deployment, monitoring is key. Set up CloudWatch alarms to track critical metrics like p99 latency and 5XX errors [8]. These indicators can catch subtle performance issues that standard health checks might miss. Your monitoring dashboard should provide real-time insights into traffic distribution between versions, instance health, and application-level data such as response times and error rates.
For processes like AWS Instance Refresh, ensure your CI/CD pipeline polls for completion rather than exiting prematurely [5][4]. Adjust the load balancer's deregistration_delay to 120 seconds to allow in-flight requests to complete without interruption [8]. If monitoring flags any issues, having a solid rollback plan already in place becomes indispensable.
Prepare Rollback Plans
A well-documented rollback plan is essential. Tailor this plan to your chosen deployment strategy. For blue/green deployments, keep the blue environment active until the green environment is fully validated. This setup enables an instant rollback by simply redirecting traffic back to the blue environment [5][6]. For rolling updates using Auto Scaling Groups, enable auto_rollback = true to automate recovery if issues arise [6][8].
AWS ECS includes deployment circuit breakers that automatically revert deployments failing to reach a steady state [6]. As a last resort, configure DNS-based failover with Route53 to redirect traffic to a maintenance page or a stable secondary environment if needed [8]. Using Launch Templates instead of Launch Configurations can also make rollbacks smoother, as they are versioned and editable [5][8].
| Deployment Strategy | Rollback Speed | Rollback Complexity | Resource Overhead |
|---|---|---|---|
| Blue-Green | Instant | Simple | High (Dual environments) |
| Canary | Gradual | Medium | Medium |
| Rolling Update | Moderate | Complex | Low |
How to Test and Verify Zero Downtime
Ensuring zero downtime during deployment involves simulating real user traffic, monitoring key metrics, and validating uninterrupted service. By simulating traffic during Terraform deployments and closely tracking metrics, you can confirm that services remain available throughout the process.
Terraform provisioners are particularly useful for running health checks before retiring old resources. For instance, a local-exec or remote-exec provisioner can execute a shell script that repeatedly checks your application's health endpoint until it receives an HTTP 200 status. As Nic Jackson, Developer Advocate at HashiCorp, explains:
Terraform is not aware of your application lifecycle... The provisioner delays the destruction of the old resources until we are sure that our new resource has been created and is capable of serving requests[1].
This method ensures Terraform doesn’t prematurely mark resources as created
, allowing new instances to be fully operational before phasing out the old ones. Once health checks confirm readiness, the next step is to monitor real-time traffic metrics.
By leveraging Terraform's lifecycle rules, you can track HTTP statuses and traffic metrics to verify a smooth transition. During the deployment phase, monitoring HTTP status codes is critical - any spike in 5XX errors could signal service degradation, even if individual instances seem healthy. For example, metrics like 'Request Count Per Target' in CloudWatch provide valuable insights [8]. For Auto Scaling Groups, the wait_for_elb_capacity attribute ensures Terraform delays resource decommissioning until the load balancer confirms the new instances are healthy [4][5].
Application-level monitoring is equally important to validate service functionality. As Tim Nolet, Chief Evangelist at Checkly, points out:
Working infrastructure does not equal a working service[2].
To address this, set up custom metrics that track essential activities, such as successful API calls or message processing rates. Synthetic monitoring tools like AppOptics or Prometheus can alert you if no successful requests are processed within a specific timeframe [2]. For asynchronous processes, such as an AWS Instance Refresh, you can integrate a Python or Bash script into your CI/CD pipeline to consistently check deployment status. This ensures the healthy instance threshold is met before marking the deployment as Successful
[4][5].
At Hokstad Consulting, these strategies are a cornerstone of achieving seamless, zero-downtime deployments.
Conclusion
Deploying with zero downtime using Terraform involves tweaking its default destroy-then-create behaviour. A key tool for this is the create_before_destroy lifecycle rule, which ensures resources are replaced seamlessly without service interruptions [1].
Different deployment methods cater to various operational priorities. For example, Blue/Green deployments allow instant rollbacks, making them ideal for mission-critical systems. Rolling updates, on the other hand, are better suited for distributed applications as they minimise resource usage. Canary deployments offer a cautious approach, gradually shifting traffic while monitoring for issues - perfect for environments prioritising risk management.
Verification plays a crucial role in these processes. Health checks and wait conditions are essential to confirm that new instances are fully functional before decommissioning the old ones [1][5]. For asynchronous tasks like AWS Instance Refresh, polling scripts can ensure every step is successfully completed before marking the deployment as a success [4][5].
These strategies collectively support reliable service delivery across multi-cloud setups. In fact, organisations embracing DevOps automation have reported a 61% improvement in software quality and a 57% reduction in deployment failures [6]. These benefits largely result from codifying infrastructure and minimising manual intervention.
At Hokstad Consulting, these practices form the backbone of dependable multi-cloud infrastructure management. Start by applying create_before_destroy for critical resources, and as your processes mature, experiment with more advanced deployment patterns to enhance efficiency and reliability.
FAQs
When should I use create_before_destroy instead of blue/green?
create_before_destroy works well for straightforward updates, such as switching an AMI or modifying an instance type, where keeping downtime to a minimum is a priority. This method ensures new resources are set up before the old ones are taken offline, keeping the process simple. On the other hand, blue/green deployments are better suited for more intricate systems, significant updates, or scenarios requiring rollbacks. By using separate environments, this approach allows for smooth transitions, comprehensive testing, and a lower chance of issues.
How do I avoid naming conflicts with create_before_destroy?
To avoid naming conflicts when using create_before_destroy in Terraform, you can add a lifecycle block to your resource configuration. By setting create_before_destroy to true, Terraform ensures the new resource is created first, before the old one is destroyed. This approach helps minimise downtime.
lifecycle {
  create_before_destroy = true
}
This method flips the usual destroy-then-create sequence, allowing for smoother resource updates without causing conflicts.
How can I prove a Terraform deploy was truly zero downtime?
To ensure a Terraform deployment had no downtime, check for any signs of service interruption. You can do this by:
- Monitoring service availability: Use tools to track uptime and identify any disruptions during the deployment.
- Analysing load balancer metrics: Review traffic patterns and response times to spot anomalies.
- Reviewing deployment logs: Look for errors or warnings that might indicate issues during the process.
- Collecting user feedback: Gather input from users to confirm their experience was uninterrupted.
By combining these methods, you can confidently verify that updates were implemented smoothly without affecting users.