Struggling with resource allocation in Kubernetes? The Vertical Pod Autoscaler (VPA) adjusts CPU and memory based on actual usage, helping you reduce waste and improve stability. Here's what you need to know:
- Why Use VPA? It prevents over-provisioning (wasting resources) and under-provisioning (performance issues or OOM errors).
- Key Components:
- Recommender: Analyses usage to suggest optimal resources.
- Updater: Evicts and restarts pods with updated settings.
- Admission Controller: Injects recommendations during pod creation.
- Modes:
- Off: Observes usage without changes.
- Initial: Updates resources only for new pods.
- Recreate: Evicts pods to apply changes.
- InPlaceOrRecreate: Updates without restarting, if possible (Kubernetes 1.27+).
- Setup Tips: Ensure Metrics Server is running, use CRDs, and configure resource limits (
minAllowed/maxAllowed) for control.
For best results, combine VPA with Horizontal Pod Autoscaler (HPA) and Cluster Autoscaler (CA), but avoid overlapping metrics to prevent conflicts. Start with VPA in Off
mode to test recommendations before automating updates. Properly configured, VPA can save 40–60% in cloud costs, translating to thousands per month for enterprise workloads.
Keep reading for installation steps, troubleshooting, and advanced strategies like integrating VPA with CI/CD pipelines and spot instances.
Installing and Configuring VPA
VPA Requirements
Before setting up the Vertical Pod Autoscaler (VPA), ensure your cluster meets these key requirements:
The Metrics Server is essential since VPA relies on the metrics.k8s.io API to obtain resource usage data. You can confirm the Metrics Server is running by executing:
kubectl get deployment/metrics-server -n kube-system
For VPA versions 0.9 and above, Kubernetes 1.16 or newer is required. Older versions of VPA (0.4–0.7) are compatible with Kubernetes 1.11+ [6]. Unlike the Horizontal Pod Autoscaler, VPA isn't part of Kubernetes' core API. It must be installed separately using Custom Resource Definitions (CRDs). Additionally, you'll need cluster-admin privileges to perform the installation. For example, on Google Kubernetes Engine (GKE), you can assign the cluster-admin role to your Google identity. If you're installing manually, ensure you're using OpenSSL 1.1.1 or later, as this version supports the -addext option [6].
Installing VPA Components
To install VPA, clone the repository and run the installation script:
git clone https://github.com/kubernetes/autoscaler.git && cd autoscaler/vertical-pod-autoscaler && ./hack/vpa-up.sh
This script deploys the necessary CRDs and the three core components of VPA: Recommender, Updater, and Admission Controller. Once the installation is complete, verify the deployment by listing the pods in the kube-system namespace:
kubectl get pods -n kube-system
If you encounter an error like unknown option -addext
, it indicates your OpenSSL version is outdated. Upgrade to OpenSSL 1.1.1 or newer, or use the 0.8 release branch of the VPA repository. For environments requiring high availability, you can deploy multiple instances of the Admission Controller and enable leader election for the Recommender and Updater by using the --leader-elect=true parameter.
Once VPA is up and running, you can move on to configuring resource limits.
Setting Resource Limits
To configure VPA for your workloads, define a VerticalPodAutoscaler resource with a targetRef pointing to the relevant workload. The critical part of the configuration lies in the resourcePolicy section, where you set the resource boundaries using minAllowed and maxAllowed. These boundaries ensure the VPA doesn't recommend resources that are too low during idle times or excessively high during sudden spikes.
You also need to choose the correct controlledValues mode. The default mode, RequestsAndLimits, adjusts both resource requests and limits while maintaining their ratio. This mode is typically effective for stateless applications. For stateful workloads, the RequestsOnly mode might be better, as it allows manual control over burst capacity. When deploying VPA for the first time, it’s a good idea to set the updateMode to Off.
This lets you review the recommendations in the VPA object's status field without causing any pod restarts during the initial setup.
Kubernetes Vertical Pod Autoscaler (VPA) Tutorial | Full Setup, Demo & VPA vs HPA Explained
Using VPA Update Modes Effectively
::: @figure 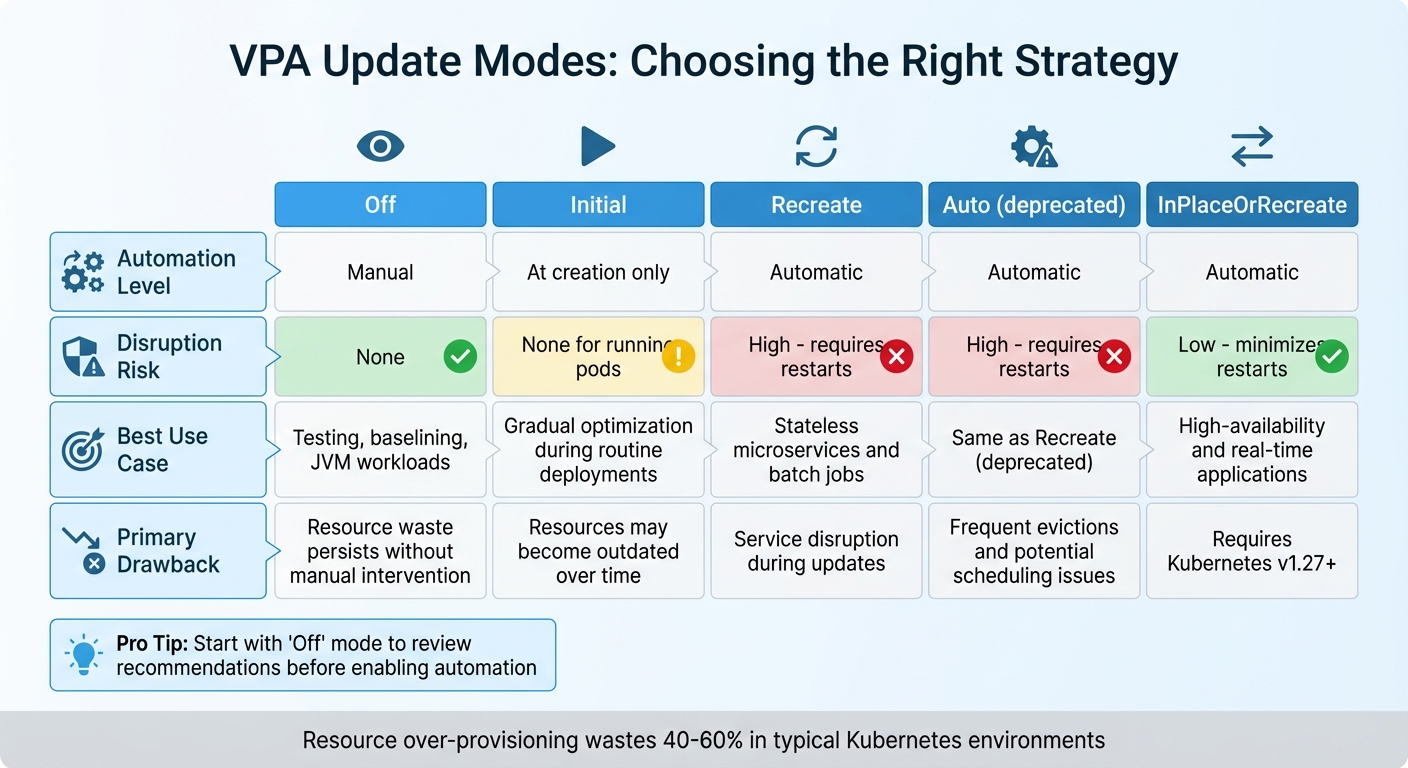 {VPA Update Modes Comparison: Features, Risks, and Use Cases}
:::
{VPA Update Modes Comparison: Features, Risks, and Use Cases}
:::
Building on the previously discussed modes, this section delves into how to apply each Vertical Pod Autoscaler (VPA) update mode in real-world scenarios.
Choosing the Right VPA Mode
VPA provides four update modes, each tailored to different operational needs.
Off mode is perfect for observation before enabling full automation. By reviewing VPA's recommendations over a week or more, you can gain confidence in its adjustments. This mode is particularly useful in production testing, especially for JVM-based workloads where VPA may struggle to accurately assess memory usage patterns.
Initial mode only applies resource requests when new pods are created, leaving existing pods untouched. This makes it ideal for gradual optimisation during routine deployment cycles, such as CI/CD updates, where new pods naturally replace older ones. However, this approach can lead to resource misalignment for long-running pods if their usage patterns change over time without a restart.
Recreate mode takes a more aggressive approach by evicting running pods when resource usage diverges significantly from recommendations. The workload controller then recreates the pods with updated configurations. It's essential to configure Pod Disruption Budgets (PDBs) when using this mode to maintain availability during restarts. For high-availability applications, InPlaceOrRecreate mode (introduced in Kubernetes v1.27+ with the InPlacePodVerticalScaling feature) offers a less disruptive alternative. This mode attempts to resize containers without restarting them, resorting to eviction only when necessary.
The following table summarises the key differences between these modes and their ideal use cases:
VPA Mode Comparison
| VPA Mode | Automation Level | Disruption Risk | Best Use Case | Primary Drawback |
|---|---|---|---|---|
| Off | Manual | None | Testing, baselining, and JVM-based workloads | Resource waste persists without manual intervention |
| Initial | At creation only | None for running pods | Gradual optimisation during routine deployments | Resources may become outdated over time |
| Recreate | Automatic | High (requires restarts) | Stateless microservices and batch jobs | Service disruption during updates |
| Auto | Automatic | High (requires restarts) | Same as Recreate (deprecated) | Frequent evictions and potential scheduling issues |
| InPlaceOrRecreate | Automatic | Low (minimises restarts) | High-availability and real-time applications | Requires Kubernetes v1.27+ |
In typical Kubernetes environments, resource over-provisioning results in 40% to 60% waste. For enterprise-scale cloud deployments, this can translate to an estimated £10,000–£50,000 in unnecessary monthly costs [8].
Louise Champ from Livewyer highlights the value of VPA in addressing this issue:
VPA replaces guesswork with statistical analysis of actual consumption patterns.[8]
To avoid VPA recommending resource allocations that exceed your cluster's capacity, always define the minAllowed and maxAllowed parameters in your resource policies. Additionally, if you're using both VPA and the Horizontal Pod Autoscaler (HPA), ensure they complement each other: let HPA handle custom or external metrics (like network traffic) while VPA focuses on CPU and memory. This approach helps prevent conflicts between the two scaling tools.
Combining VPA with Other Scaling Tools
Integrating Vertical Pod Autoscaler (VPA) with other scaling tools is crucial for efficient resource management in Kubernetes. Each tool plays a distinct role: VPA adjusts vertical resources like CPU and memory, Horizontal Pod Autoscaler (HPA) manages replica counts, and Cluster Autoscaler (CA) adjusts cluster capacity. However, using these tools together requires careful planning to prevent conflicts that could destabilise the cluster.
Using VPA and HPA Together
Running VPA and HPA on the same workload can lead to a race condition. Since both tools can modify CPU and memory settings, their simultaneous actions might create a feedback loop, causing instability in scaling.
Oracle Cloud Infrastructure cautions against this, stating: We recommend that you do not use the Horizontal Pod Autoscaler and Vertical Pod Autoscaler together
[4]. Similarly, Densify explains, VPA won't work with HPA using the same CPU and memory metrics because it would cause a race condition
[2].
To avoid these issues, the key is to separate metrics. Configure HPA to scale based on custom or external metrics - like requests per second, queue depth, or network traffic - while letting VPA handle CPU and memory adjustments [10][2]. Another option is to set VPA's updateMode to Off
, allowing it to provide recommendations that can be applied manually during maintenance, leaving HPA's logic for horizontal scaling unaffected.
Now, let's look at how VPA interacts with node scaling through the Cluster Autoscaler.
Using VPA with Cluster Autoscaler
VPA and Cluster Autoscaler work well together. VPA ensures that pod resource requests match actual usage, while CA uses these requests to make informed decisions about scaling the cluster. For instance, if VPA increases a pod's resource requirements beyond the current cluster capacity, the pod enters a pending state, prompting CA to add more nodes [11].
As Kubecost points out, using HPA without VPA could accumulate wasted resources by replicating under-utilised pods to meet an increasing workload
[10]. VPA's accurate resource sizing helps CA avoid overprovisioning or under-scaling nodes.
To optimise this setup, consider running low-priority pause
pods as a buffer. These pods ensure there’s warm capacity available, which can be preempted when real workloads need to scale up. Additionally, organise node groups by workload types - such as CPU-optimised or memory-optimised instances - and use labels or taints to ensure VPA-managed pods are placed on the most suitable nodes [11].
Need help optimizing your cloud costs?
Get expert advice on how to reduce your cloud expenses without sacrificing performance.
Monitoring and Troubleshooting VPA
Keeping an eye on how Vertical Pod Autoscaler (VPA) is functioning is critical to ensure it runs smoothly and delivers the expected improvements in resource allocation. Without proper monitoring, important issues might slip through unnoticed.
Tracking VPA Metrics
The best way to monitor VPA is by checking the Status field of the VerticalPodAutoscaler custom resource. This field provides four key recommendation values for each container:
- Target: The suggested resource request.
- Lower Bound: The minimum level before scaling up.
- Upper Bound: The maximum level before scaling down.
- Uncapped Target: The recommendation based solely on usage, ignoring any constraints you’ve set [1][13].
You can use kubectl describe vpa <vpa-name> to quickly review current recommendations and status conditions, such as RecommendationProvided or LowConfidence [13]. To cross-check, run kubectl top pods to see if actual resource usage aligns with VPA recommendations. Keep in mind, the VPA Recommender uses up to eight days of historical data for its calculations.
Scaling events, such as pod evictions and recreations, can be tracked with kubectl get events. In Recreate mode, VPA applies new resource requests by evicting and restarting pods, so these events signal active adjustments. Together, these metrics help identify and resolve potential scaling challenges.
Preventing Common VPA Problems
Once you’ve got reliable metrics, it’s easier to tackle common problems and avoid disruptions. For example, to prevent resource conflicts, assign memory optimisation tasks to VPA while leaving traffic or custom metrics to Horizontal Pod Autoscaler (HPA). This separation avoids issues like thrashing [3][5].
Another frequent issue is unschedulable pods. VPA might recommend resource levels that exceed the capacity of any single node in the cluster, causing pods to be evicted but unable to restart [10][12]. To avoid this, enforce node limits to ensure recommendations stay within your cluster’s capacity.
For deployments with only one replica, be aware that the VPA Updater’s default --min-replicas setting is 2, meaning it won’t update single-pod deployments unless you manually adjust this setting [5]. Additionally, always define PodDisruptionBudgets (PDBs) to maintain a minimum number of pods during evictions and restarts [4][12]. This prevents aggressive updates from causing unnecessary downtime for your applications.
Advanced VPA Techniques
Once you’ve got the basics of Vertical Pod Autoscaler (VPA) down, it’s time to explore more advanced methods. These strategies can help you fine-tune your Kubernetes clusters for even greater efficiency and stability.
VPA with Spot Instances
Spot instances are a fantastic way to cut costs - sometimes by as much as 90% compared to on-demand pricing. However, they come with the trade-off of being susceptible to sudden preemptions. VPA can help you maximise the value of spot instances by optimising pod sizes based on actual usage rather than conservative estimates. This approach avoids over-provisioning and allows you to fit more pods onto each spot instance, significantly reducing your overall workload costs [3][15].
For workloads running on spot instances, it’s best to use VPA in Initial mode. This ensures that resource requests are optimised when pods are first created - such as when a spot instance is reclaimed and the workload controller spins up new pods. This way, you avoid unnecessary pod evictions while ensuring replacement pods are efficiently configured [1][12]. To maintain stability during spot reclamation events, make sure to define PodDisruptionBudgets. These budgets help ensure a minimum number of replicas remain available [1][4][12].
Pairing VPA with Cluster Autoscaler can amplify your savings. As VPA reduces pod resource demands, Cluster Autoscaler identifies underutilised nodes and shuts them down, further lowering costs. To keep things running smoothly, set minAllowed and maxAllowed values in your VPA resourcePolicy to ensure resource recommendations fit within the capacity of your spot instance types [3][14][1][15].
This approach is a solid foundation for integrating VPA into automated deployment workflows.
VPA in CI/CD Pipelines
Integrating VPA into your CI/CD pipeline removes the need for manual resource benchmarking, ensuring accurate allocations right from the start [17]. A good starting point is to use VPA in Off mode during testing. This lets you gather telemetry data without triggering pod restarts. Use the status.recommendation.containerRecommendations[].target values from VPA to guide resource requests in your deployment manifests [16].
We recommend that you consider using the Vertical Pod Autoscaler when you are in the early stages of writing an application, simply to create recommendations (without updating pods).
- Oracle [4]
When it’s time for production, switch to Initial mode. This ensures that new pods are correctly sized based on historical data without causing disruptive restarts during critical operations [1][9]. It’s wise to run multiple CI/CD cycles before locking in resource changes [16]. Additionally, deploying Kubernetes LimitRange resources alongside VPA can help enforce namespace-level constraints, even if VPA suggests higher values [1][12].
Combining Multiple Scaling Approaches
Achieving optimal Kubernetes scalability often involves using VPA, Horizontal Pod Autoscaler (HPA), and Cluster Autoscaler together. Each tool serves a unique purpose: VPA adjusts individual pod resources based on historical data, HPA manages replica counts to handle traffic spikes, and Cluster Autoscaler scales the number of nodes to meet demand [3][10][14].
A key best practice is to keep metrics separate - don’t let VPA and HPA scale the same metrics (like CPU or memory), as this can lead to conflicting adjustments or “flapping” [3][4]. Instead, assign CPU and memory scaling to VPA, while letting HPA handle traffic or custom metrics [3][7]. VPA is particularly effective for stateful workloads that are harder to scale horizontally, whereas HPA excels with stateless applications that can quickly scale replicas up or down [3][10].
If you’re using VPA in production, start with updateMode: "Off". This allows you to review VPA’s recommendations without triggering immediate pod restarts, giving you time to manually verify settings before enabling automatic updates [4][12].
Conclusion
Summary
The Vertical Pod Autoscaler (VPA) simplifies the process of optimising Kubernetes workloads by automatically adjusting CPU and memory requests based on actual usage. By analysing up to eight days of historical data, VPA ensures resources are allocated efficiently, helping to minimise waste and avoid problems like CPU throttling or out-of-memory crashes [12][1][3].
Getting the best results from VPA requires selecting the right update mode for your needs. For instance, Off mode allows you to review recommendations without affecting production environments. Initial mode is ideal for setting up new deployments, while Recreate mode should only be used once you've implemented Pod Disruption Budgets to maintain availability [4].
When integrated with other scaling tools, VPA's impact becomes even greater. Pairing it with the Horizontal Pod Autoscaler (HPA) creates a dynamic scaling system: VPA handles resource adjustments for CPU and memory, while HPA focuses on scaling pod replicas based on traffic or other metrics. Keeping their metrics separate ensures smooth operation [3][10]. Additionally, combining VPA with the Cluster Autoscaler can significantly lower infrastructure costs by improving resource utilisation.
For businesses aiming to fully leverage these benefits, expert guidance can make all the difference.
How Hokstad Consulting Can Help
Implementing VPA effectively requires a strategic approach to balance performance, cost, and stability. Hokstad Consulting specialises in optimising DevOps and cloud infrastructure, helping organisations cut cloud costs by 30–50% through smarter resource management and automation. Learn more at hokstadconsulting.com.
Whether it's configuring VPA, integrating autoscaling into CI/CD pipelines, or conducting a detailed cloud cost audit, Hokstad Consulting offers tailored solutions for Kubernetes optimisation across public, private, and hybrid cloud environments. With flexible engagement options - including retainer-based support and a no savings, no fee
model - you can be confident you're paying only for measurable results.
FAQs
How can I prevent conflicts between Vertical Pod Autoscaler (VPA) and Horizontal Pod Autoscaler (HPA)?
To prevent conflicts when using the Vertical Pod Autoscaler (VPA) and Horizontal Pod Autoscaler (HPA) together, it's important to set up their scopes and behaviours thoughtfully. VPA focuses on adjusting resource requests and limits, while HPA handles scaling the number of pods based on metrics like CPU or memory usage. If both are active simultaneously, their actions might clash.
One effective approach is to disable VPA's resource recommendations for pods that are managed by HPA. This way, HPA can function without unexpected changes to resource requests disrupting its scaling decisions. Another option is to use HPA for horizontal scaling and reserve VPA for workloads where horizontal scaling isn't needed. By assigning distinct roles to each, you can manage resources efficiently while avoiding conflicts.
What should I consider when configuring the update mode for a Vertical Pod Autoscaler (VPA)?
When configuring the update mode for a Vertical Pod Autoscaler (VPA), it's crucial to think about how resource adjustments might affect your workloads. The VPA offers three modes - Off, Auto, and Initial - each designed for specific scenarios. Choosing the right one depends on the needs of your cluster and the nature of your applications.
Off: This mode is perfect if you want the VPA to provide recommendations without making any automatic changes. It's a great option for monitoring resource usage while keeping your workloads stable and uninterrupted.
Auto: With this mode, the VPA actively adjusts resource requests and limits for running pods. However, keep in mind that these updates may cause pods to restart. This mode works well for workloads that can handle occasional restarts as part of resource optimisation.
Initial: This mode applies recommendations only when a pod is created, leaving existing pods untouched. It's ideal for applications that require high availability or cannot afford disruptions during operation.
The mode you choose should reflect your application's ability to handle changes and the level of control you want over resource management. Carefully assess your workloads to ensure the update mode supports your operational priorities.
How does integrating VPA into CI/CD pipelines improve resource management?
By incorporating Vertical Pod Autoscaler (VPA) into your CI/CD pipelines, you can automate the process of adjusting CPU and memory requests during builds and deployments. This ensures pods are properly sized before they go live, cutting down on the chances of over-provisioning and helping to make better use of resources.
This method not only improves the performance of your Kubernetes clusters but also helps lower costs by avoiding excessive resource allocation. It’s an effective way to strike the right balance between performance and budget efficiency in your deployments.