
Managing costs in multi-tenant Kubernetes clusters is crucial for controlling expenses and ensuring fair resource allocation. Here's what you need to know:
- Multi-Tenant Clusters: Shared infrastructure for multiple teams or projects, balancing simplicity and control.
- Why Cost Tracking Matters: Helps identify wasted resources, improve budget forecasting, and allocate costs accurately.
- Key Steps:
Best Practices:
- Set resource quotas to prevent overuse by any tenant.
- Allocate costs based on actual usage, including shared infrastructure and idle resources.
- Regularly review for idle or underutilised resources to optimise spending.
For organisations looking to reduce cloud costs, tools and strategies like these can make a significant impact. Start by standardising labels, integrating monitoring tools, and setting clear usage limits.
How we Attributed Cost Per Tenant in a Kubernetes Environment Yizhar Gilboa, Finout

Setting Up Cost Tracking in Kubernetes
::: @figure 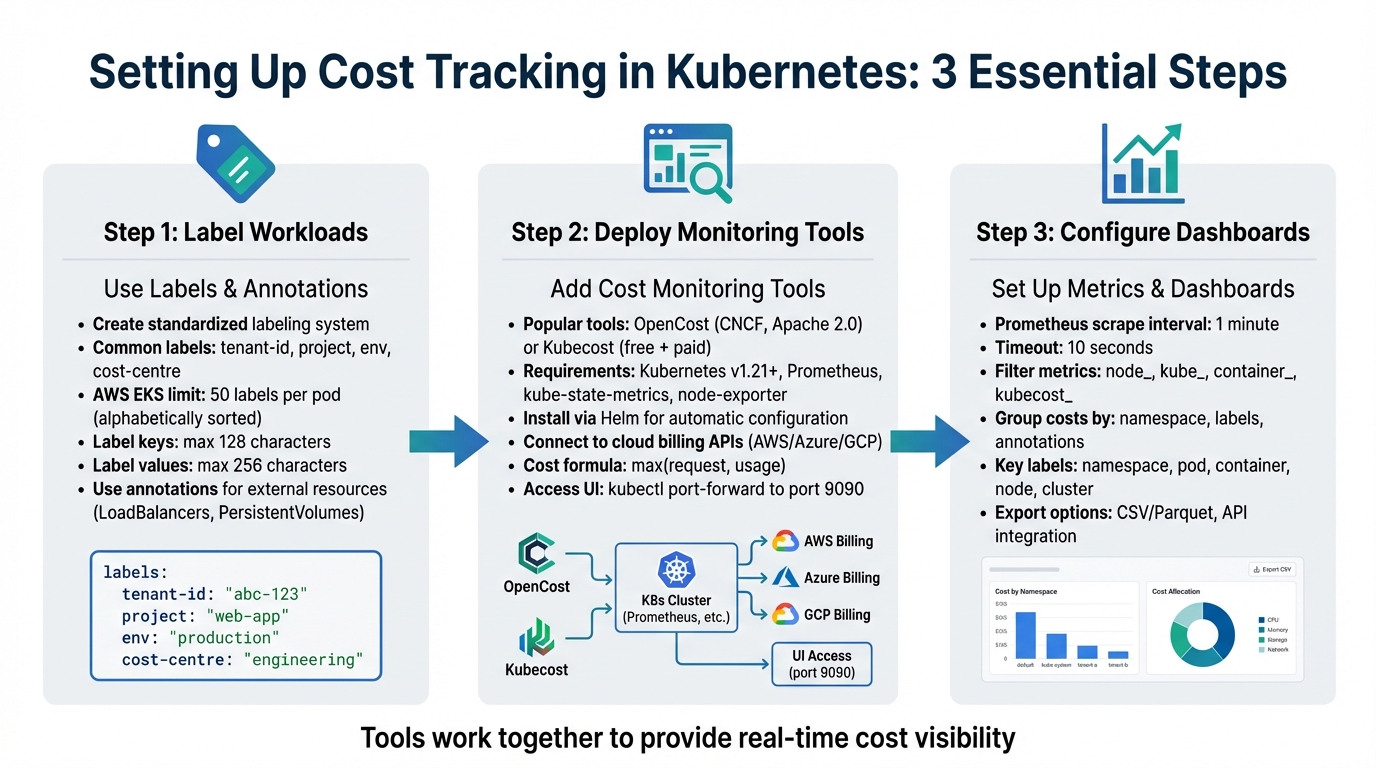 {3-Step Process for Setting Up Kubernetes Cost Tracking in Multi-Tenant Clusters}
:::
{3-Step Process for Setting Up Kubernetes Cost Tracking in Multi-Tenant Clusters}
:::
To track costs effectively in Kubernetes, you'll need to label workloads, deploy monitoring tools, and configure real-time dashboards. Each step works together to help you understand where your resources are being used.
Using Labels and Annotations for Cost Allocation
Labels in Kubernetes play a critical role in tracking costs, especially in environments with multiple tenants. They allow you to link pod-level costs to specific cost centres, applications, business units, or environments [4]. Without a consistent labelling approach, separating costs between tenants becomes a challenge.
Start by creating a standardised labelling system for all tenants. Common label keys include tenant-id, project, env, and cost-centre. Tools like OpenCost and Kubecost utilise these labels to break down expenses across dimensions like CPU, GPU, memory, and storage [5][7]. If your setup is simpler, assigning each tenant their own namespace can make cost tracking straightforward [1].
Keep in mind that Kubernetes enforces limits on labels. For example, AWS EKS allows only 50 labels per pod, sorted alphabetically. To ensure essential labels like aaa-cost-centre aren't excluded, prioritise them by using a prefix [4]. Additionally, label keys must not exceed 128 characters, and values are capped at 256 characters [4].
While labels are great for Kubernetes objects, annotations are equally important for external resources. Use annotations to tag resources like LoadBalancers or PersistentVolumes, ensuring they are correctly attributed in your cloud provider's billing system [6]. Note that AWS cost allocation tags can take up to 24 hours to appear and another 24 hours to activate after being enabled [4].
| Resource Type | Cost Allocation Basis |
|---|---|
| CPU | Higher of requested or used CPU (cores/millicores) [7] |
| Memory | Higher of requested or used memory (bytes/GB) [7] |
| GPU | Higher of requested or used GPU (cores) [7] |
| Storage | Persistent Volume Claim (PVC) requests [7] |
| Network | Ingress/egress volume across zones, regions, or the internet [7] |
Once your labelling strategy is in place, you're ready to integrate monitoring tools for deeper insights.
Adding Cost Monitoring Tools
For real-time cost tracking in Kubernetes, OpenCost and Kubecost are two popular open-source options [12][11]. OpenCost is supported by the Cloud Native Computing Foundation (CNCF) and is free under the Apache 2.0 licence [10]. Kubecost, on the other hand, offers both a free version and paid options with advanced features like multi-cluster support [5][11].
To get started, you'll need a Kubernetes cluster (v1.21 or later), Prometheus for metrics storage, and tools like kube-state-metrics and node-exporter for collecting resource data [9][11]. Installing these tools using Helm simplifies the process by automatically configuring dependencies [9][5].
Accurate cost tracking also requires connecting the tool to your cloud provider's billing APIs (e.g., AWS, Azure, or GCP). If you're using on-premises or hybrid environments, you can upload custom pricing sheets [10][11]. By default, costs are shown in USD, but you can adjust inputs to GBP (£) for UK-based reporting [5][11]. Keep in mind that while the tools themselves are free, cloud providers may charge for metrics storage (e.g., Amazon Managed Service for Prometheus) and API usage [4].
To access the OpenCost UI, run the command kubectl port-forward --namespace opencost service/opencost 9003 9090 [9]. Costs are calculated using the formula max(request, usage) to ensure even idle but reserved resources are accounted for [7]. Once installed, you can set up Prometheus metrics and dashboards for continuous monitoring.
Setting Up Metrics and Dashboards
Once your monitoring tool is in place, OpenCost generates cost metrics by combining usage data from cAdvisor with pricing information from your cloud provider or custom pricing sheets [10][11]. These metrics are stored in Prometheus and can be queried using PromQL.
For reliable, real-time data, configure Prometheus with a 1-minute scrape interval and a 10-second timeout [8]. To improve performance, use metricRelabelConfigs to filter out unnecessary metrics, keeping only essential ones like node_, kube_, container_, or kubecost_ [8].
Costs can be grouped by Kubernetes elements such as namespaces, labels, or annotations, which often correspond to tenants or departments [7]. You can view expenses via the built-in UI (accessible through port-forwarding to port 9090), the kubectl cost CLI plugin, or external tools like Grafana [9][11]. Custom dashboards can be created using PromQL to focus on tenant-specific data. For instance, sum by (namespace) aggregates CPU and memory costs by tenant namespace [8].
Key labels for filtering dashboards include namespace, pod, container, node, and cluster [8]. For more advanced use cases, cost data can be exported in CSV/Parquet formats or accessed via APIs for integration with business intelligence platforms [9][11].
Best Practices for Managing Costs in Multi-Tenant Clusters
Setting Resource Quotas and Limits
Resource quotas are essential for ensuring that no single tenant monopolises cluster resources. Without them, one team could consume excessive CPU, memory, or storage, leaving other teams short and driving up costs unnecessarily [13].
In multi-tenant setups, applying quotas at the Project level works particularly well. A project, which groups namespaces for a team or business unit, can have an overall resource cap while allowing flexibility across its namespaces [13]. For instance, you could assign 100 CPU cores to a project, with a default limit of 20 cores per namespace, which automatically applies to all namespaces within that project [13].
It’s also important to track reserved system resources (kube:system-overhead) and unused capacity (kube:unallocated) to get a clear picture of total spending [3]. Since Google Kubernetes Engine calculates costs based on resource requests rather than actual usage, setting accurate requests is critical for staying on budget [3].
Regularly review the gap between requested resources and actual usage to spot over-provisioning [14][6]. Efficiency alerts can help flag when resources are either under-provisioned (potentially harming performance) or over-provisioned (wasting money) [14].
Once quotas are in place, the next step is to allocate costs fairly among tenants.
Allocating Costs Fairly Across Tenants
To ensure fairness in shared clusters, costs should be distributed based on actual resource usage per workload or namespace [1]. This approach promotes both accountability and transparency, as tenants are charged for what they genuinely consume.
Shared infrastructure costs, like NAT gateways, load balancers, and control planes, should also be apportioned proportionally based on actual usage [2].
Idle costs - expenses from resources that remain unused - shouldn’t be ignored. These costs can be redistributed among tenants according to their usage, encouraging them to optimise their workloads [2][15].
Cloud providers impose limits on cost allocation labels, with AWS and Google Cloud capping imports at 50 labels per pod [4][3]. This makes it crucial to prioritise the most important labels in your tagging strategy.
Once costs are fairly allocated, the focus can shift to eliminating resource waste.
Finding Idle and Underutilised Resources
Identifying idle resources is a crucial step in reducing cluster costs. With nearly 49% of organisations reporting increased cloud expenses due to Kubernetes usage, the stakes are high [15]. Alarmingly, 38% of organisations lack proper Kubernetes cost monitoring, and 40% rely on estimates rather than precise data [15].
Unused pods can be identified by monitoring traffic thresholds - pods with no meaningful traffic over a set period are likely inactive but still consuming resources [1]. Historical usage data can also help right-size containers to better match their actual needs [1][14]. For optimising clusters as a whole, bin-packing strategies ensure that node infrastructure aligns with the combined requirements of all workloads [1].
The table below summarises key resource categories, detection methods, and recommended actions:
| Resource Category | Detection Method | Recommended Action |
|---|---|---|
| Unused Pods | Traffic threshold monitoring [1] | Decommission or scale to zero |
| Over-provisioned Pods | Request vs. actual usage gap [15] | Adjust requests and limits [1]
|
| Idle Node Capacity | Bin-packing analysis [1] | Use cluster autoscaling or consolidate nodes |
| Unallocated Storage | Unclaimed persistent volumes [14] | Delete orphaned volumes or adjust reclaim policies |
To identify excess capacity, compare CPU and memory usage against provisioned resources over a 24-hour rolling window [14]. Network egress costs, often overlooked, can be tracked using lightweight agents that collect data from the Linux kernel’s nf_conntrack module [14]. Automated efficiency alerts can then notify you when resource consumption drops below a certain threshold relative to provisioned capacity [14].
Need help optimizing your cloud costs?
Get expert advice on how to reduce your cloud expenses without sacrificing performance.
How Hokstad Consulting Can Help
Cloud Cost Reduction Services
Hokstad Consulting takes cloud cost management to the next level, helping businesses cut infrastructure expenses by 30–50% without compromising performance. They achieve this by integrating financial accountability directly into your infrastructure, starting with Infrastructure as Code (IaC). This ensures that key tagging structures like tenant_id and environment are embedded in your deployments from the outset, rather than being added later. Automated validation processes make sure these structures are consistently applied.
To maintain compliance, Hokstad Consulting leverages Policy as Code enforcement with tools like Open Policy Agent (OPA). This approach automatically blocks any non-compliant or untagged deployments before they can start consuming resources. Their pricing model is straightforward and risk-free: you only pay based on actual cost savings achieved, with fees capped as a percentage of those savings. For UK businesses managing multi-tenant Kubernetes clusters, this means expert guidance on cost optimisation without financial uncertainty.
Their support doesn’t end with initial implementation. Hokstad also offers one-time audits and ongoing monitoring to identify and address idle assets that may be driving up costs. Additionally, they create real-time dashboards to allocate expenses accurately to individual teams, fostering transparency and accountability across your organisation. This comprehensive approach ensures that cost tracking practices remain consistent and effective across all deployments.
Custom Solutions for Multi-Tenant Environments
Multi-tenant environments often come with unique challenges, and Hokstad Consulting provides tailored solutions to meet these needs. Whether your architecture uses namespace-based isolation, virtual clusters, or a cluster-per-tenant model, they design cost tracking systems that align perfectly with your setup. By offering granular cost attribution for containerised workloads - especially for Amazon ECS and EKS clusters - they make it easy to trace every pound spent back to the specific tenant or workload responsible.
Their services go beyond cost tracking. Hokstad develops custom tools like efficiency alerts, right-sizing recommendations, and bin-packing optimisations tailored to your cluster configuration. For businesses operating hybrid or private cloud setups, they also provide managed hosting solutions and seamless migration services. With zero downtime, they ensure that your cost tracking remains accurate and consistent, regardless of the environment.
Conclusion
The Benefits of Cost Tracking in Multi-Tenant Clusters
Tracking costs in multi-tenant Kubernetes clusters is a game-changer for managing cloud expenses. By accurately allocating costs, you gain better control over budgets and can address spending issues before they escalate [5][16][14]. But it’s not just about keeping an eye on expenses - effective cost tracking helps uncover waste and inefficiencies. It allows you to identify underutilised nodes, idle pods, over-provisioned resources, and abandoned workloads that quietly drain funds without adding value [1][6]. Introducing financial accountability through showback and chargeback models ensures teams are responsible for their own resource usage [12][1]. These practices pave the way for more informed and immediate cost-saving actions.
Next Steps for Cost Management
Start by leveraging tools like Kubecost or OpenCost to gain real-time insights into your cluster spending, broken down by namespace and label [17][5][19]. Implement resource quotas and limit ranges at the namespace level to prevent noisy neighbour problems and establish a clear cost baseline [17][20]. Standardising your labelling strategy is equally important - use consistent tags such as environment, team, or product to ensure costs are allocated accurately across workloads [14][4].
It’s worth noting that 79% of organisations either don’t monitor Kubernetes costs or rely on outdated monthly estimates, while nearly 49% report higher expenses tied to Kubernetes usage [18]. Avoid falling into these traps by automating financial reports and fostering a FinOps culture. This approach brings engineering, finance, and leadership together to align Kubernetes usage with budget goals [18][19]. Set up weekly or monthly automated reports to maintain financial transparency and keep everyone informed [17][19].
For those ready to take the plunge, Hokstad Consulting offers tailored solutions to optimise your cost management strategy. Their expertise spans Infrastructure as Code, real-time dashboards, and continuous monitoring, helping organisations cut cloud costs by 30–50% while ensuring cost tracking remains effective across all deployments.
FAQs
How can I fairly allocate costs in a multi-tenant Kubernetes cluster?
To manage costs effectively in a multi-tenant Kubernetes cluster, tools like Kubecost or OpenCost can be invaluable. These Kubernetes-native solutions allow you to monitor spending by namespace or through custom labels, making it easier to allocate costs accurately. However, for these tools to work effectively, it's crucial to establish consistent labelling and tagging practices across your organisation. This ensures data accuracy and keeps all teams accountable.
You might also want to consider implementing charge-back or show-back dashboards. These dashboards give teams clear visibility into their resource usage and associated costs, linking consumption directly to cost centres. This kind of transparency not only promotes fairness but also helps teams understand and manage their expenses better.
If you're looking for expert advice on cutting cloud costs or optimising your infrastructure, Hokstad Consulting provides tailored solutions designed to simplify operations and reduce expenses.
What are the best tools for monitoring Kubernetes costs in real time?
For monitoring costs in real-time within Kubernetes, a few tools consistently prove useful. Kubecost and the open-source OpenCost project are well-regarded for providing detailed insights into both resource usage and related costs. Alternatively, pairing Prometheus with Grafana offers a highly customisable and flexible way to track expenses. Additionally, many cloud providers include built-in cost monitoring tools, which can be an effective option depending on your specific setup.
When deciding on the right tool, think about what fits your organisation best - factors like ease of integration, scalability, and the level of detail you need are key considerations. Using these tools effectively can help you fine-tune resource allocation and cut down on unnecessary spending in your multi-tenant clusters.
How can labels and annotations help with cost tracking in Kubernetes?
Labels and annotations in Kubernetes are simple yet powerful key-value pairs that you can attach to objects like pods, namespaces, or services. Labels are particularly useful for encoding metadata that reflects your business needs - think cost-centre=marketing, team=frontend, or environment=prod. By tagging workloads this way, you can link them to specific financial units. This makes it easier to allocate costs accurately, breaking down expenses by team, project, or environment. When paired with cost-management tools, labels can generate detailed charge-back or show-back reports tailored to your organisation's structure.
Annotations, on the other hand, are designed to store additional information, such as billing policies or pricing model versions. Unlike labels, annotations aren't used for querying but can still be read by cost-management tools to provide deeper insights or support optimisation efforts. Together, a well-thought-out approach to labelling and annotations can offer detailed visibility into multi-tenant cluster costs, simplify reporting in pounds (£), and even enable automated workflows for cost-saving. Hokstad Consulting can assist in designing and implementing such a system, ensuring precise tracking and billing practices aligned with UK financial standards.