
Container image scanning is a critical part of securing your CI/CD pipelines. It identifies vulnerabilities, misconfigurations, and risks in container images before they reach production. By integrating scanning into your pipeline, you can automatically prevent flawed images from being deployed, ensuring a safer and more secure application environment.
Here’s a quick breakdown of the process:
- Choose a Scanning Tool: Select a tool compatible with your infrastructure (e.g., Trivy, Grype, Anchore Engine) that supports custom policies, vulnerability feeds, and SBOM generation.
- Prepare Your Pipeline: Configure your CI/CD environment, set up secure authentication, and define vulnerability thresholds.
- Add a Scanning Stage: Integrate scanning into your pipeline immediately after building the image, using tools like GitHub Actions, GitLab CI templates, or Google Cloud Build.
- Define Security Policies: Create automated rules to enforce consistent standards, focusing on critical vulnerabilities, available fixes, and compliance requirements.
- Test and Monitor: Validate your setup with sample images, enable alerts for new vulnerabilities, and extend scanning to runtime environments.
::: @figure 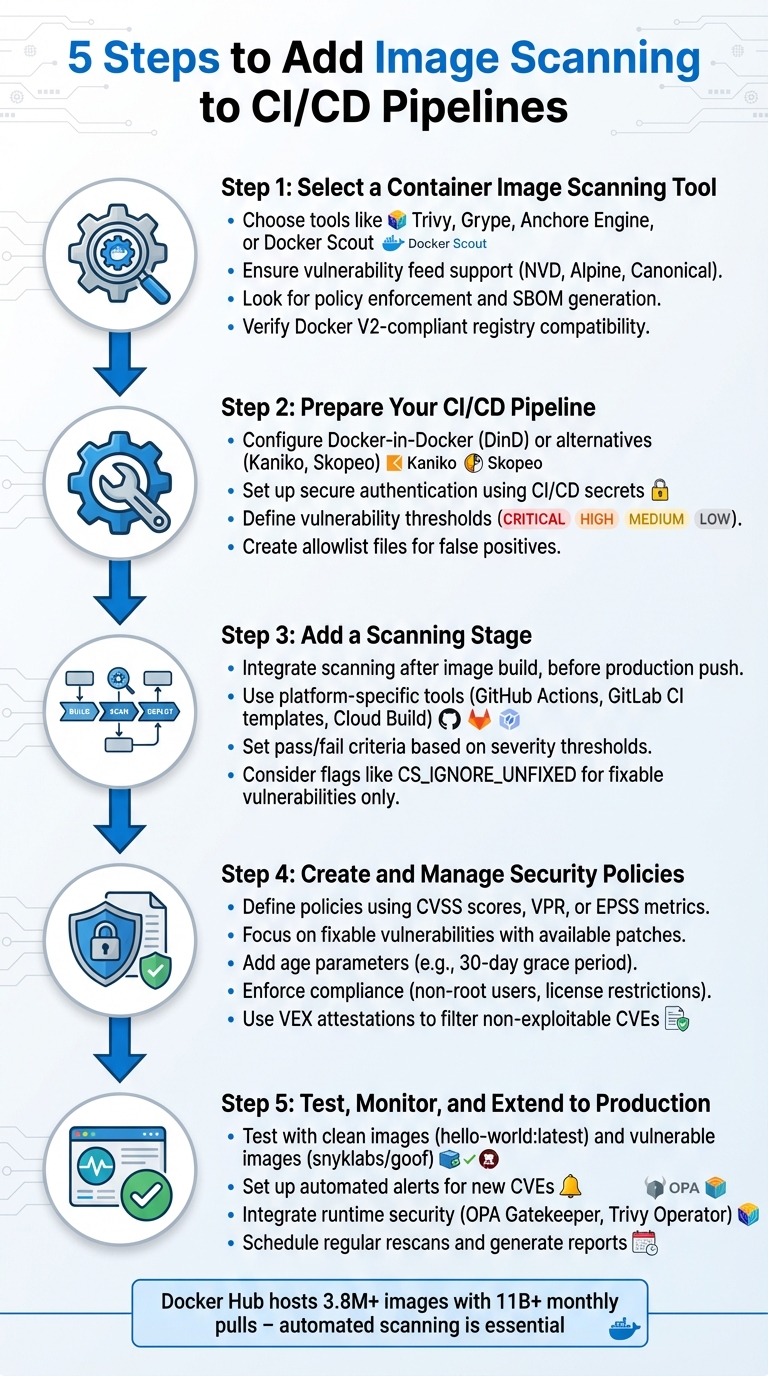 {5 Steps to Add Container Image Scanning to CI/CD Pipelines}
:::
{5 Steps to Add Container Image Scanning to CI/CD Pipelines}
:::
Secure Your CI/CD: Trivy Image & Filesystem Scans in GitLab Pipelines
Step 1: Select a Container Image Scanning Tool
Picking the right container image scanning tool is crucial for maintaining security and ensuring compatibility with your infrastructure. Start by examining how the tool identifies vulnerabilities. It should be capable of scanning both operating system packages and third-party application libraries (like those in Python, Go, or Node.js). Additionally, it should pull data from multiple vulnerability feeds, such as NVD, Alpine, and Canonical.
A key feature to look for is policy enforcement. This differentiates a basic scanner from a production-grade solution. The tool should allow you to create custom rules, such as blocking builds based on vulnerability severity, licence types (e.g. AGPL v3), or enforcing security practices like using non-root users. Advanced tools also support VEX attestations, which help filter out known non-exploitable CVEs.
Decide if you need inline scanning. This method analyses images directly within your CI/CD pipeline, eliminating the need to push them to a staging registry. It keeps scan metadata private and reduces the risk of credential leaks. For comprehensive supply chain security, ensure the tool supports generating and validating Software Bill of Materials (SBOM) and provenance attestations, helping you track image composition and build history.
Here are a few examples of tools to consider:
- Trivy: Offers extensive scanning for vulnerabilities, misconfigurations, and secrets, with support for VEX attestations.
- Grype: Focuses on fast vulnerability detection using standard advisories.
- Anchore Engine: Ideal for organisations needing centralised analysis, offering a RESTful API and flexible user-defined policies for automated validation.
- Docker Scout: Integrates directly into Docker workflows, providing policy checks and remediation advice within Docker Desktop and the CLI.
Make sure the tool is compatible with Docker V2-compliant registries like Amazon ECR, Google GCR, Azure ACR, or Red Hat Quay. It should also integrate smoothly with your CI/CD platform through native plugins, GitHub Actions, GitLab CI templates, or CLI commands. Once you've selected your scanning tool, the next step is configuring your CI/CD pipeline for seamless integration.
Step 2: Prepare Your CI/CD Pipeline for Scanning
Before running any scans, it's essential to set up your CI/CD pipeline to work seamlessly with your chosen scanning tool. This includes configuring the environment, setting up secure authentication, and defining security policies.
Environment Configuration
Most CI/CD platforms rely on Docker-in-Docker (DinD) to build and scan container images. This setup often requires running a container in privileged mode to host the Docker daemon (dockerd). You'll also need shared volume mounts, such as /var/run (for the Docker socket) and /var/lib/docker, to allow communication between the build and scan stages [3][4].
If privileged mode isn't an option, tools like Kaniko or Skopeo provide alternatives. These tools can build or transfer images without needing a full Docker daemon. For example, Sysdig's GitLab integration uses Kaniko to create a local .tar file, which the scanner analyses using the file:// protocol [9].
You'll also need to install the scanner's CLI tool within your pipeline. This can be done by downloading the binary during runtime using tools like curl or wget. Alternatively, you can use pre-configured CI templates or actions. Make sure your pipeline runner has access to container registries - such as Docker Hub, AWS ECR, Google Container Registry, or JFrog Artifactory - to pull base images or push scanned results [12].
Once your environment is ready, you can move on to securing authentication and setting up security policies.
Authentication and Policy Setup
Avoid embedding credentials directly in your pipeline configuration files. Instead, store sensitive information like registry passwords, API keys, and personal access tokens as secure CI/CD environment variables or secrets (e.g., DOCKER_HUB_PAT or SECURE_API_TOKEN). Mark these variables as masked to prevent them from being exposed in job logs [9][13]. For AWS ECR, you'll typically need a pre-scan step to generate a temporary login token using aws ecr get-login-password [13].
It's also crucial to establish vulnerability thresholds early in the process. Many scanners allow you to define failure conditions using flags like --exit-code or configuration variables such as CS_SEVERITY_THRESHOLD. These thresholds often include levels like CRITICAL, HIGH, MEDIUM, LOW, and INFO [4][12]. To manage false positives or irrelevant findings, you can create an allowlist file (e.g., vulnerability-allowlist.yml) in your repository root to exclude specific CVEs [13]. If your environment is behind a firewall, ensure the scanner can access vulnerability databases by manually configuring HTTP_PROXY, HTTPS_PROXY, and NO_PROXY variables [12].
Step 3: Add a Scanning Stage to Your Pipeline
Once your environment is set up and authentication is sorted, it’s time to add a scanning stage to your pipeline. This step should come right after the image is built but before it’s pushed to a production registry. Scanning locally ensures the image remains secure until it’s verified.
Pipeline Configuration Examples
While the setup details depend on your platform, the overall approach stays the same: build the image, scan it locally, and proceed only if it meets your security standards.
GitHub Actions
For GitHub Actions, you can either use marketplace actions or run scanner binaries directly. For example, if you’re working with Docker Scout, set load: true in docker/build-push-action to make the image available locally for scanning. Once that’s done, you can trigger the scanner action with arguments like --severity-threshold=high to define acceptable risk levels.
GitLab CI
GitLab CI simplifies scanning with built-in templates. By including the Jobs/Container-Scanning.gitlab-ci.yml template in your pipeline, you can quickly set up scanning jobs. For consistency, it’s a good idea to name these jobs with _container_scanning at the end. The scanner outputs results in JSON, which GitLab automatically displays on its security dashboard, making it easy to review and manage vulnerabilities.
Google Cloud Build
In Google Cloud Build, you can add the gcloud artifacts docker images scan command to your cloudbuild.yaml file. If a scan detects critical vulnerabilities, you might need to update your Dockerfile - such as switching to a leaner base image - to allow the build to pass. Once resolved, the process continues to retag and push stages.
Implementing image scanning in the CI/CD pipeline means that if vulnerabilities are found, you prevent the image from being published at all.- Eduardo Mínguez, Sysdig
After setting up the scanning stage, make sure to establish clear pass/fail rules to enforce security.
Setting Pass/Fail Criteria
Once the scanning stage is in place, it’s crucial to define specific pass/fail conditions. Automated checks can flag vulnerabilities without requiring manual oversight. Most scanning tools rely on severity thresholds to decide whether a pipeline should fail. For instance, GitLab’s default threshold is MEDIUM, meaning any vulnerability at that level or above will trigger a failure.
You can also refine these criteria further. Many teams choose to fail builds only for vulnerabilities that have available fixes, using flags like CS_IGNORE_UNFIXED. Others might fail builds if a high-severity issue remains unresolved for over 30 days.
To ease into this process, consider using flags such as DONT_BREAK_BUILD or setting allow_failure: true. These options let you gather data on vulnerabilities without disrupting development workflows. For Google Cloud Build, scan results can be piped into a command that looks for terms like CRITICAL
or HIGH
, triggering a non-zero exit status when necessary. This way, teams can assess their security posture before enforcing stricter rules.
Step 4: Create and Manage Security Policies
After setting up a dedicated scanning stage, the next step is to define security policies that enforce consistent standards across your builds. These policies act as automated checkpoints, deciding which vulnerabilities are acceptable and which should block deployment. By tailoring these policies to focus on genuine risks, you ensure that builds only fail for critical issues. This step formalises decision-making through automation, helping your environment stick to your organisation's specific security standards.
Policy Customisation
Security policies are often written as JSON files or policy sets, combining multiple criteria using logical operators like AND/OR. These allow you to set thresholds based on various metrics, such as CVSS v2/v3 scores, Vulnerability Priority Rating (VPR), or Exploit Prediction Scoring System (EPSS), aligning with your organisation’s risk tolerance [14][15]. For example, you might configure a policy to fail builds only when vulnerabilities score above 7.0 on the CVSS scale and have an available fix.
To minimise unnecessary build failures, you can focus on fixable vulnerabilities - issues with patches readily available [11]. Another useful approach is adding age parameters to your policies. By flagging only vulnerabilities older than 30 days, you create a grace period for newly discovered issues, giving developers time to address them without disrupting the pipeline [11].
Policies can also go beyond CVEs. For instance, you might require the use of non-root users to enhance runtime security or enforce licence compliance by blocking packages distributed under prohibited licences like AGPL v3 through allow-lists [11]. Additionally, integrating VEX (Vulnerability Exploitability eXchange) attestations helps filter out CVEs that aren’t exploitable, reducing false positives and keeping the pipeline focused on real threats [5].
Policy Enforcement in Pipelines
Once you’ve customised your policies, integrate them into your pipeline for automatic enforcement. Use flags like exit-code: true or exit-on: policy to stop the pipeline whenever critical issues arise, building on the pass/fail mechanisms from the scanning stage [10]. Advanced techniques, such as baseline comparisons, allow you to evaluate new builds against the current production version. This ensures the build only fails if the security posture has worsened [10].
Policies can also be tailored to different environments. For instance, development namespaces might have more lenient rules, while production environments enforce stricter controls for high-severity vulnerabilities [1]. If your team is just starting out, consider adopting a more relaxed approach initially. This lets you gather security data without disrupting workflows, tightening enforcement as your processes mature.
Step 5: Test, Monitor, and Extend to Production
With scanning and policy practices already in place, this step focuses on validating your setup and expanding security measures into production environments. Before rolling out to production, test your scanning logic thoroughly - using both clean and vulnerable images - set up automated alerts for new vulnerabilities, and ensure security checks extend beyond the CI/CD pipeline to live environments. By addressing the entire container lifecycle, from build to runtime, you maintain robust protection even after deployment.
Testing with Sample Images
Start by testing your scanner with a simple image like hello-world:latest to confirm it runs correctly without errors or false positives [8]. Follow this by scanning images known to have vulnerabilities, such as snyklabs/goof or older Debian 9 base images, to verify it flags CVEs and generates accurate reports [4][16].
In March 2023, a Google Cloud security demo highlighted how Cloud Build automates vulnerability management. It built a
badimage using Debian 9, which triggered aCRITICALfailure, halting the pipeline. The issue was resolved by switching topython:3.8-slim, enabling a secure build to proceed [16].
Once your tests confirm that the scanner detects vulnerabilities correctly, integrate automated alerts to simplify and speed up responses.
Setting Up Notifications and Alerts
Configure your scanner to notify teams immediately when new CVEs appear. Schedule regular rescans - every few hours or whenever vulnerability feeds update - to catch emerging threats [1]. Build a searchable vulnerability database that filters results by criteria such as CVE age, severity, fix availability, and namespace. Additionally, enable the generation of reports (PDF or CSV formats) for easy sharing with management [1].
Runtime Security Integration
To ensure security doesn't end at deployment, integrate runtime scanners to monitor live environments. Use Kubernetes admission controllers like OPA Gatekeeper or validating webhooks to block the deployment of non-compliant images [17]. For ongoing monitoring, deploy runtime-specific tools such as the Trivy operator or Sysdig agent to identify vulnerabilities discovered after deployment [17][9].
Christopher Grant from Google Cloud highlights that
Admission Control Policies... allow you to secure your runtime environments more effectively than CI/CD pipeline checks alone[16].
For hardened images, consider scanners that support VEX (Vulnerability Exploitability eXchange) attestations - like Docker Scout, Trivy, or Grype. These tools help filter out non-exploitable vulnerabilities, reducing noise and improving the accuracy of production reports [5].
| Scanning Phase | Tool/Mechanism | Primary Goal |
|---|---|---|
| Pipeline | sysdig-cli-scanner, Trivy, Clair | Detect vulnerabilities before images reach the registry [7] |
| Admission | OPA Gatekeeper, Validating Webhooks | Prevent vulnerable images from being deployed on the cluster [17] |
| Runtime | Security Agents, Trivy Operator | Monitor for new CVEs in running containers [9] |
Conclusion
Securing your CI/CD pipeline doesn't stop at implementation - it requires continuous validation to ensure your defences stay strong. By following the five key steps - choosing the right tools, preparing your environment, integrating scanning stages, setting up security policies, and testing all the way to production - you create a layered approach that identifies vulnerabilities before they can reach live environments. This proactive method ensures that any weak or compromised images are caught and addressed before deployment.
With Docker Hub hosting over 3.8 million images and seeing approximately 11 billion pulls each month [18], the importance of robust scanning practices cannot be overstated. A single unchecked base image has the potential to introduce hundreds, even thousands, of vulnerabilities across your containerised infrastructure. Automated scanning serves as a crucial checkpoint, ensuring that only images meeting your security standards make it to production registries [3][19].
Beyond identifying CVEs, scanning tools can detect insecure configurations, such as running containers with root privileges or relying on mutable tags like latest. Addressing these issues early helps teams meet compliance requirements, including NIST 800-190 and PCI-DSS standards [2][6].
For organisations seeking to strengthen or refine their security workflows, Hokstad Consulting offers expertise in DevOps transformation and cloud security. Their services include custom automation, policy-as-code implementation, and tailored strategies designed to integrate security seamlessly into your operations. Whether you need help choosing the right scanning tools, implementing zero-trust architectures, or meeting UK compliance standards like GDPR and ISO 27001, they can help accelerate your path to a secure and efficient CI/CD pipeline.
FAQs
What are the advantages of adding image scanning to CI/CD pipelines?
Adding image scanning to CI/CD pipelines brings some clear benefits. For starters, it allows for the early identification of vulnerabilities, tackling potential security threats before they can make their way into production. Catching these issues at an earlier stage not only bolsters your application's security but can also save time and money by avoiding complex fixes down the line.
On top of that, spotting problems early helps teams maintain more seamless workflows, leading to smoother deployments. Incorporating image scanning into your process also ensures alignment with security standards, giving you greater peace of mind about the integrity of your containerised applications.
What should I consider when selecting a container image scanning tool for my CI/CD pipeline?
When selecting a container image scanning tool for your CI/CD pipeline, it’s important to focus on a few essential factors to ensure it fits your workflow and requirements.
Start by checking compatibility with your current CI/CD tools. Whether you’re using Jenkins, GitHub Actions, or GitLab CI, the scanning tool should integrate smoothly. This will help avoid unnecessary complications and ensure a straightforward setup.
Next, evaluate the tool’s scanning capabilities. It should reliably detect vulnerabilities, outdated dependencies, and misconfigurations. Accuracy is key, but the tool should also perform scans efficiently to avoid slowing down your pipeline.
Lastly, think about automation and cost. Open-source tools are often free and can be automated easily, making them a good choice for teams with limited budgets. On the other hand, commercial tools may offer extra features and dedicated support. Choose a solution that balances cost, functionality, and the resources you have available.
How can I effectively monitor vulnerabilities in runtime environments?
To keep an eye on vulnerabilities in runtime environments, start by adding container image scanning to your CI/CD pipeline. This step catches vulnerabilities early in development, lowering the chances of deploying insecure images. Automating scans at crucial points - like during image builds, in registries, and at runtime - helps maintain consistent security.
Pair this with runtime security tools to monitor container activity and spot unusual behaviour as it happens. You can also use admission controllers in Kubernetes to enforce security policies, blocking the deployment of images with vulnerabilities. Stay proactive by keeping vulnerability databases up to date and linking alerts to your monitoring systems, so you can act fast when new threats emerge.