
If I want low-downtime releases in Kubernetes, a rolling deployment is usually my first pick. It works by starting new Pods in small steps, waiting until they are Ready, and only then removing old ones. That keeps traffic flowing during the change.
Here’s the short version:
- I use rolling deployments for stateless services such as web apps and APIs.
- I avoid them when old and new versions cannot run together safely.
- I make sure readiness probes, shutdown handling, and resource requests are set before rollout.
- I tune
maxSurgeandmaxUnavailableto control pace and uptime. - I watch the rollout with
kubectl rollout statusand roll back fast if errors climb. - I add PDBs, HPA, and regular rightsizing checks to keep uptime steady and cloud spend under control.
A few numbers matter straight away: Kubernetes often gives a Pod 30 seconds to shut down by default, many teams keep maxUnavailable: 0 for production services, and worker shutdown windows often sit around 60 to 300 seconds based on job length.
What this comes down to is simple: a rolling deployment is only as safe as the app behind it. If probes are wrong, shutdown is messy, or the new version breaks compatibility, the rollout can stall or send traffic to the wrong Pods.
So when I think about rolling updates, I focus on three things first:
- Can the app start cleanly and prove it is ready?
- Can it stop cleanly without dropping work?
- Can old and new versions run side by side for a short time?
If the answer is yes, rolling deployment is often the plainest and safest default for day-to-day Kubernetes releases.
How to Do Kubernetes Rolling Updates & Rollbacks (Hands-On)
Need help optimizing your cloud costs?
Get expert advice on how to reduce your cloud expenses without sacrificing performance.
2. Prepare the application before changing the Deployment
::: @figure 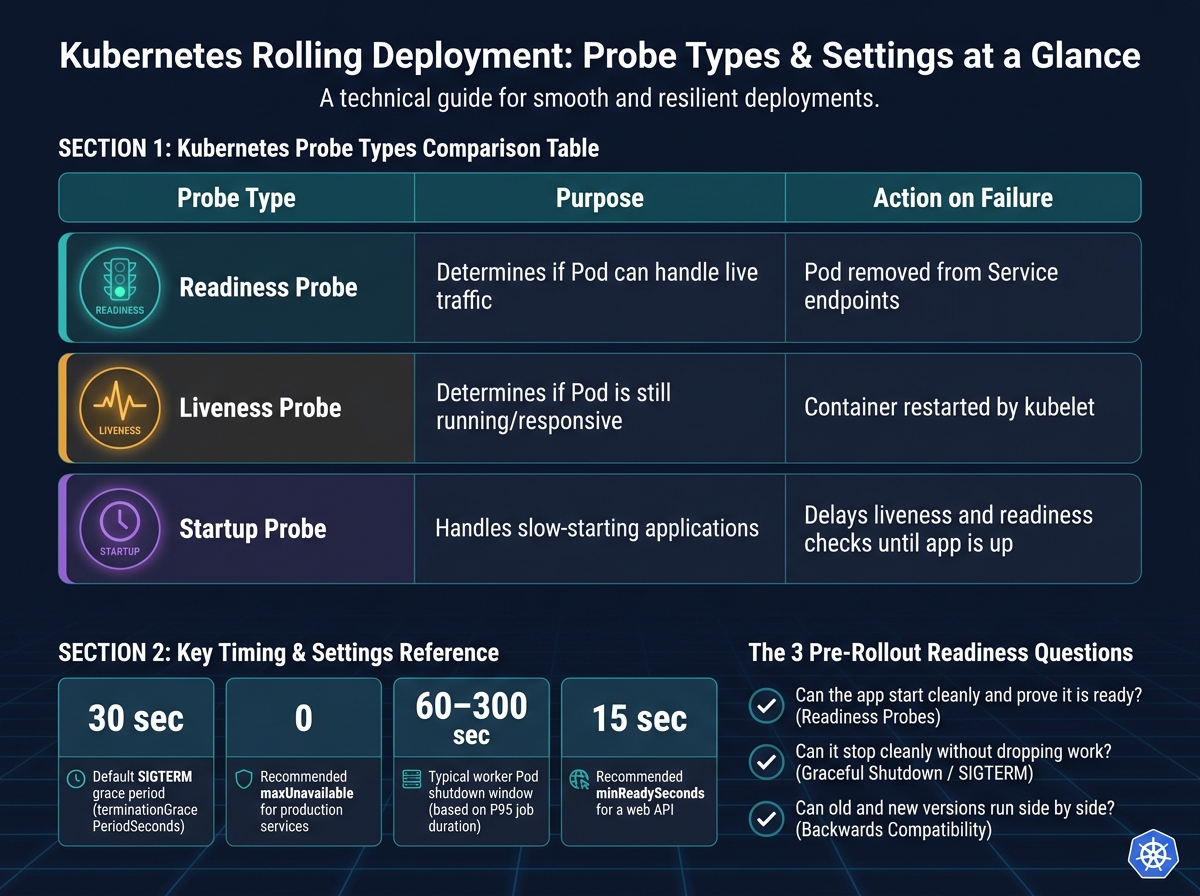 {Kubernetes Rolling Deployment: Probe Types & Key Settings Compared}
:::
{Kubernetes Rolling Deployment: Probe Types & Key Settings Compared}
:::
Once you've picked a rollout strategy, get the workload ready before you touch the Deployment. That means accurate probes, clean shutdown, and resource requests that match how the app behaves in production.
Set readiness and liveness probes that reflect real application health
A readiness probe answers a simple question: can this Pod handle live traffic right now? If the readiness probe fails, Kubernetes removes the Pod from Service endpoints until it passes again [4][5][6]. That stops traffic reaching Pods that aren't ready yet during the rollout.
Set initialDelaySeconds based on the slowest production start-up you actually see, not what happens on a local machine. Then tune periodSeconds and failureThreshold so the probe doesn't flap up and down for no good reason.
Liveness probes do a different job. They're for cases where the process is stuck, such as a deadlock, and a restart is the right move. Keep liveness checks light and aimed at internal process health. Don't tie liveness checks to downstream dependencies. If you do, a database or API wobble can trigger pointless restarts. Worse, new Pods may never become Ready during a rollout, which can leave the update stuck [5][6].
| Probe type | Purpose | Action on failure |
|---|---|---|
| Readiness | Determines if Pod can handle traffic | Pod is removed from Service endpoints |
| Liveness | Determines if Pod is still running/responsive | Container is restarted by the kubelet |
| Startup | Handles slow-starting applications | Delays liveness and readiness checks until the app is up |
Once the probes reflect the app's actual health, turn to termination.
Handle SIGTERM, draining and backwards-compatible changes
When Kubernetes terminates a Pod during a rolling update, it sends a SIGTERM signal and waits. The default grace period is 30 seconds. After that, it sends SIGKILL if the process is still running [4][2].
Your application should catch SIGTERM, stop taking new traffic, finish in-flight work, and exit before the grace period runs out. If requests or jobs often run for more than 30 seconds, increase terminationGracePeriodSeconds to fit what you see in production, with a bit of breathing room. Some teams also add a short preStop delay so endpoint changes have time to spread before shutdown starts [3][7][9].
There's another trap here: shutdown can be clean, but the rollout can still break if old and new versions can't run side by side. During a rolling update, they usually do. So keep changes backwards-compatible: add fields first, ship code that supports both formats, and remove the old path later [8][10][11].
Right-size CPU and memory to avoid surge costs
Last part: make sure the new Pods can actually be scheduled during the surge. Size CPU and memory requests from production metrics, not guesswork. If requests are too high, surge Pods become harder to place and may trigger node scale-out you didn't need [12].
3. Configure the rollingUpdate strategy in the Deployment manifest
Next, define how Kubernetes should pace the rollout: how many Pods it may add, remove, and wait on before moving ahead. These fields turn readiness into rollout behaviour.
Set maxSurge and maxUnavailable for your environment
Declare RollingUpdate explicitly so rollout behaviour is clear in the manifest. [1][14]
The two settings that matter most are maxSurge and maxUnavailable.
-
maxSurgesets how many extra Pods can run above your target replica count during the update. -
maxUnavailablesets how many Pods can go offline at the same time.
For a four-replica production HTTP service, start with this:
apiVersion: apps/v1
kind: Deployment
metadata:
  name: web-api
spec:
  replicas: 4
  strategy:
    type: RollingUpdate
    rollingUpdate:
      maxSurge: 1        # allow 1 extra Pod during rollout
      maxUnavailable: 0  # keep all existing Pods available
  selector:
    matchLabels:
      app: web-api
  template:
    metadata:
      labels:
        app: web-api
    spec:
      containers:
        - name: web-api
          image: example/web-api:v2
          ports:
            - containerPort: 80
With maxUnavailable: 0, Kubernetes starts a new Pod and waits for it to pass its readiness probe before it terminates an old one. [13][14]
For staging, you can trade a bit of availability for speed by increasing both values.
Once rollout speed is set, add the timing and history limits that decide when Kubernetes moves on, stalls, or rolls back.
Add minReadySeconds, progressDeadlineSeconds and revisionHistoryLimit
Set minReadySeconds so Kubernetes doesn't treat a Pod as available after a brief, shaky pass. For a web API that usually settles within 10–20 seconds, this is a sensible starting point:
spec:
  minReadySeconds: 15
  progressDeadlineSeconds: 300
  revisionHistoryLimit: 10
progressDeadlineSeconds marks the rollout as stalled when progress stops. Match progressDeadlineSeconds to your delivery pipeline timeout.
revisionHistoryLimit sets how many old ReplicaSets Kubernetes keeps for rollback. A value of 10 gives you enough history to roll back across several releases without cluttering the cluster.
Tune settings for HTTP services, long-lived connections and worker Pods
The right values depend on how long your Pods need to drain and how stateful their work is.
Short-request HTTP APIs, such as REST microservices that handle requests in tens or hundreds of milliseconds, can use a 30-second terminationGracePeriodSeconds. That's usually enough time to drain in-flight requests and exit cleanly. Rollouts can move fast here, and minReadySeconds can stay modest.
Services with persistent long-lived connections, such as WebSocket servers, need more care. When the application gets SIGTERM, it should fail its readiness probe at once to stop new traffic, then allow existing connections to close before the process exits. A grace period of 120 seconds is a sensible place to start:
spec:
  template:
    spec:
      terminationGracePeriodSeconds: 120
      containers:
        - name: websocket-server
          image: example/websocket:v2
Background worker Pods that process long-running jobs often need the longest grace periods, often 60 to 300 seconds depending on your 95th-percentile job duration. Keep maxUnavailable: 0 here as well, so you don't lose processing capacity during the rollout. Set minReadySeconds a bit higher for workers so new Pods show they are processing before old ones exit.
4. Run, monitor and roll back the deployment safely
With the Deployment set up, the next job is simple: watch the rollout and stop it fast if things start to drift.
Trigger the rollout and track progress with kubectl
When your manifest is ready, apply it with kubectl apply -f deployment.yaml. Kubernetes then creates a new ReplicaSet and starts moving Pods over to it based on the rolling update strategy in your Deployment. The rollout speed, and how Kubernetes handles stalls, comes from the settings in that manifest.
Run kubectl rollout status deployment/web-api --timeout=5m straight away. It waits until the rollout either finishes or times out, which makes it a good CI/CD gate.
Right after release, keep a close eye on what’s happening. Check:
- the Deployment for stalled progress
- the ReplicaSet for scale-up and scale-down activity
- the Pods for restart loops, scheduling issues or readiness failures
If error rates climb or Pods begin to fail, pause the rollout with kubectl rollout pause deployment/web-api. That stops Kubernetes from replacing more Pods while you look into the problem. If progress stalls, pause first, then decide whether to fix the issue and carry on or roll the change back.
Once you’ve fixed the cause, resume with kubectl rollout resume deployment/web-api. If you need to back out the release, use kubectl rollout undo deployment/web-api. To return to a known-good revision, run kubectl rollout undo deployment/web-api --to-revision=N.
Add production guardrails in the delivery pipeline
To make rollouts repeatable, wire the same process into your delivery pipeline.
Build once, tag the image, then promote that same artefact from development to staging and then to production. In staging, use the same kubectl apply and kubectl rollout status flow that you plan to use in production. Only when staging passes smoke tests and health checks should the pipeline move the release to production.
Production should also include a manual approval step. A designated engineer reviews the change ticket and test evidence before the pipeline runs kubectl apply against the production namespace. Run deployment changes through CI/CD so audit logs and access control stay in place.
Small, frequent releases help here too. Ship one fix or one feature at a time, keep the blast radius narrow, and make root cause analysis much easier.
5. Best practices for reliability, cost control and next steps
Use PodDisruptionBudgets and autoscaling without overspending
Once you've tuned rollout settings, use disruption budgets and autoscaling to keep capacity steady during drains and traffic spikes.
PodDisruptionBudgets (PDBs) help protect availability during voluntary disruptions like node drains, cluster upgrades and rolling updates. For critical services with three replicas, minAvailable: 2 means only one Pod can be disrupted at a time. Don’t set minAvailable to the full replica count, because that can block node maintenance and upgrades altogether [15][16][17].
Autoscaling works alongside PDBs by absorbing the temporary capacity bump that rolling updates create. HPA is a good fit for stateless web APIs. Aim for 60–70% CPU utilisation and set a sensible maxReplicas limit based on past traffic data [18]. Run VPA in recommendation mode first, then apply changes to production workloads. Scale down overnight and back up for peak trading hours to cut spend without hurting reliability.
Keep your attention on:
- PDBs
- HPA
- VPA recommendations
- regular rightsizing
Review requests each month against 30-day P95 usage.
Key takeaways for a safer default rollout process
For a safer default rollout, keep these habits steady. Test rollouts in lower environments first, using the same Deployment and Service setup you plan to run in production. That gives you room to check probes, rollout settings and resource limits without putting live traffic at risk. Get the application ready for change with graceful shutdown, connection draining and backwards-compatible schema updates. Set readiness and liveness probes with care so Pods only take traffic when they’re actually ready, and unhealthy Pods restart without triggering knock-on failures.
Tune maxSurge and maxUnavailable with care, especially for production services. Start with small surges and very low unavailability, watch how things behave under live-like load in staging, and adjust from there. Monitor every rollout in real time with latency, error rate and saturation metrics, not just kubectl rollout status. Clear out stale workloads soon after experiments end, and treat each deployment as a first-class event, not background noise.
If you need a review of Deployment manifests, rollout settings and autoscaling policies, Hokstad Consulting can help UK teams cut waste and tighten delivery.
FAQs
When should I avoid a rolling deployment?
Avoid a rolling deployment if your application can’t handle multiple versions running at the same time.
It can also be a poor fit for high-stakes releases where instant rollback matters, if you don’t have enough capacity to take servers offline for a short period, or if you need very granular, percentage-based traffic control.
What can cause a rollout to stall?
A Kubernetes rollout can stall when new Pods fail their readiness probes. When that happens, the Deployment can’t move on to the next batch. And if the desired state isn’t reached within the set time limit, the rollout effectively hangs.
Set progressDeadlineSeconds so stalled Deployments are marked as failed. Then use kubectl rollout status to track progress and spot blockers in your CI/CD pipeline.
How do I choose maxSurge and maxUnavailable?
For zero-downtime rolling deployments, set maxUnavailable to 0. That keeps service capacity from dropping below your target replica count while the rollout is happening.
Then set maxSurge to 1 or 25%. That gives Kubernetes room to start extra pods before it shuts down the old ones.
Pair those settings with readiness probes. They let Kubernetes check that each pod is healthy before traffic moves over.
Hokstad Consulting recommends this setup to balance resource use with service availability.