
I can’t test everything before release, so I should test the parts most likely to cause the worst damage. That’s the core idea here. Risk-based testing means I score each change by how likely it is to fail and how bad the result would be, then I put most of my pre-release time into the top-risk items.
The article boils down to four steps:
- Define scope: list what changed, what did not, and which user journeys, services, APIs, config updates, and infra changes are in play
- Find and score risk: use a simple likelihood × impact model, backed by defect history, recent churn, integrations, and business impact
- Match score to test depth: high-risk items get deep checks, medium-risk items get focused regression, and low-risk items get smoke coverage
- Make the release call on residual risk: review open defects, controls, rollback plans, and monitoring before deciding Go, Conditional Go, or No-Go
A few numbers stand out:
- One study found 83% of defects by testing just 13% of classes
- A MasterCard case reported 25% effort saving and 25% cost reduction
- Another study saw after-release failures drop from 477 to 214 in the first five weeks
In plain terms: I use risk to decide where deep testing goes, where light testing is enough, and when a release should stop. The rest of the article explains how to score that risk, turn it into a test plan, and make a release decision with written evidence instead of gut feel.
::: @figure 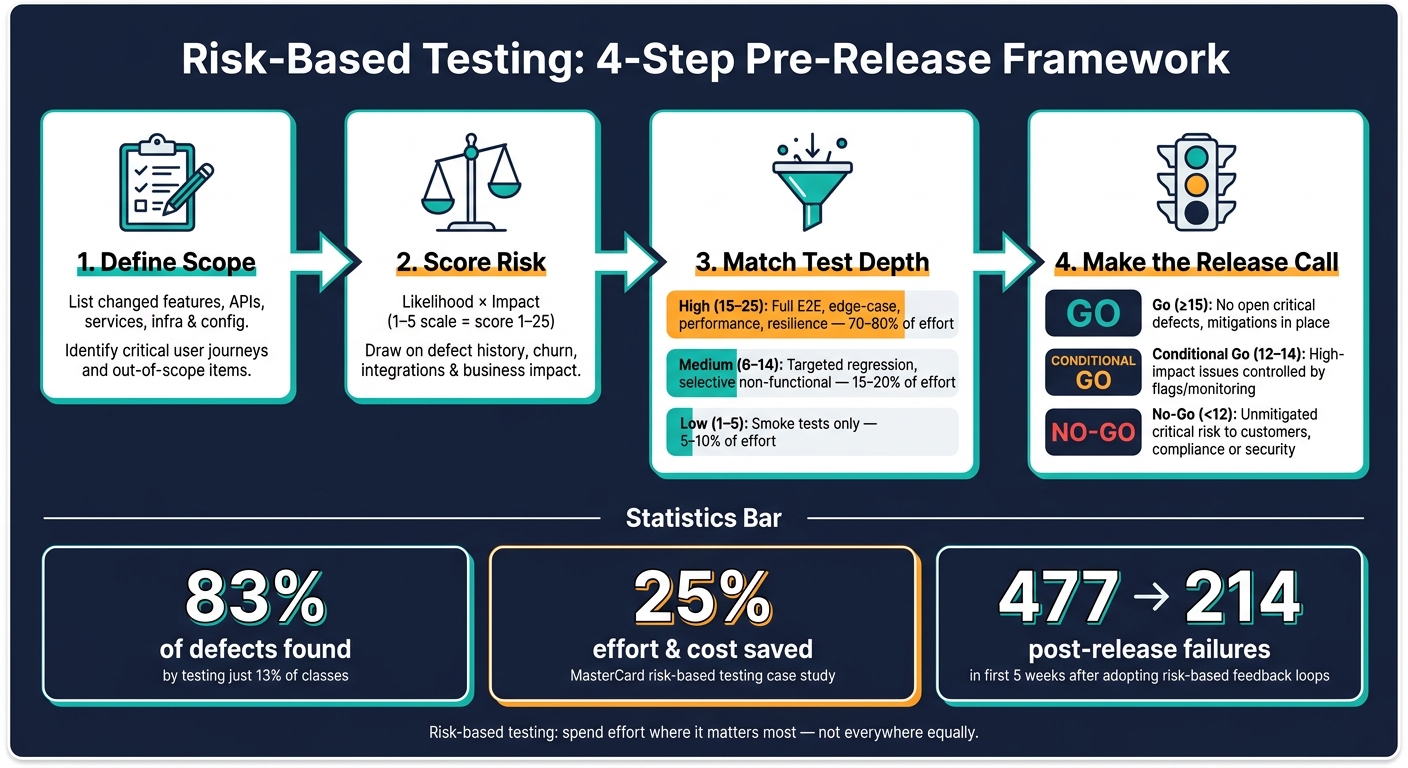 {Risk-Based Testing: 4-Step Framework for Smarter Pre-Release Validation}
:::
{Risk-Based Testing: 4-Step Framework for Smarter Pre-Release Validation}
:::
Risk-Based Testing Explained: A Smarter Approach to Quality Assurance
1. Define release scope and identify risk
Before testing starts, the team needs a plain answer to one question: what is changing in this release? That means listing every in-scope feature, workflow, API, backend service, infrastructure change, and configuration update. It also means being just as clear about what sits out of scope. That line sets the test set.
Once the scope is clear, the next job is to work out where the release could go wrong.
Map critical journeys, integrations and change areas
Begin with customer journeys that affect continuity or trust. Focus on flows such as log in, account creation, search, checkout, payment processing, data submission, and other revenue- or compliance-critical paths. If one of these breaks, the damage is rarely small.
Then map third-party integrations and dependencies. This includes payment processors, authentication providers, analytics services, email or SMS services, database changes, and infrastructure dependencies. A fault in one of these areas can ripple across several features at once.
It also helps to look at version control history and sprint reports for high-churn modules. Pay close attention to:
- recent changes
- major refactors
- unstable interfaces
- recurring defects
Those areas tend to deserve closer scrutiny, even before anyone runs a test.
Use impact, likelihood and delivery history to find risk
Assess each item using impact and likelihood.
Impact comes from things like revenue exposure, compliance or legal risk, privacy concerns, customer trust, and operational fallout such as downtime or weaker performance. Likelihood tends to climb when there have been recent changes, dependencies are complex, requirements are unclear, or automated coverage is thin.
Delivery history gives you another strong signal. Components with production incidents, failed deployments, repeated defects, or rollbacks should be treated as higher risk, even if the current change looks minor on paper. Looking back over the last 6–12 months of defect data by component can bring fragile areas into view before testing begins.
Bring in cross-functional input early
No single team sees the whole risk picture. Product knows the business impact. Engineering knows the code and dependency risk. QA sees defect patterns and coverage gaps. Operations understands deployability, monitoring, and rollback consequences.
Run a short pre-validation risk review, using either a checklist or a workshop, to capture:
- affected journeys
- dependencies
- known defects
- monitoring gaps
- release constraints
Record the output in a shared risk register or test map so everyone works from the same view.
Use that shared risk map to score items and set test depth in the next step.
2. Score risk and convert it into testing priority
Turn the risk map into a ranked list so the team knows where to spend pre-release testing time.
Apply a simple likelihood × impact model
The simplest way to do this is to score each risk on two dimensions - likelihood and impact - on a 1–5 scale, then multiply the two numbers. That gives you a score from 1 to 25. It’s easy to explain, fast to use, and simple for the whole team to work with. [2][6][5]
For likelihood, tie each score to things you can actually see, not instinct. A score of 5 might mean the area has had repeated production incidents across the last three releases, or that it includes major new functionality with little automated coverage. A score of 1 might mean a small configuration change in a stable component with strong test coverage and no recent incidents.
For impact, a 5 means a production issue that could lead to major financial loss, a UK GDPR breach, or a broad outage. A 1 means a cosmetic defect with no measurable business effect. [9]
The logic here is straightforward: when test time is tight, the highest-risk changes should get the most attention.
A short scoring session can help before release scoring starts. Review a few past incidents, score them after the fact, and use that discussion to get everyone on the same page.
Match each risk level to test depth
Once the scores are in place, group them into bands and link each band to a testing policy. Use 1–5 for low risk, 6–14 for medium risk, and 15–25 for high risk. [7][3][8] The table below shows a practical mapping for digital products and cloud-hosted systems.
| Risk Level | Score Range (Likelihood × Impact) | Test Depth |
|---|---|---|
| High | 15–25 | Full end-to-end, negative, edge-case, performance, resilience and rollback checks |
| Medium | 6–14 | Targeted functional tests on changed components, focused regression on impacted integrations, selective non-functional checks |
| Low | 1–5 | Smoke tests to confirm basic operation; broader regression deferred to a later cycle |
Write down these thresholds with delivery, QA and operations before the release cycle starts. That way, test depth follows agreed rules instead of turning into last-minute debate.
In DevOps setups, you can bake these risk levels straight into CI/CD pipelines as metadata on change tickets or pull requests. A High label can trigger full regression and performance tests on its own. A Low label can run smoke checks and limited regression. Simple CI/CD rules cut down arguments and keep validation work aimed at the changes that matter most. [7]
That ranking then becomes the basis for assigning test depth in the next step.
3. Allocate pre-release testing where it matters most
Once every change has a risk score, turn that list into a clear execution plan. Each item should link to a test type, an owner, an environment and an exit criterion. The score then tells you what should run, where it should run and who is on the hook for it. [10][7][1][16]
Deep validation for high-risk release items
High-risk items need layered coverage. If you're dealing with a critical customer journey, that usually means end-to-end tests across key devices and browsers, boundary cases, negative paths and checks on downstream notifications. For critical integrations, run contract tests, failure simulation and boundary security checks. [11][13][1]
You also need proper evidence. That includes structured test reports, severity-rated defects and pre-production monitoring logs. In regulated sectors, teams often need explicit sign-offs from QA leads, product owners and, where needed, compliance or InfoSec. Release should stay blocked until failures are fixed, or the residual risk is formally accepted with a documented workaround. [7][15]
Set test effort by risk band:
- 70–80% for high risk
- 15–20% for medium risk
- 5–10% for low risk
Coverage targets should follow the same pattern. Critical-risk areas should aim for 80–95% coverage, high-risk 60–80%, medium-risk 40–60% and low-risk 20–40%. [14][8]
Anything below that level should drop into targeted regression and lighter checks.
Targeted regression, smoke coverage and lower-risk handling
Medium-risk items should get targeted regression on changed code, fragile components and shared integrations. Use automated tests for representative scenarios, then add manual exploratory checks where behaviour is new or more complex. [4][10][11][12]
Low-risk items can move through with smoke tests and automated checks. If the architecture and observability are there, lean on canary releases, feature flags and error-rate dashboards instead of heavier pre-release coverage. Write down the decision, the expected impact and the monitoring thresholds. [8][4][10][13][15]
Any exceptions, defects or deferred checks should be carried into the release decision record.
Link test allocation to release speed and cost
This kind of risk-based allocation cuts wasted effort and shortens release windows. Track it in person-days and £ per test cycle, then compare that with post-release incident rates. [14][7]
On the ground, UK SaaS and platform teams using this model tend to move towards smaller, more frequent releases. Why? Because most changes fall into the low- or medium-risk bands and can pass through leaner pipelines without much drag. High-risk releases - like billing engine changes or major authentication updates - get dedicated hardening time, but they should be the exception, not the default. [12][7][15]
Unresolved defects and control gaps should carry forward into residual-risk review.
4. Review residual risk and make the release decision
Once testing is done, the final call is simple in theory and often tricky in practice: is the risk left on the table acceptable? Testing almost never removes every risk. Before release, review open defects, untested areas, and any partial mitigations still doing the heavy lifting.
Document unresolved defects and mitigation controls
Record each open item in the risk register with:
- Defect ID
- Affected component or user journey
- Impact type
- Likelihood rationale based on test failures or production history
- Controls
- Owner
- Escalation path covering UK hours
Alongside each defect, document the controls in place at release. That includes active feature flags and their default state, rollback time and whether data migration makes rollback harder, plus the monitoring and alert thresholds that will catch the issue if it appears in production.
Every accepted risk needs named approval. If that approval is missing, the default decision is no-go. [17][20]
Use the register as the input for the final go/no-go score.
Set release-readiness thresholds for proceed, proceed with controls, or delay
Use the same scoring model every time. That keeps release calls consistent instead of turning them into gut-feel debates. Apply the pre-agreed nine-gate score:
- 0 = fail
- 1 = conditional pass
- 2 = pass
- ≥15 = Go
- 12–14 = Conditional Go
- <12 = No-Go [20]
Any failed critical check is a no-go unless it has been formally waived. That includes an open critical defect, unverified rollback, or a failed security scan. [18][19]
| Release outcome | Residual risk condition | Typical trigger in practice |
|---|---|---|
| Proceed | No open critical defects; only low/medium issues with clear mitigations | All high-impact compliance/security risks resolved or isolated behind effective controls; risk score below the agreed threshold; agreed availability and performance targets met |
| Proceed with controls | Some high-impact issues remain but with strong, tested controls | High-impact customer issue contained behind feature flags; known performance risk with enhanced monitoring and on-call cover; agreed temporary workarounds for a specific UK customer segment; or gradual rollout starting with internal users or low-risk cohorts with strict rollback criteria |
| Delay / No-Go | Unacceptable unmitigated risk to customers, compliance, security or availability | Any open critical security or compliance defect; severe outage risk without rollback confidence; aggregated risk score above the threshold |
Record the decision, along with any dissenting views. That gives you a clear audit trail and helps tune thresholds over time. [21][22]
Conclusion: Make risk-based testing a repeatable release discipline
Risk-based testing works best when it becomes part of the normal release rhythm, not a one-off exercise. The goal is simple: keep pre-release effort tied to business and operational risk. In practice, that means running the same four steps in every release cycle and making release calls based on acceptable residual risk, not just a neat set of passing tests.
The evidence backs this up. One study on software quality improvement found that after-release failures in the first five weeks fell from 477 to 214 - less than half - after teams introduced regular feedback to developers and testers and tracked coverage and completeness in a steady way. [25]
That feedback loop matters. Incidents, escaped defects, and monitoring data should feed straight into the next release’s likelihood scores and test priorities. If a component keeps causing trouble in production, it should carry a higher baseline risk rating next time. And if a service settles down, its likelihood score can come down. The same logic applies to deployment controls. Canary rollouts, feature flags, and blue–green deployments should be adjusted based on what worked and what failed in live use.
A simple way to check whether this loop is doing its job is to watch change failure rate. DORA’s change failure rate gives teams a direct view of delivery risk. Tracking it from one release to the next shows whether the risk model is getting sharper or starting to drift. [23][24]
To keep the process light, reuse the same risk template, review, and go/no-go score inside your current release ceremonies. And don’t leave the sign-off to QA on its own. Product, engineering, QA, and operations all need to stay in the same risk review flow, so scope, scoring, testing, and release decisions stay lined up.
FAQs
How do I score risk consistently?
Use a risk matrix to assess each risk by likelihood × impact. A 5×5 matrix is often used because it separates priorities clearly.
To keep scoring consistent, set clear, objective criteria for each level. For example, you might define impact as anything above £50,000, or set likelihood based on three or more occurrences in the past year.
Once those rules are in place, plot each risk on the matrix. Then use colour-coding to focus validation on the highest-ranked items.
What if everything seems high risk?
If everything looks high risk, the issue may be your assessment itself. It may be too broad, or just not detailed enough.
A more granular risk matrix can help sort things out. For example, a 5x5 matrix often separates risks more clearly than a 3x3 matrix.
It also helps to set clear, objective criteria for impact and likelihood. Otherwise, different people may label the same risk in very different ways, and suddenly everything ends up in the red.
If risks still come out as critical after that, shift your attention to mitigation and resilience. In practice, that usually means:
- progressive roll-outs
- feature flags
- automated rollback mechanisms
Who should approve a Conditional Go?
For critical changes and sensitive releases, approval should involve both technical leads and business stakeholders. That mix matters. It helps balance security with day-to-day speed, so teams don't lean too far in either direction.
For high-stakes releases, organisations should also document the approval process, limit production access to senior staff, and use multi-layered sign-offs to keep governance in place.