
Service meshes simplify communication, security, and traffic management for microservices. But managing their configurations can be tricky. Small missteps - like setting incorrect concurrency limits - can lead to outages. This guide explores the essentials of service mesh configuration, including:
- Core components: Control plane (policy management) and data plane (traffic handling with proxies like Envoy).
- Key areas: Traffic routing, security (mTLS), resilience (timeouts, retries), and observability (metrics, logs).
- Best practices: Use GitOps for version control, validate changes before deployment, and roll out updates carefully to avoid downtime.
- Rollback strategies: Quickly revert configurations using Git or delete problematic resources to restore functionality.
To ensure stability, always validate changes, monitor their impact, and centralise configurations in Git for better control and recovery.
::: @figure 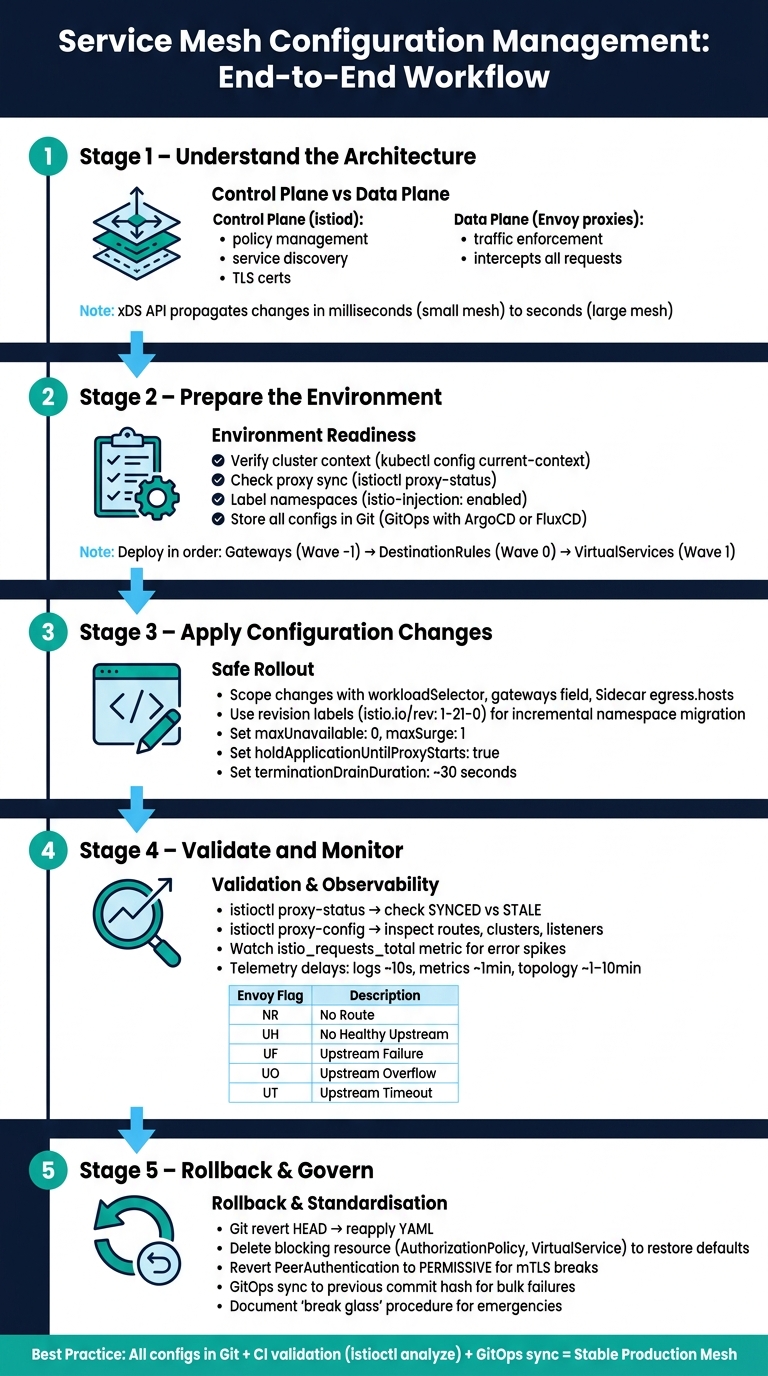 {Service Mesh Configuration Management: End-to-End Workflow}
:::
{Service Mesh Configuration Management: End-to-End Workflow}
:::
Istio Service Mesh Tutorial: Traffic Management for Kubernetes

Need help optimizing your cloud costs?
Get expert advice on how to reduce your cloud expenses without sacrificing performance.
Service Mesh Configuration Model
Before diving into changes, it’s crucial to grasp the two-layer structure of a service mesh. Every adjustment - whether it’s tweaking routing rules or enabling mutual TLS (mTLS) - relies on an architecture that separates what actions need to occur from how they’re executed.
Control Plane vs Data Plane
The control plane acts as the brain of the system, managing policies without directly dealing with application traffic. It handles tasks like service discovery, issuing TLS certificates, validating configurations, and distributing policies throughout the mesh. In Istio, this is managed by a single binary called istiod. This binary replaced three separate components - Pilot, Citadel, and Galley - making operations simpler [5].
The data plane, on the other hand, is where the actual work happens. It’s made up of Envoy sidecar proxies, which are deployed alongside each application container. These proxies intercept all incoming and outgoing traffic, ensuring that the policies defined by the control plane are enforced.
The control plane is everything involved with establishing and enforcing policy, while the data plane is everything involved with carrying out that policy.- Kong Inc. [4]
If the control plane goes down, existing traffic flows remain unaffected, but no new updates can be applied. However, if the data plane fails, communication between services halts immediately.
With that foundation, let’s explore the major configuration areas that govern these components.
Core Configuration Areas
Service mesh configuration typically revolves around four main areas: traffic management, security, resilience, and observability.
- Traffic management: This includes routing rules, load balancing, and traffic splitting. For instance, during a canary release, you might route 10% of requests to a new service version.
- Security: Focuses on mTLS, which ensures both sides of a connection authenticate each other.
- Resilience: Covers settings like retries, timeouts, and circuit breaking to maintain stability.
- Observability: Handles the collection of metrics, logs, and distributed traces, all without requiring changes to your application code [6][5].
Configurations are divided into two main categories:
-
meshConfigfor mesh-wide settings, such as access logging. -
ProxyConfigfor per-proxy settings, like concurrency limits and tracing behaviour [3].
How Configuration Is Applied
When you apply a configuration change (e.g., a VirtualService YAML), the control plane translates it into instructions for the proxies. These updates are then sent out using the xDS API [5]. This API consists of several sub-protocols, each addressing a specific area:
| xDS Component | Function |
|---|---|
| LDS (Listener Discovery) | Defines which ports the proxy listens on |
| RDS (Route Discovery) | Specifies request routing rules |
| CDS (Cluster Discovery) | Identifies upstream services |
| EDS (Endpoint Discovery) | Lists the pod IPs for each service |
| SDS (Secret Discovery) | Distributes TLS certificates for mTLS |
The propagation of these changes is generally quick - milliseconds in smaller meshes - but in larger environments with thousands of sidecars, it might take a few seconds [5]. To confirm whether proxies have received the latest configuration, you can use the istioctl proxy-status command. This tool shows whether each sidecar is SYNCED or STALE with the control plane [3][5].
This efficient propagation ensures that configuration changes are implemented smoothly, paving the way for a well-prepared environment.
Preparing the Environment
Now that you understand how configuration flows through the mesh, the next step is to ensure your environment is set up to handle changes safely. Proper preparation is key to avoiding disruptions and aligning your environment with the configuration model. Skipping this step could lead to outages.
Cluster and Namespace Readiness
Before making any changes, confirm you're working in the correct cluster by running:
kubectl config current-context
Once you've verified the active cluster, check the control plane's health. For example, use:
istioctl proxy-status
This ensures istiod is reachable and that the sidecars are properly synchronised.
Next, ensure namespaces are labelled correctly. For sidecar injection to work in Istio, the target namespace must include the label istio-injection: enabled. Without this label, new pods may start without proxies, bypassing your mesh policies. To verify labels across namespaces, run:
kubectl get namespace --show-labels
Version Control and Tools
Store all mesh configurations in Git. As Nawaz Dhandala from OneUptime advises:
Version controlling Istio configuration is not optional for production. It is the minimum bar for operating a service mesh responsibly.[8]
For an efficient setup, use a repository structure with Kustomize. A common approach includes a base directory for shared configurations and overlays for environment-specific adjustments, such as shorter timeouts in staging compared to production [1][8].
If you're adopting GitOps, tools like ArgoCD or FluxCD can automate synchronisation between Git and your cluster. This eliminates the need for manual kubectl apply commands and provides an audit trail of changes. To avoid deployment errors, integrate istioctl analyze --use-kube=false into your CI pipeline. This ensures that version control aligns with the continuous update process.
Checking Dependencies
With version control and tools in place, it's crucial to deploy resources in the correct sequence. For instance, DestinationRules must be applied before VirtualServices to prevent 503 errors.
If you're using GitOps tools like ArgoCD, you can manage this sequence using sync waves:
- Wave -1: Gateways – set up entry points.
- Wave 0: DestinationRules – define subsets and traffic policies.
- Wave 1: VirtualServices – apply routing rules.
| Sync Wave | Resource Type | Why This Order Matters |
|---|---|---|
| Wave -1 | Gateways | Entry points must exist before routing rules are applied [1] |
| Wave 0 | DestinationRules | Defines subsets and traffic policies before routing is set [1] |
| Wave 1 | VirtualServices | Routing rules depend on subsets defined in DestinationRules [1] |
Lastly, check for configuration drift - this happens when live cluster resources no longer match what's stored in Git. Manual fixes using kubectl are often the cause. To catch these discrepancies, use automated drift detection scripts that compare Git manifests with live resources. Identifying and resolving drift early can prevent unexpected issues [7].
Applying Configuration Changes
Make configuration changes with care: focus on the specific components they affect, roll them out gradually, and monitor their progress across the system.
Editing and Scoping Changes
When making configuration changes, it's crucial to target only the components that need to be updated. In Istio, this is done using specific fields and resources. For example:
- The
workloadSelectorfield in resources likeAuthorizationPolicyandSidecarallows you to apply policies to specific pods by using labels, avoiding a blanket effect on all workloads in a namespace. - The
gatewaysfield in aVirtualServiceensures routing rules apply to a specific ingress or egress gateway, keeping unrelated traffic unaffected.
Additionally, the Sidecar resource's egress.hosts field can significantly reduce unnecessary configuration propagation - by as much as 90% in some cases. This kind of optimisation can make a big difference in performance, especially in larger deployments.
| Scoping Mechanism | Target Level | Primary Resource/Field |
|---|---|---|
| Namespace | Group of services | Metadata namespace field or GitOps path |
| Workload | Specific pods |
workloadSelector (labels) |
| Traffic Route | Specific FQDNs |
VirtualService hosts field |
| Gateway | Edge load balancer |
VirtualService gateways field |
| Visibility | Proxy egress |
Sidecar egress.hosts field |
| Control Plane | Versioning |
istio.io/rev namespace label |
Once you've scoped the changes accurately, proceed with a controlled rollout to minimise disruption.
Safe Rollout Methods
To ensure smooth updates, take advantage of revision-based upgrades. Label namespaces with a specific revision tag, such as istio.io/rev: 1-21-0, to migrate workloads incrementally - one namespace at a time - rather than applying changes across the board all at once [9][12].
As Nawaz Dhandala from OneUptime explains:
Unlike application deployments where you can gradually roll out new code, most Istio configuration changes take effect the moment they are applied. This makes a solid change management process essential.[10]
To maintain service availability during pod restarts, configure your Kubernetes deployment strategy with maxUnavailable: 0 and maxSurge: 1. Additionally, set holdApplicationUntilProxyStarts: true in the mesh configuration. This ensures your application container won’t accept traffic until its sidecar proxy is fully operational [13]. For graceful shutdowns, set terminationDrainDuration to about 30 seconds, giving Envoy enough time to close active connections cleanly [13].
Once changes are rolled out safely, keep an eye on their propagation through the mesh.
How Changes Propagate Across the Mesh
After syncing changes through GitOps, Istiod automatically distributes the updated configuration to all relevant Envoy sidecars. However, this process isn’t instantaneous - it can take anywhere from a few seconds to several minutes, depending on the size of your mesh [11].
Google's Traffic Director documentation explains this as a two-step process:
The configuration pipeline performs a two-pass configuration commit for reliability purposes. The first pass performs validations... The subsequent phase propagates the configuration globally to your service deployments.[14]
Endpoint-related updates, like pod scaling, usually propagate faster than entirely new policies. For revision-based changes requiring new proxy injection, trigger a rolling restart for affected deployments to ensure sidecar configurations are updated [12][15].
Validating and Monitoring Changes
Once you've carefully rolled out your changes, the next step is making sure the service mesh applies configurations correctly to maintain smooth system performance.
Service Health Checks
Start by checking the synchronisation status of proxies. Use istioctl proxy-status to ensure that all Envoy sidecars have received and acknowledged the latest configuration updates from Istiod. If any proxy shows a STALE or NOT SENT status, it means those changes haven't been applied yet, which could lead to unexpected traffic behaviour [17][21].
For a more detailed view, run istioctl proxy-config to inspect the actual routes, clusters, and listeners loaded on a specific sidecar. You can further test internal routing by running curl from a mesh pod to confirm the routes are functioning as expected [22].
Reading Observability Data
The istio_requests_total metric is key for verifying traffic flow after a configuration change. Keep an eye out for unusual spikes in error rates or changes in response codes. If you've made security-related updates, you can use istioctl proxy-config secret to check that mTLS certificates are valid and active on the sidecar [16].
In Cloud Service Mesh environments, telemetry data isn't instantaneous. Logs are generally updated every 10 seconds, metrics every minute, and topology edges every 1 to 10 minutes [20]. Be mindful of these delays when evaluating whether your configuration is working as intended. Once you've reviewed the observability signals, use them to identify any inconsistencies, which you can then troubleshoot further with log analysis.
Finding and Fixing Misconfigurations
Envoy access logs are your go-to tool for diagnosing routing issues. Each log entry includes a response flag that helps pinpoint the source of a problem:
| Response Flag | Meaning | Common Cause |
|---|---|---|
| NR | No Route | Host mismatch in VirtualService or missing route |
| UH | No Healthy Upstream | Target service pods failing health checks |
| UF | Upstream Failure | Connection refused or reset by the destination |
| UO | Upstream Overflow | Circuit breaker triggered due to connection limits |
| UT | Upstream Timeout | Request exceeded the configured timeout |
If you see NR flags, double-check that your Kubernetes service ports are named with the correct protocol prefix, such as http-api or grpc-backend. Without this, Istio won't detect the protocol correctly and may return 503 errors [19][20]. For RBAC: access denied errors, run istioctl x authz check to find out which AuthorizationPolicy is blocking the traffic [22].
If logs point to specific failures, you can temporarily increase Envoy's log verbosity by posting to /logging?level=debug on the admin interface (port 15000). This provides detailed insights into connection and routing decisions without requiring a pod restart [18].
Rolling Back and Standardising Updates
When a misconfiguration arises, the ability to quickly roll back changes is crucial. Having predefined procedures in place ensures that reverting to a stable state is a straightforward process.
Rollback Procedures
In Git-based workflows, rolling back is as simple as running git revert HEAD and reapplying the YAML configuration. This approach, as Nawaz Dhandala from OneUptime points out, is highly effective:
The best rollback strategy is keeping all your Istio configuration in Git. When something goes wrong, you just revert to the previous commit.[23]
If an issue like a traffic-blocking AuthorizationPolicy arises, deleting the problematic resource immediately restores functionality. For instance, removing a VirtualService will revert routing to Kubernetes' default round-robin behaviour, while deleting a restrictive AuthorizationPolicy reopens traffic flow [23]. Regularly saving YAML snapshots can also speed up recovery when needed.
Here’s a quick reference for common rollback scenarios:
| Rollback Scenario | Recommended Action |
|---|---|
| VirtualService Error | Reapply the previous YAML or modify selectors [23]. |
| AuthorizationPolicy Lockout | Delete the policy immediately to restore traffic flow [23]. |
| mTLS Connectivity Break | Revert PeerAuthentication to PERMISSIVE mode to allow both mTLS and plaintext [23]. |
| Bulk Config Failure | Use GitOps tools like Argo CD or Flux to sync the namespace to a previous Git hash [23]. |
Every team should also establish and document a break glass
procedure. This is a clear, step-by-step guide that any engineer can follow during an emergency, eliminating the need to search for context [23] [10].
These rollback strategies lay the groundwork for stronger configuration management.
Implementing Governance
Uncontrolled, direct configuration changes to clusters are a frequent cause of drift and outages. To avoid this, centralise service mesh manifests in Git and use GitOps tools like Argo CD or Flux. This approach helps prevent unauthorised, ad hoc changes that can lead to instability [24] [10].
For better oversight, use Git CODEOWNERS files to manage review responsibilities. For example, configure them so that changes to shared, mesh-wide configurations (like base/mesh-config.yaml) require approval from the platform team. Namespace-specific updates can be routed to the respective application teams [10]. Combining this with tiered risk categorisation - where high-risk updates (e.g., changes to mesh-wide mTLS or EnvoyFilters) are scheduled during maintenance windows - ensures a balanced process that doesn’t slow down lower-risk updates [10].
If an emergency necessitates bypassing GitOps with direct kubectl commands, document the action as part of the break glass
procedure. Review and synchronise these changes with Git within 24 hours to avoid configuration drift [10].
When to Standardise Across Environments
Standardising configurations helps maintain consistency across environments, which is especially important in multi-cluster setups. Differences in retry, timeout, or circuit breaker settings can result in cascading failures during periods of database or network instability [27]. Diverging configurations between staging and production environments also complicate debugging and incident resolution.
A clear sign that standardisation is needed is when managing multi-cluster or hybrid cloud setups. Configuration drift in such cases can cause subtle bugs that are difficult to reproduce. Using control plane revisions, such as labelling namespaces with istio.io/rev=canary, allows teams to run multiple control planes simultaneously. This setup enables a gradual migration of workloads by simply updating namespace labels and restarting pods. Rolling back is as easy as reverting the label [26]. This canary upgrade method is far safer than in-place updates, which affect all workloads at once and may require a complete uninstall to undo [25].
To avoid deployment issues, integrate istioctl analyze -f <file> into your CI pipeline for pre-deployment validation [23].
Conclusion
Key Lessons
Successfully managing service mesh configurations boils down to a few essential principles. First, keeping all configurations under version control and using GitOps workflows ensures your mesh remains auditable, reproducible, and easy to recover. A multi-layered validation process is equally important: running istioctl analyze in your CI pipeline, using admission controllers during deployment, and leveraging istiod for post-deployment monitoring provide three layers of protection. Observability tools also play a crucial role, helping to identify issues like timeout mismatches and routing errors that static checks might overlook.
When it comes to traffic management, the make-before-break
principle is key to avoiding 503 errors during updates. On the security front, enforcing zero-trust principles with STRICT mTLS and detailed AuthorizationPolicy rules ensures a consistent and secure mesh setup. Together, these practices lay the groundwork for actionable improvements.
Next Steps
To put these lessons into practice, start by aligning your current processes with these recommendations. Conduct a thorough audit of your workflow: move any mesh configurations not already under version control into Git, integrate istioctl analyze --use-kube=false into your pre-merge pipeline, and set up sync waves in your GitOps tooling to maintain proper resource ordering. Use the exportTo: "." field to limit configuration visibility to the local namespace. If you're using a managed platform like Azure Kubernetes Service, consider revision-specific shared ConfigMaps to ensure your settings persist through managed reconciliations. [2]
A consistent and disciplined approach to configuration management is what distinguishes stable, reliable production meshes from those that are prone to failure. For guidance on implementing these workflows - from GitOps integration to optimising cloud infrastructure - Hokstad Consulting offers expertise in DevOps transformation and automation.
FAQs
Which service mesh settings are the riskiest to change?
When it comes to service mesh configurations, core mesh-wide settings - like those in MeshConfig - are among the riskiest to modify. These settings govern critical aspects such as proxy behaviour, traffic policies, and security features like mutual TLS (mTLS). A single misstep here can lead to service outages, traffic misrouting, or even security vulnerabilities.
Adjustments to features like access logging, tracing, or traffic management policies should never be taken lightly. Always test such changes thoroughly in a staging environment first. Skipping this step could result in issues like HTTP 503 errors or weakened security measures.
How can I test Istio configuration safely before it hits production?
To ensure Istio configurations are safe before deployment, start with tools like istioctl analyze. This tool performs static analysis, helping you spot potential problems early in the process. Another useful approach is running dry-run validations using kubectl with the --dry-run=server flag. This checks for schema and semantic errors without applying changes.
For a more robust testing workflow, adopt a change management process. Use Git to track changes, implement pull requests for reviews, and include CI/CD validation steps. These practices help catch issues before they reach production, minimising the chances of misconfigurations or service disruptions.
What’s the fastest way to roll back a broken mesh change?
The fastest way to undo a problematic mesh change is by reapplying a previously saved configuration using a YAML file:
kubectl apply -f old-virtualservice.yaml
If the resource is still active, you can also manually edit it to return to a stable version:
kubectl edit virtualservice my-vs -n my-namespace
For Istio, if versioning was set up in advance, you can also revert to the last applied configuration using kubectl.