
In Kubernetes, Resource Quotas are tools to control resource usage in a cluster. They prevent teams or applications from consuming excessive resources, ensuring fair distribution and avoiding unexpected costs. Quotas are set at the namespace level and can limit CPU, memory, storage, and object counts (e.g., pods, services). If a workload exceeds its quota, Kubernetes blocks the request, maintaining stability and predictability.
Key points:
- Types of quotas: Compute (CPU, memory), storage (disk, PVCs), and object counts (pods, services).
- Enforcement: Quotas are applied during resource creation. Violations result in a
403 Forbiddenerror. - Monitoring: Tools like Prometheus can track usage, alerting teams when nearing limits.
- Best practices: Pair quotas with LimitRanges, reserve resources for system components, and review usage regularly.
Quotas are essential for cost control, preventing overuse, and ensuring efficient resource allocation in shared Kubernetes environments.
How Resource Quotas Work in Kubernetes
::: @figure 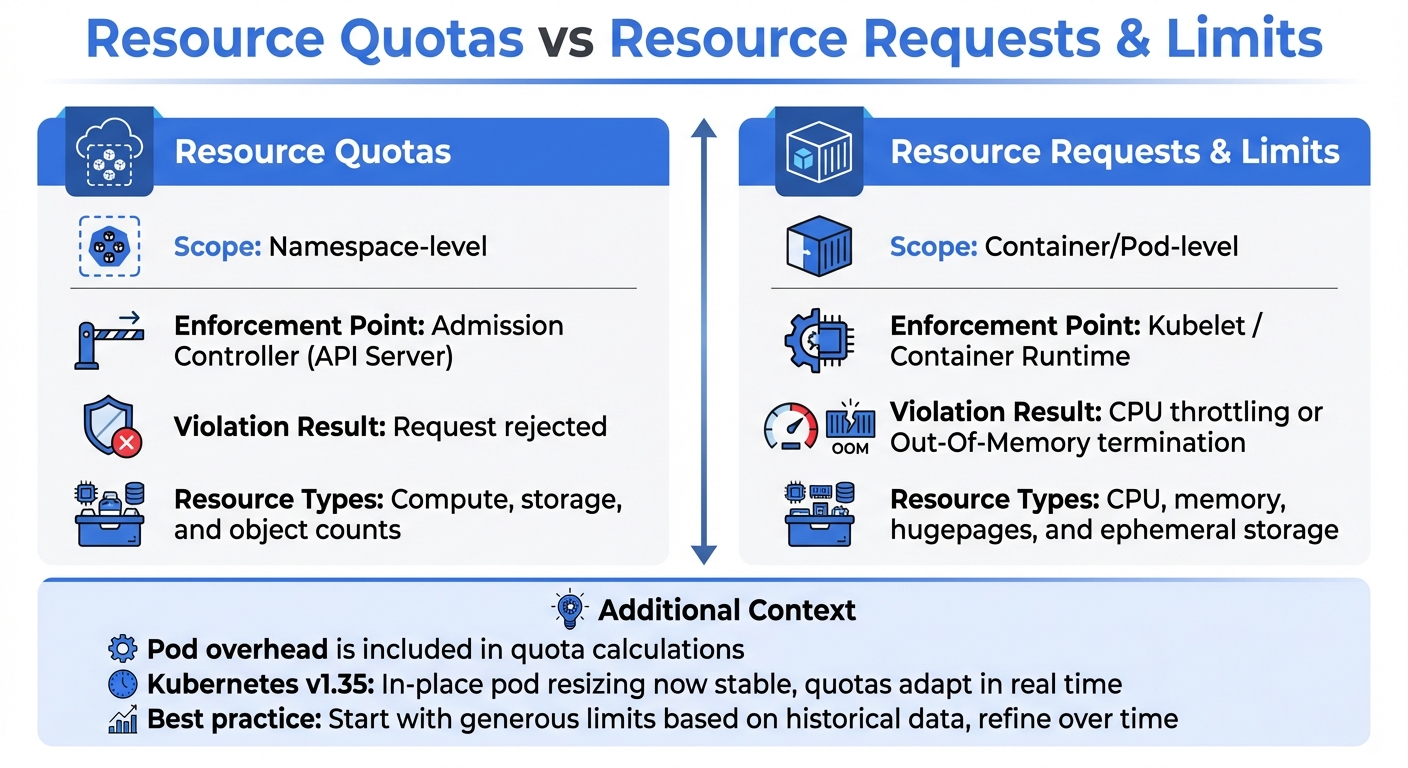 {Resource Quotas vs Resource Requests and Limits in Kubernetes}
:::
{Resource Quotas vs Resource Requests and Limits in Kubernetes}
:::
What Are Resource Quotas?
In Kubernetes, resource quotas are defined through ResourceQuota objects, which set strict limits on the total resources a namespace can use. These limits are enforced during the admission control phase. If a request exceeds the defined quota for a namespace, it is denied outright [1].
The system continuously monitors all active pod requests and limits within a namespace, ensuring they stay within the specified boundaries. Importantly, these quotas are fixed values and do not scale automatically when more nodes are added to the cluster [1]. Administrators are responsible for assigning specific portions of the cluster's overall resources to each namespace [1].
When compute resource quotas are in place, Kubernetes requires that pods explicitly define resource requests or limits. If these are missing, administrators can use LimitRange objects to set default values. They can also restrict changes using tools like RBAC or ValidatingAdmissionPolicy [1]. By enforcing these rules, Kubernetes helps maintain predictable resource distribution and prevents unexpected costs across different workloads.
This framework offers a foundation for understanding how quotas differ from per-pod resource requests and limits.
Resource Quotas vs Resource Requests and Limits
Understanding the distinction between resource quotas and resource requests and limits is crucial for managing resources effectively. While both mechanisms aim to control resource usage, they operate at different levels. Resource quotas function at the namespace level, defining overall limits, whereas resource requests and limits are tied to individual containers or pods. Quotas are enforced during resource creation by the admission controller, while the kubelet and container runtime manage requests and limits during runtime [1].
Here’s a breakdown of their key differences:
| Feature | Resource Quotas | Resource Requests & Limits |
|---|---|---|
| Scope | Namespace-level [1] | Container/Pod-level |
| Enforcement Point | Admission Controller (API Server) [1] | Kubelet / Container Runtime |
| Violation Result | Request rejected | CPU throttling or Out-Of-Memory termination |
| Resource Types | Compute, storage, and object counts [1] | CPU, memory, hugepages, and ephemeral storage |
The quota system also takes into account pod overhead - the extra resources required by the pod infrastructure - when calculating total usage [7]. With Kubernetes v1.35, the feature for in-place pod resizing became stable, meaning quotas now adapt in real time to resized pod values [6]. To strike a balance between resource availability and cost efficiency, administrators are advised to start with generous limits based on historical data and gradually refine them over time [5].
Need help optimizing your cloud costs?
Get expert advice on how to reduce your cloud expenses without sacrificing performance.
Types of Resources Managed by Quotas
Managing Kubernetes clusters effectively means keeping a close eye on resource-specific quotas. These quotas fall into three main categories: compute, storage, and object counts. Together, they help control costs, maintain stability, and prevent unexpected resource overuse.
Compute Resources: CPU and Memory
Compute quotas are all about managing how CPU and memory are allocated. They set hard limits on the requests and limits for these resources across all pods in a namespace [4][1]. In Kubernetes, 1 CPU unit equals one physical or virtual core, with requests as precise as 1m (one-thousandth of a CPU) [8].
Here’s how it works:
-
requests.cpu: Defines the total CPU requested by pods. -
limits.cpu: Sets the maximum CPU available, allowing for bursts beyond requests. -
requests.memory: Caps the memory requested by pods. -
limits.memory: Establishes the upper memory limit, enforced by the kernel through out-of-memory kills if exceeded.
To make compute quotas effective, use them alongside a LimitRange. This ensures default requests and limits are applied to pods without explicit specifications. Without this setup, pods lacking resource definitions will be rejected [1][5][9]. For added control, consider scoped quotas such as the BestEffort scope, which separates pods with minimal resource guarantees from those with defined allocations [5][2].
Storage Resources
Storage quotas manage the total storage requested across all Persistent Volume Claims (PVCs) in a namespace using the requests.storage parameter [10][1]. Administrators can also limit the number of PVCs to keep costs in check and balance the cluster load [10][2].
Quotas can be applied to specific storage classes, allowing stricter limits on high-performance storage while being more lenient with standard options [1][5]. For example, you might set tighter quotas on premium storage to encourage teams to use cost-effective tiers for less critical data [5][3].
A limit range can put a ceiling on how much storage is requested while a resource quota can effectively cap the storage consumed by a namespace through claim counts and cumulative storage capacity.- Kubernetes Documentation [10]
Ephemeral storage is also covered by quotas, using requests.ephemeral-storage and limits.ephemeral-storage [1]. If you're using a CRI container runtime, remember that container logs count against this quota, which could lead to pod evictions [1]. Additionally, keep in mind that AWS EBS volumes require a minimum size of 1Gi, which should guide your minimum storage limits in a LimitRange [10].
Object Counts
Object count quotas limit the number of specific API resources in a namespace, such as pods, services, configmaps, secrets, and PVCs [1][5]. This helps protect the API server and etcd from overload, as too many objects can degrade cluster performance and increase management costs [1][3].
One of the most cost-sensitive objects is services.loadbalancers. Each LoadBalancer-type service typically incurs a separate fee from cloud providers, so setting low limits in development or staging environments can prevent unnecessary expenses [5][9].
The pods quota, on the other hand, counts only non-terminal pods - those still running or pending. Once a pod completes or fails, it no longer counts against the quota [1]. Quotas are enforced at the time of resource creation. If a request exceeds the set limits, the API server rejects it with a 403 Forbidden error, stopping cost spikes before they happen [1][5].
Next, we’ll look at how to configure resource quotas effectively based on these metrics.
Setting Appropriate Resource Quotas
When managing Kubernetes resources, setting quotas effectively is key to balancing costs and operational flexibility. These quotas should reflect workload needs, the environment type, and the capacity of your cluster. Done right, they support cost control and align with Kubernetes cost management practices.
Factors to Consider When Setting Quotas
Start by analysing the characteristics of your workloads. For example, CPU-heavy tasks like video encoding or data processing have different needs compared to memory-intensive applications such as caching systems or in-memory databases. Similarly, microservices architectures often require higher quotas for objects like pods and services compared to monolithic applications [2].
Next, think about the environment type. Production environments typically demand stricter quotas to ensure stability and predictability, while development and testing setups can operate with more relaxed limits [2]. The importance of the application also matters - critical services should have more headroom and priority access, while less essential workloads can run under tighter constraints to encourage efficient resource use [2].
One important thing to note: quotas remain fixed, even when clusters scale [1].
| Benefit | Drawback |
|---|---|
| Cost Control: Prevents unexpected expenses | Setup Complexity: Requires careful configuration |
| Predictable Spending: Aids in budget planning | Throttling Risk: Tight quotas can hurt performance |
| Resource Efficiency: Encourages right-sizing | Operational Overhead: Managing quotas across namespaces takes time |
Begin by monitoring actual usage. Set quotas with higher limits initially, then adjust based on observed patterns [2]. Pair quotas with LimitRange objects to ensure containers without specified limits are accounted for, making it easier to track and manage resource usage [1][2].
By combining these strategies with robust monitoring tools, you can create quotas that reflect the real-world demands of your workloads.
Using Monitoring Tools for Quota Planning
Monitoring tools like Prometheus and kube-state-metrics are invaluable for setting and fine-tuning quotas. These tools provide detailed insights into the gap between current usage and set limits, helping teams make informed decisions [11][3]. For instance, kube-state-metrics exposes kube_resourcequota metrics, which allow you to compare hard limits with actual usage [11].
Set alerts for when usage hits 80% and 100% of the quota. This ensures teams have enough time to optimise workloads or request quota increases before deployments are impacted [11][3]. Additionally, monitoring growth rates is crucial. Use the PromQL formula (hard - used) / rate(used[1h]) to estimate how many hours remain before the quota is exhausted, based on current trends [11].
| Metric Name | PromQL / Source | Purpose in Resource Planning |
|---|---|---|
| Quota Usage % | (kube_resourcequota{type="used"} / kube_resourcequota{type="hard"}) * 100 |
Identifies namespaces nearing their limits [11] |
| Quota Growth Rate | rate(kube_resourcequota{type="used"}[1h]) |
Predicts resource needs based on consumption speed [11] |
| Remaining Budget | kube_resourcequota{type="hard"} - kube_resourcequota{type="used"} |
Shows available resources for new deployments [11] |
Don’t forget to account for hidden resource consumers. Elements like DaemonSets, monitoring agents, and sidecar containers also use resources within namespace quotas, but they’re often overlooked during planning [5]. Monitoring tools can help track these consumers, enabling better allocation. For example, you can apply stricter quotas on costly resources while being more lenient with less critical ones [1][5].
With these insights, you can adjust quotas proactively, ensuring they align with your cost management goals and operational requirements.
Best Practices for Implementing Resource Quotas
Managing costs in Kubernetes effectively comes down to setting up resource quotas correctly. Follow these practices to ensure quotas are efficient without affecting performance.
Configuring and Applying Quotas
Resource quotas are set at the namespace level, placing strict limits on total usage of CPU, memory, storage, and object counts. To implement them, define the quotas in YAML files and apply them using kubectl apply. For CPU and memory quotas, ensure each pod in the namespace specifies requests or limits; otherwise, pod creation may fail. Use kubectl describe resourcequota to monitor real-time usage and check how close teams are to their limits.
Start with more generous quotas. Tools like Prometheus and Grafana can help track actual resource usage over a few weeks, giving you a clear picture before tightening restrictions. Consider tiered quotas - critical applications should have larger buffers, while development environments can operate with stricter limits to encourage resource efficiency. Keep in mind, quotas are not tied to cluster capacity; adding nodes won’t automatically increase namespace quotas. To fine-tune resource allocation further, pair these quotas with LimitRanges.
Combining Quotas with LimitRanges
LimitRanges complement resource quotas by setting constraints on individual pods and containers. While ResourceQuotas manage the total budget
for a namespace, LimitRanges focus on individual resources.
LimitRanges can provide default values for pods that don’t define their own resource requests or limits, preventing them from being rejected by the admission controller. Always pair ResourceQuotas with a LimitRange to avoid issues with pod creation [12] [2].
Additionally, LimitRanges can define a maxLimitRequestRatio, which limits how much higher a container’s limit can be compared to its request. This prevents scenarios where teams set very low requests to fit more pods but assign excessively high limits, potentially destabilising nodes [12] [2]. Together, ResourceQuotas and LimitRanges ensure fair resource distribution, preventing any single application from overusing the allocated resources.
Monitoring and Adjusting Quotas
Once quotas are set, ongoing monitoring is essential. Changes to quotas don’t affect existing pods; enforcement only applies at admission time [1] [5].
Use tools like kube-state-metrics with Prometheus and Grafana to track resource usage, identify patterns, and make timely adjustments [5] [2]. Self-service dashboards can help teams monitor their consumption and avoid deployment issues. Regular reviews - quarterly, for instance - can help identify wasted resources and resolve bottlenecks. For emergencies or traffic spikes, have a documented process for temporary quota increases, including automatic rollback dates [2].
When setting quotas, reserve space for system-level components like DaemonSets, monitoring agents, and sidecar injectors [5]. Also, plan ahead for busy periods, such as holiday sales for e-commerce platforms, to ensure quotas can handle the increased load. This prevents issues like the Horizontal Pod Autoscaler failing due to quota exhaustion.
Resource Quotas in Multi-Tenant Environments
Managing resource quotas becomes even more critical in multi-tenant environments, where multiple teams share a single infrastructure. These quotas are essential for keeping costs under control and ensuring that no single team consumes more than its fair share of resources. Without such measures, one team's uncontrolled deployment could deplete the cluster's capacity, leaving others unable to run their applications.
As noted in the Kubernetes documentation:
Resource quotas are a tool for administrators to address the concern that one team could use more than its fair share of resources [1].
Resource quotas work by enforcing limits at the namespace level. The admission controller actively blocks requests that exceed these limits [1]. This mechanism prevents noisy neighbours
from hogging resources and ensures equitable access for all tenants.
To streamline management across multiple namespaces, many organisations use tiered quota templates. This approach not only guarantees fair resource allocation but also aligns with cost management strategies, treating quotas as infrastructure budgets. Scoped quotas can further refine control, limiting access to high-priority resources and curbing overuse.
Object count quotas also play a vital role in protecting the control plane. For instance, limiting the creation of services.loadbalancers can help control cloud costs, as each load balancer typically incurs additional provider charges. Similarly, by setting distinct quotas for different storage classes - like costly SSDs versus more economical HDDs - teams are encouraged to make budget-friendly choices.
To ensure smooth operations, it's a good practice to set quotas 20–30% above steady-state resource requirements. This buffer accommodates rolling updates, where both old and new pods may temporarily coexist. Additionally, configure alerts for when usage reaches 80% of quota limits, giving teams time to adjust their usage or request more resources before hitting critical thresholds [13]. Starting with generous limits based on actual usage data and gradually tightening them over time can also prevent unnecessary disruptions.
These strategies form the backbone of resource management in multi-tenant environments, laying the groundwork for broader cost management practices, which will be discussed in the next section.
Resource Quotas in Cost Optimisation Strategy
Resource quotas play a crucial role in managing costs by enforcing limits on the consumption of CPU, memory, storage, and object counts. By capping usage at the namespace level, quotas ensure that no single namespace can dominate resources, promoting fairness and efficiency across workloads [1][3]. This approach compels development teams to carefully assess and define their resource requirements, leading to better-sized workloads and avoiding over-provisioning. It also ties seamlessly into dynamic scaling policies, further driving cost efficiency.
Integrating Quotas with Autoscaling Policies
When paired with autoscaling, quotas can help maintain a balance between resource efficiency and performance - provided they are configured with enough headroom. For example, the Horizontal Pod Autoscaler (HPA) requires sufficient quota space to spin up additional replicas during traffic surges. Without this buffer, pod creation may fail, even if physical capacity is available [2]. To avoid such scenarios, it’s essential to combine quotas with default resource definitions that allow room for scaling.
A tiered approach to namespaces can provide flexibility while maintaining control. For instance, production namespaces might have more generous quotas to accommodate autoscaling needs, whereas development and testing environments operate under stricter limits [2]. For cost-sensitive workloads, combining HPA with spot instances can reduce compute expenses by as much as 70–90% [14]. Additionally, the Vertical Pod Autoscaler (VPA) can dynamically adjust CPU and memory requests, aligning them with actual usage patterns [14]. This ensures that quotas reflect real-world needs rather than guesswork, making scaling not only more efficient but also more cost-conscious.
Cost Anomaly Detection and Right-Sizing
Quotas act as a built-in mechanism for detecting cost anomalies. If a namespace frequently nears its quota limits, it could indicate either legitimate growth that warrants budget adjustments or inefficient resource usage that needs attention. By monitoring quota usage, teams can uncover oversized deployments or redundant replicas that inflate costs unnecessarily. The hard limits imposed by quotas turn abstract cost concerns into tangible constraints, prompting teams to optimise their resource allocation proactively. This not only keeps costs in check but also encourages a culture of accountability and efficiency.
Conclusion
Effective quota management plays a key role in controlling Kubernetes costs. Resource quotas act as namespace-level safeguards, restricting resource usage to prevent overspending and ensure fair distribution within a cluster. By setting limits on CPU, memory, storage, and object counts, these quotas translate cost concerns into enforceable boundaries that teams must respect. They work in real time, automatically rejecting resource requests that exceed the defined limits, making governance seamless and practical.
The advantages extend beyond simple cost control. Quotas support precise budget planning and enable chargeback models, directly linking resource usage to specific teams or projects. They discourage over-allocation and prevent teams from hoarding resources. In shared environments, quotas protect critical production workloads from being disrupted by development or testing activities. They also shield the control plane from being overwhelmed by excessive object creation, ensuring stability and fairness across all users.
A practical approach is to start with generous quotas based on the past 30 days of usage data, gradually tightening them as teams refine their processes. Pairing quotas with LimitRanges helps set default resource requests for pods that lack specified limits. To stay proactive, set alerts at 80% usage and review quotas quarterly to keep up with changing requirements.
The operational cost of implementing quotas is minimal - the API server adds just a few milliseconds of latency during resource creation. However, the benefits are substantial: reduced gaps between allocated and actual usage, fewer unexpected cloud expenses, and a culture of accountability around resource consumption. When combined with monitoring and autoscaling, quotas form the foundation of a cost-management strategy that balances efficiency with performance, aligning with best practices in DevOps and cloud resource management.
FAQs
How do I pick the right quota values per namespace?
To set suitable quota values for a Kubernetes namespace, begin by assessing the resource demands and usage patterns of its workloads. Use a ResourceQuota object to define limits on resources like CPU, memory, or the number of objects. Start with practical limits that align with the workload's needs, and adjust them over time based on data from monitoring tools. This approach ensures better resource allocation, avoids overconsumption, and helps control costs.
Why did my deployment fail with a 403 Forbidden quota error?
A 403 Forbidden quota error happens when your namespace surpasses its allocated resource quota. This prevents you from creating or updating resources such as pods or services. To fix this, review the quotas set for your namespace and either reduce resource usage or adjust the limits accordingly.
How can I stop quotas breaking autoscaling during traffic spikes?
To ensure autoscaling operates smoothly during sudden traffic surges, it's essential to configure resource quotas thoughtfully and incorporate stabilisation mechanisms. Use stabilisation windows and cooldown periods to help balance scaling decisions, avoiding unpredictable or erratic adjustments.
Make sure resource requests and limits are clearly defined, with enough buffer space to allow autoscaling to function effectively. Additionally, review and fine-tune quotas regularly to align with traffic trends while keeping costs manageable and maintaining operational flexibility.