
FluxCD simplifies Kubernetes deployments by using GitOps to keep your clusters in sync with your Git repository. This guide explains how to integrate FluxCD into your CI/CD workflows to streamline deployments, improve security, and reduce manual effort.
Key Points:
- FluxCD Basics: It uses a pull-based model to monitor Git repositories, OCI artefacts, and Helm charts for changes, ensuring the desired state matches the actual state of your cluster.
- Why Integrate with CI/CD: CI handles building and testing, while FluxCD manages deployments, reducing security risks and improving workflow clarity.
- Setup Steps:
- Prepare a Kubernetes cluster with outbound network access.
- Install the Flux CLI and bootstrap FluxCD to your Git repository.
- Configure secure Git access (SSH or tokens) and CI variables for registries.
- Install FluxCD controllers and verify the setup.
- Automation: Use FluxCD’s image automation features to detect new container images and update manifests automatically.
- Monitoring and Validation: Test workflows, monitor deployments, and troubleshoot issues using Flux commands and logs.
With FluxCD, you can separate CI from deployments, automate updates, and maintain security by limiting direct access to production clusters. This approach ensures a reliable and scalable workflow for Kubernetes environments.
::: @figure 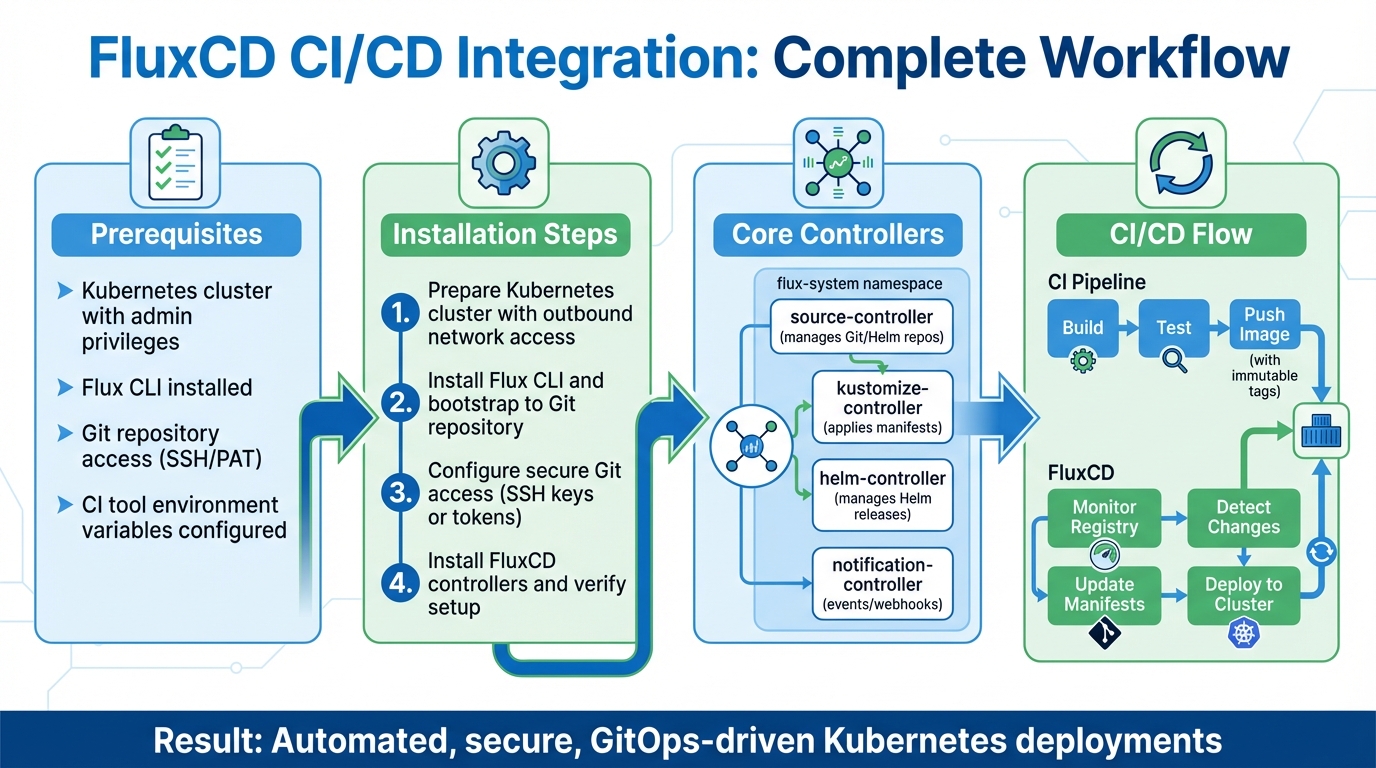 {FluxCD CI/CD Integration Workflow: 4-Step Setup Process}
:::
{FluxCD CI/CD Integration Workflow: 4-Step Setup Process}
:::
Building with FluxCD and Kubernetes | GitOps Principles Explained in Action
Prerequisites for FluxCD and CI/CD Integration
Before integrating FluxCD with your CI/CD pipeline, you'll need to establish a few key components. These steps ensure the necessary infrastructure and permissions are in place for a seamless deployment process. Once you've completed these, you can move on to installing and setting up FluxCD.
Setting Up a Kubernetes Cluster
Start by setting up a Kubernetes cluster, ensuring you have administrative privileges for the user managing the FluxCD installation. FluxCD supports specific Kubernetes versions, so make sure you're using a compatible one. For example, version 1.32 requires at least 1.32.0, while version 1.34 and above need 1.34.1 or later [3]. To confirm your setup meets the requirements, run the command flux check --pre, which checks version compatibility, network settings, and permissions.
If you're testing locally, tools like kind or minikube can help you quickly spin up a cluster. Also, ensure that your cluster has outbound network access to your Git provider and container registry. This is essential for synchronising manifests and scanning image tags.
Installing the Flux CLI
Next, install the Flux CLI, which works alongside kubectl to interact with your cluster. The CLI simplifies the initial setup by automating tasks such as creating Git repositories, installing Flux controllers in the flux-system namespace, and configuring synchronisation. The bootstrap command is idempotent, meaning you can rerun it to update or fix configurations without issues. This tool is critical for managing FluxCD and integrating it with your CI/CD workflows.
Configuring Git Repository Access
You'll need to set up secure Git access for FluxCD using either SSH keys or Personal Access Tokens (PATs). For SSH-based authentication, generate a key pair and add the public key to your Git provider (e.g., GitHub, GitLab, Bitbucket, or Azure DevOps). Then, provide the private key to Flux [4]. If you're using image automation features, make sure to enable the Allow write access
option on your deploy key, allowing Flux to commit updated image tags back to the repository.
Alternatively, you can use token-based authentication via HTTPS. This can be configured during the bootstrap process with the --token-auth flag [6]. Keep in mind that GitHub now requires either PATs or SSH keys for Git operations [5]. Proper configuration ensures FluxCD can continuously monitor and synchronise your cluster state with your Git repository.
CI Tool Access
Finally, configure your CI tools with secure environment variables, such as DOCKERHUB_TOKEN and GITHUB_TOKEN. Use dedicated service accounts or bot
accounts with minimal permissions to push images to registries and access Git repositories. For Kubernetes clusters, ensure a docker-registry secret is created, allowing the cluster to pull images from private registries. By limiting privileges to what's strictly necessary, you can maintain a secure and efficient setup.
Installing and Configuring FluxCD
Installing FluxCD Controllers
To get started with FluxCD, you’ll need to install its controllers. For production environments, the bootstrap method is highly recommended. This method simplifies the process by installing the controllers, pushing manifests to your Git repository, and setting up automatic synchronisation - all in one command. Essentially, it makes FluxCD self-sufficient.
A typical installation includes four main controllers deployed in the flux-system namespace:
- source-controller: Manages Git and Helm repositories.
- kustomize-controller: Applies Kustomize manifests.
- helm-controller: Oversees Helm releases.
- notification-controller: Handles events and webhooks.
If you’re planning to automate image updates, you can also enable the image-reflector-controller and image-automation-controller during the bootstrap process.
Bootstrapping FluxCD to Git
The bootstrap process connects FluxCD to your Git repository. Start by exporting your GITHUB_TOKEN and GITHUB_USER environment variables. Then, use the following command to bootstrap FluxCD with your Git provider:
flux bootstrap github --owner=<your-org> --repository=<repo-name> --branch=main --path=clusters/production --personal
The --path flag is crucial for managing multiple clusters within a single repository. For example, you can maintain separate configurations for staging (clusters/staging) and production (clusters/production).
This command does several things automatically: it creates the repository (if it doesn’t exist), generates the necessary manifests, pushes them to your Git repository, and configures a deploy key for synchronisation. If you’re using token-based authentication over HTTPS, you’ll need to include the --token-auth flag.
Verifying FluxCD Installation
Once the installation is complete, verify everything is working as expected. Start by running:
flux check
This ensures that all controllers are installed correctly. Next, confirm that your cluster is synchronising by using:
flux get kustomizations
You should see a Ready
status marked as True
. For a deeper inspection, use:
kubectl get pods -n flux-system
This command lets you check the health of individual pods, ensuring they are all in a Running
state. If you want to monitor synchronisation in real time, use:
flux get kustomizations --watch
This can be especially helpful during the initial setup, allowing you to see how FluxCD applies changes from your Git repository. Once verified, you’re ready to integrate these FluxCD configurations into your CI/CD pipelines.
Need help optimizing your cloud costs?
Get expert advice on how to reduce your cloud expenses without sacrificing performance.
Integrating FluxCD with CI/CD Pipelines
Once FluxCD is installed and verified, the next step is connecting your CI processes with GitOps automation. This setup ensures a clear division of tasks: CI handles building, testing, and pushing container images, while FluxCD takes care of updating Kubernetes manifests. As outlined in the FluxCD documentation:
Flux's only firm requirement for integrating with CI is for the CI to build and push an image[7].
Building and Pushing Container Images
With FluxCD ready, you’ll need to configure your CI pipelines to build and push container images. A key best practice here is to use immutable tags for your images. Instead of relying on mutable tags like latest or canary, opt for tags that follow a format like ${BRANCH}-${REVISION}-${TIMESTAMP}. For example, a GitHub Actions workflow could generate a tag such as main-a3f5b2c1-1704672000, combining the branch name, commit SHA, and a Unix timestamp [7].
This approach ensures that your tags are both unique and sortable, making it easier for FluxCD to detect and process updates.
Configuring Image Automation in FluxCD
To enable automatic updates in FluxCD, you’ll need to configure three key Custom Resource Definitions (CRDs): ImageRepository, ImagePolicy, and ImageUpdateAutomation. Here’s how each one works:
- ImageRepository: Scans your container registry at defined intervals (e.g., every five minutes) to look for new image tags.
- ImagePolicy: Filters tags based on specified rules, such as Semantic Versioning (SemVer), alphabetical or numerical order, or custom regular expressions.
- ImageUpdateAutomation: Clones your Git repository, updates the manifests with the new tag, and commits the changes back.
To ensure FluxCD updates the correct fields in your manifests, include inline comments in your YAML files. For example:
image: ghcr.io/example/app:1.0.0 # {"$imagepolicy": "flux-system:podinfo"}
Here’s a practical example: an Nginx application pinned to version 1.0.0 was automatically updated to 1.2.0 after FluxCD detected a new tag in the registry, applied a policy filter (e.g., selecting tags that match 1.x.0), and committed the updated manifest to the main branch [1].
Make sure your Git deploy key or token has write access so the automation controller can push updates. For registry authentication, it’s recommended to use native cloud provider credentials (like AWS, Azure, or GCP) to avoid manually managing Kubernetes secrets [8].
Triggering Flux Reconciliation
Once image automation is configured, it’s important to ensure FluxCD reconciles changes without delay. By default, FluxCD polls your Git repository and container registry at set intervals. To make your pull-based pipeline as responsive as a push-based one, use webhook receivers.
Expose the webhook-receiver (port 9292) via a LoadBalancer or Ingress, and configure webhooks in GitHub, GitLab, or your container registry to notify FluxCD immediately when changes occur [2].
If you need to trigger reconciliation manually, you can use the following command:
flux reconcile image update <automation-name>
In case of an incident, you can pause automated deployments temporarily by running:
flux suspend image update <name>
For organisations aiming to refine their CI/CD pipelines, expert guidance from Hokstad Consulting can help optimise DevOps workflows and cloud infrastructure.
Testing and Validating the Integration
Once you've successfully installed and integrated FluxCD into your system, it's crucial to validate the setup. This ensures your deployment workflow operates smoothly. After connecting FluxCD to your CI/CD pipeline, start by running flux check --pre and flux check. These commands help verify the health of your controllers and confirm that everything is functioning as expected. The goal here is to ensure the desired state in Git stays aligned with your live environment, a core principle of GitOps.
Running End-to-End Tests
To test the entire workflow, push a new container image through your CI pipeline and monitor how FluxCD processes the update. Use flux get image repository and flux get image policy to check if the ImageRepository and ImagePolicy resources correctly detect the new tag. If you want to speed up the process, you can trigger immediate reconciliation using flux reconcile kustomization <name> --with-source.
Before changes are applied to your cluster, preview them with flux diff kustomization. This command shows exactly what FluxCD plans to implement, making it easier to spot configuration errors or detect drift early. These tests act as a bridge between the initial setup and the ongoing monitoring of your system.
Monitoring Deployment Outcomes
Set up the Notification Controller to send alerts via platforms like Slack, Discord, or Microsoft Teams. These notifications provide real-time updates on deployment status, allowing developers to receive feedback quickly. You can also configure Git commit status providers to show visual indicators - such as green checkmarks or red crosses - next to commit hashes in tools like GitHub, GitLab, Bitbucket, or Azure DevOps. This feedback loop keeps developers informed without requiring direct access to the cluster.
Additionally, include healthChecks in your Kustomization or HelmRelease manifests. This ensures FluxCD waits for workloads to become fully operational before marking the deployment as successful [10].
Troubleshooting Common Issues
Some of the most frequent issues arise from network policy restrictions in the flux-system namespace. These restrictions can block webhook notifications or cert-manager ACME challenges unless explicitly allowed. Authentication problems often stem from incorrect SSH keys or personal access tokens, while secret decryption errors may occur if the controller lacks access to necessary KMS or PGP keys.
If reconciliation fails, check the logs using flux logs --kind=Kustomization or inspect Flux custom resources with kubectl describe. You can also suspend and resume deployments to troubleshoot further. Keep in mind that FluxCD automatically reverts any manual changes made with kubectl edit back to the Git-defined state during the next reconciliation cycle. This reconciliation process may take up to twice the value defined in spec.timeout [9]. Addressing these issues promptly helps maintain the efficiency of your CI/CD workflows.
Conclusion
Bringing FluxCD into your CI/CD pipelines creates a well-defined separation of responsibilities, enhancing your deployment process. While CI tools like Jenkins or GitHub Actions focus on building and testing artefacts, Flux takes charge of continuous delivery to your Kubernetes cluster. This setup eliminates the need for CI systems to directly access production environments, reducing potential security vulnerabilities.
Flux's pull-based approach changes the way deployments work by pulling updates from Git repositories. This not only enforces least privilege but also ensures any unauthorised manual changes are automatically rolled back.
With Git acting as your single source of truth, you gain full traceability. Every deployment is logged in your Git history, making compliance checks and troubleshooting much easier. Flux also supports automated image updates using SemVer policies, allowing it to monitor container registries and apply patches automatically. This keeps your applications updated with critical security fixes without requiring manual input.
For production environments, consider adopting pull-request workflows. Configure your CI/CD pipelines to generate pull requests against your GitOps repository, enabling manual reviews before Flux applies the changes. Using separate repositories for application source code and GitOps configurations adds another layer of security and allows for independent permission management. These workflows work seamlessly alongside automated image updates, creating a robust GitOps process. In emergencies, the flux suspend command can temporarily halt Flux, giving you the flexibility to implement urgent fixes.
This approach results in a scalable, repeatable deployment process. By using declarative artefacts like YAML, Helm charts, or Kustomize overlays, Flux ensures consistent deployments across staging and production environments. It transforms your DevOps workflow into a fully automated, traceable system built on modern GitOps principles.
If you need help tailoring these GitOps practices to your needs, Hokstad Consulting offers expert guidance to get you there.
FAQs
How does FluxCD enhance security in CI/CD pipelines?
FluxCD improves security in CI/CD pipelines by using a GitOps-driven approach. This approach ensures your Kubernetes cluster stays in sync with a single, version-controlled source of truth, minimising the chances of unauthorised modifications.
Key features like immutable audit trails and signed configuration updates offer transparency into every change. Automated controllers work behind the scenes to continuously reconcile the desired state, effectively preventing manual drift and limiting potential vulnerabilities. This level of automation not only bolsters security but also makes compliance and governance easier to manage.
What do I need to set up FluxCD with a CI/CD pipeline?
To get started with FluxCD in a CI/CD pipeline, there are a few essentials you'll need. First, make sure you have a Kubernetes cluster ready to go, as FluxCD is designed to run directly within Kubernetes environments. You'll also need a Git repository to house your application's configuration and deployment manifests. This is crucial because FluxCD uses GitOps principles to manage and synchronise deployments.
You'll also require a CI/CD tool capable of integrating with both Git and Kubernetes. This tool will handle the testing and building stages of your pipeline, leaving FluxCD to focus on deployments. Lastly, having a basic understanding of Kubernetes concepts, YAML configuration files, and Git workflows will make the setup process much smoother.
How do I automate container image updates with FluxCD?
To keep your container images updated automatically with FluxCD, you can rely on its Image Automation controllers. These controllers keep an eye on your container registry, select the right image tag based on your defined policy, and update your Git repository automatically, ensuring your Kubernetes cluster stays aligned with the latest changes.
To get started, make sure to enable the required controllers when installing Flux. Next, set up these key resources:
- ImageRepository: Tracks your container images.
- ImagePolicy: Defines the rules for selecting tags (e.g., semantic versioning).
- ImageUpdateAutomation: Pushes the updated manifests back to your Git repository.
Once these configurations are in place, Flux will continuously monitor for new images, update the manifests, and trigger deployments without requiring manual input.
For a smoother workflow, consider integrating this process with a CI pipeline. This way, your pipeline can handle building and pushing images, while Flux takes care of applying updates automatically. It’s an efficient way to ensure your Kubernetes workloads stay current with minimal effort.