
Identifying which workloads to migrate first is crucial for minimising risks and maximising benefits during a cloud migration. Here’s a simple guide to get started:
- Understand Critical Workloads: These are IT systems that directly impact revenue, customer satisfaction, or compliance. Downtime here can cause serious disruptions.
- Start Small: Begin with low-risk systems like test environments to refine your migration process before tackling high-priority applications.
- Key Factors: Prioritise workloads based on business impact, dependencies, and performance needs.
- Analyse Your IT Environment: Use tools to assess servers, databases, and applications. Verify findings with experts to catch overlooked details.
- Set Clear Goals: Define why you’re migrating - cost savings, scalability, or performance - and plan accordingly.
- Plan in Phases: Group workloads into manageable waves, starting with simpler systems and progressing to complex, mission-critical ones.
- Engage Stakeholders: Collaborate with IT and business leaders to validate plans, ensuring alignment with organisational priorities.
::: @figure 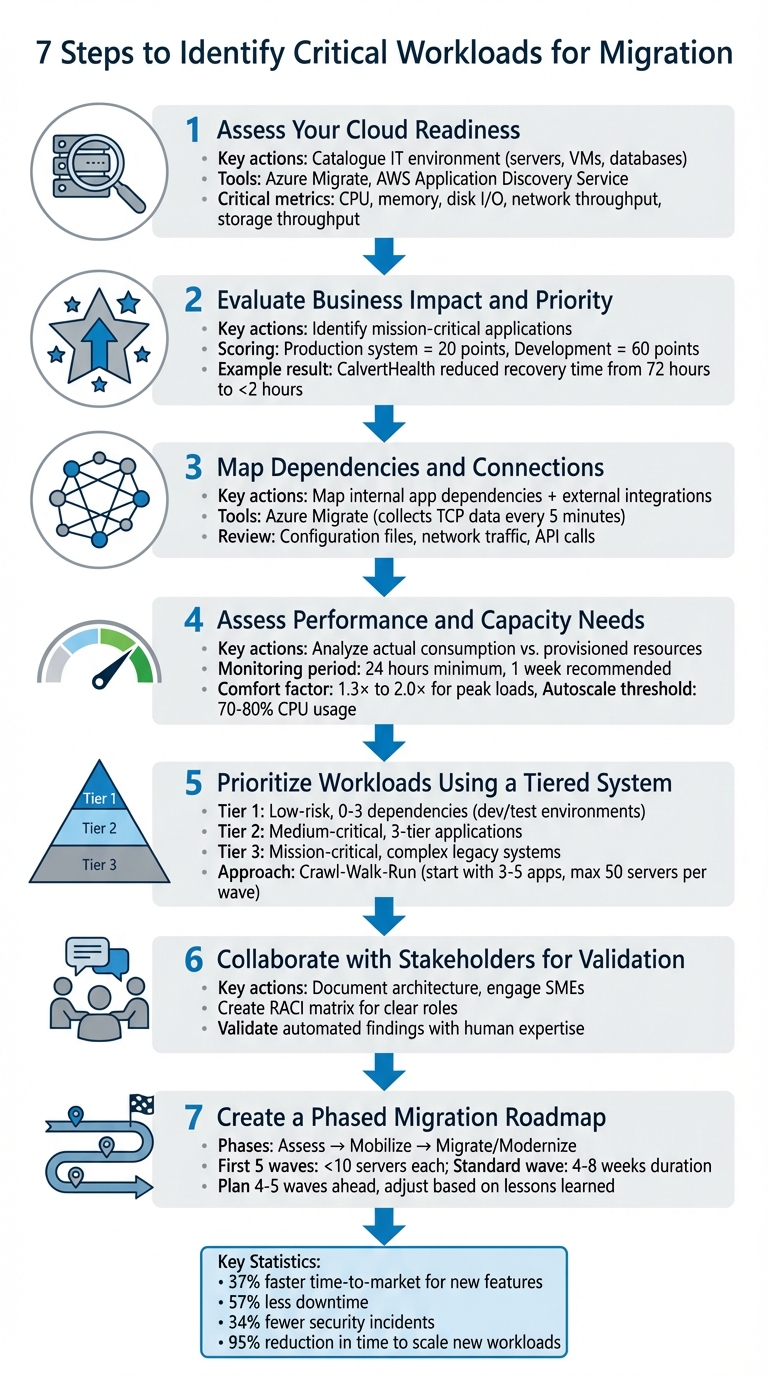 {7-Step Cloud Migration Workload Prioritization Framework}
:::
{7-Step Cloud Migration Workload Prioritization Framework}
:::
How to Plan and Execute a Cloud Migration Project
Step 1: Assess Your Cloud Readiness
Start by cataloguing every element of your IT environment - servers, virtual machines (VMs), databases, and hardware appliances. Automated tools like Azure Migrate, AWS Application Discovery Service, or Google Cloud Migration Centre can speed up this process. However, even these tools can miss important details. Tim Radney, Principal Consultant at SQLskills, highlights one commonly overlooked area:
An area consistently overlooked is storage throughput. This is how much data is read and written to disk... What's critical is to capture the existing workload for storage throughput so you can size the cloud environment properly [4].
To avoid costly mistakes, gather baseline data such as CPU usage, memory consumption, disk I/O, and network throughput. Without this information, you risk over-provisioning resources (leading to unnecessary expenses) or under-provisioning (causing performance issues). This foundational step is crucial for a detailed infrastructure review and goal-setting in subsequent stages.
Review Your Current Infrastructure and Systems
Once you've recognised the need for a full assessment, create a comprehensive inventory of your technical assets. This includes physical servers, VMs, databases, and network appliances like firewalls or NAS devices. Document operating systems, middleware, application frameworks, and software licences to identify compatibility challenges early. For instance, some third-party software licences are tied to physical hardware configurations, such as CPU sockets, which may not translate well to cloud environments.
While automated tools are helpful, they aren't foolproof. Engage subject matter experts to verify findings, as informal integrations or undocumented dependencies often go unnoticed. Conduct interviews or architecture reviews with workload owners to fill in these gaps. Additionally, assess your security setup by listing service accounts, encryption methods, and firewall rules that may need replication or adjustment in the cloud. A deeper performance analysis will follow in later steps.
Define Your Migration Goals
Understanding why you're migrating is key to shaping your decisions. Are you aiming for cost efficiency, better scalability, improved performance, or compliance with regulations? Your objectives will influence workload priorities and the migration strategy you choose. For example, cloud migrations often deliver measurable benefits, such as reducing the time needed to scale new workloads by 95% compared to on-premises setups [6]. If cost is a priority, opting for Throughput Optimised HDD storage can save you around 50% compared to General Purpose SSD options [7].
Your goals also guide your Total Cost of Ownership (TCO) analysis. This should account for more than just hardware and software expenses - include costs for power, cooling, maintenance, and network utilisation. Additionally, establish a risk register to document potential blockers, such as unsupported operating systems or compliance issues, and outline mitigation strategies to keep your migration on track.
A thorough readiness assessment lays the groundwork for a smooth cloud migration. Clear, well-defined goals ensure that every subsequent decision aligns with your organisation's needs. Hokstad Consulting recommends this detailed approach to maximise the value of your migration efforts. With your environment assessed and your objectives set, you're ready to analyse business impacts and dependencies in the next step.
Step 2: Evaluate Business Impact and Priority
After cataloguing your infrastructure and setting your migration goals, the next step is to prioritise workloads based on their influence on your business. Some applications are absolutely critical, while others can endure a bit of disruption. This step helps you rank workloads clearly by their importance to your operations.
Identify Mission-Critical Applications
Mission-critical workloads are those that, if unavailable or performing poorly, could lead to severe financial losses or even safety issues. As the Microsoft Azure Well-Architected Framework puts it:
The term mission-critical refers to a criticality scale that covers significant financial cost (business-critical) or human cost (safety-critical) associated with unavailability or underperformance.[8]
Start by determining which workloads directly impact revenue generation or essential business functions. This often involves speaking with business leaders to understand the processes supported by each workload. For instance, consult your VP of Sales about your CRM system to estimate the potential revenue loss if it were to go offline. Typically, systems that interact with customers rank higher in priority than internal tools.
To make this process more objective, use a structured scoring system. For example, a production system with high business importance might score 20, while a development environment with lower importance might score 60. Don’t forget to account for dependency chains - a workload might not directly face customers but could still be critical if other high-value systems depend on it. Take CalvertHealth as an example: this rural Maryland hospital successfully migrated its disaster recovery site to AWS using AWS Elastic Disaster Recovery and AWS Backup, which reduced its recovery time from 72 hours to less than 2 hours [1].
Once you’ve determined criticality, refine your priorities by assessing each workload’s tolerance for downtime.
Assess Downtime and Migration Risks
Downtime tolerance is just as important as performance metrics when planning your migration. Define Service Level Agreements (SLAs), Recovery Point Objectives (RPOs), and Recovery Time Objectives (RTOs) for each application to establish acceptable levels of availability and data loss. For instance, a financial trading platform might require near-zero downtime, while an internal knowledge base could handle maintenance during off-peak hours.
Document operational constraints, such as maintenance windows, blackout periods, and peak usage times. Migrating during high-traffic periods can disrupt business significantly, so plan for quieter times - like late evenings or weekends - when downtime would have minimal impact. Evaluate whether the complexity and cost of a zero-downtime migration are worth the benefits, or if negotiating a planned maintenance window is a more practical approach.
Create a risk register to track potential challenges for each workload. Include both technical and operational risks, and examine how workloads behave under unusual conditions, like network failures or issues with dependent systems. Establish rollback triggers with clear execution time limits for each migration step. If a step takes too long without success, initiate a pre-planned rollback to restore services quickly and maintain operational continuity.
For additional expert advice on prioritising workloads and ensuring a smooth migration, you can consult specialists like Hokstad Consulting (https://hokstadconsulting.com).
Step 3: Map Dependencies and Connections
Once you've prioritised workloads, the next step is to map out their internal and external connections. This is crucial to avoid downtime and performance hiccups. A well-constructed dependency map not only prevents disruptions but also helps you organise related systems into logical migration phases.
Map Internal Application Dependencies
Start by understanding how your organisation's systems, databases, and applications interconnect. Automated tools can make this process much faster and more accurate than manual approaches. For example, Azure Migrate collects TCP connection data from servers every five minutes, using the migration appliance to process dependency information [10][11].
While automation is a huge help, it's not the whole story. Complement these tools with manual checks to ensure nothing is missed. Dive into configuration files (like XML, JSON, or YAML) to pull out database connection strings, service URLs, and API endpoints [9]. Dynamic analysis, such as monitoring real-time network traffic, database queries, and API calls, can reveal interactions that static methods might miss [9][10]. Don’t forget to sit down with application owners - they can confirm the tool-generated data and highlight undocumented or informal integrations [3].
Once you've gathered the data, group dependencies by their level of importance. Migrate tightly connected dependencies together, while indirect ones can be separated if latency isn't a concern. Also, align systems based on business priorities to ensure organisational goals are met [5].
After mapping internal connections, shift focus to external dependencies to ensure a smooth transition.
Identify External Dependencies
External connections - like third-party services, SaaS platforms, and partner APIs - need just as much attention. Document all upstream and downstream integrations, including messaging systems, ETL processes, authentication mechanisms (like API keys or service accounts), and data exchange patterns. Network traffic monitoring can help uncover active external dependencies by analysing destination IPs, ports, and protocols [9][3].
Before migration, adjust your DNS record TTL to a lower value well in advance. This ensures traffic can be redirected quickly during the cutover. Be wary of client-side DNS caching, which can ignore TTL settings and cause traffic to hit the old environment post-migration. After the cutover, monitor the source environment’s network logs to catch any lingering traffic aimed at retired endpoints. Additionally, review the SLAs of external partner APIs to confirm that your target cloud environment can meet or exceed these requirements.
With both internal and external dependencies thoroughly mapped, you're now prepared to evaluate performance and capacity needs, ensuring your cloud environment is appropriately configured for every workload.
Step 4: Assess Performance and Capacity Needs
To avoid wasting resources or falling short, it's crucial to evaluate each workload's resource usage. Instead of simply copying on-premises allocations, focus on actual consumption to size your cloud environment effectively.
Analyse Workload Performance Metrics
Gather detailed metrics like CPU usage, memory consumption, disk I/O (reads, writes, and IOPS), and network throughput. Ideally, monitor your environment for at least 24 hours, though a full week is better for capturing peak, weekly, and cyclical patterns [13].
Organizations should focus on what their existing workloads need and not just what is currently provisioned.
– Tim Radney, Principal Consultant, SQLskills [12]
On-premises systems often include extra capacity for growth that might never materialise. For instance, a virtual machine with 4 cores operating at 20% and 8 GB of RAM at 10% utilisation could realistically need only about 1.04 cores and 1.04 GB of memory in the cloud if you apply a 1.3× comfort factor [13]. When assessing storage, track metrics like 'Disk Read Bytes/sec' and 'Disk Write Bytes/sec', as cloud providers often cap throughput based on instance size [12]. Additionally, separate end-user activities from background processes - like backups or ETL jobs - to fine-tune your baseline sizing [12].
Plan for Scalability and Peak Loads
To accommodate usage spikes, apply a comfort factor, typically between 1.3× and 2.0×. For example, a virtual machine with 10 cores running at 20% utilisation might be better suited as a 4-core instance, rather than a 2-core one, when using a 2.0 comfort factor [16]. Use tools like Azure Log Analytics or Google Cloud Monitoring to track daily peaks and identify trends [14][15]. Setting autoscale thresholds at around 70–80% CPU usage can ensure scaling actions happen before performance dips [14].
It’s also important to differentiate between static workloads (which use consistent resources) and dynamic workloads (which have fluctuating demands). This helps determine whether vertical scaling (upgrading a single instance) or horizontal scaling (adding more instances) is the smarter approach [14].
Once you've gathered these metrics, you'll be ready to move on to organising workloads into a tiered migration strategy in the next step.
Step 5: Prioritise Workloads Using a Tiered System
Once you've assessed performance needs, the next logical step is figuring out how to prioritise workloads. Rather than attempting to migrate everything at once, it’s smarter to establish a clear hierarchy. This approach allows you to build confidence while gradually working your way up to the most complex systems.
Group Workloads into Tiers
To make this process manageable, divide your workloads into three tiers based on factors like risk, complexity, and their importance to the business:
- Tier-One: These are low-risk applications with minimal dependencies (0–3 connections). Examples include development or test environments already running on cloud-supported infrastructure.
- Tier-Two: This tier consists of medium-critical systems, such as three-tier applications (web, application, and database layers). These might require some minor adjustments but won’t need a complete overhaul.
- Tier-Three: This is where the mission-critical workloads live - think legacy mainframe applications, customised ERP systems, or services with strict latency requirements. These often come with complex dependencies and may require significant refactoring.
To assess workloads objectively, use a scoring framework based on 2–10 data points. Assign each workload a score between 0 and 99, factoring in attributes like the type of environment, business criticality, and regulatory requirements. Multiply these scores by their importance weights (e.g., business criticality might have a weight of 1, while migration strategy could have a weight of 0.6). Once scored, plot the results on a histogram. Ideally, you’ll see a bell curve, with most workloads grouped in the middle.
For smoother migrations, group applications with shared dependencies. This helps prevent service disruptions during the transition.
Use a Crawl-Walk-Run Approach
Begin with a small pilot migration - just 3–5 low-complexity, non-production Tier-One applications. This initial step allows you to test the process and build your team’s confidence without putting critical systems at risk.
Keep migration waves manageable, aiming for no more than 50 servers per wave. Assign clear ownership for each phase to maintain accountability. When it comes to Tier-Three workloads, schedule a test cutover two weeks before the actual migration. This gives you time to identify and resolve any issues early. By gradually scaling your efforts, you’ll develop cloud expertise while minimising disruption to essential systems. This phased method ties your initial assessments to a well-structured migration plan.
Step 6: Collaborate with Stakeholders for Validation
Once you've prioritised your workloads, it's time to validate your findings with the experts who know these systems inside out. Automated tools are helpful, but they often miss nuances that only human expertise can identify. At Hokstad Consulting, we stress the importance of aligning technical findings with broader business goals by actively engaging stakeholders. A well-documented environment is the foundation for meaningful discussions with subject matter experts (SMEs).
Document Architecture and Configurations
Before engaging stakeholders, ensure you have a comprehensive record of your system's architecture and configurations. This includes creating architecture diagrams, compiling inventories of components like servers, virtual machines (VMs), and databases, and detailing configuration data such as operating system versions, storage types, and software licensing. Additionally, note operational constraints like maintenance windows and uptime requirements.
For each workload, capture the business context. Identify its owners in both business and IT, outline the business function it supports, and determine its criticality. Don’t forget to include any security and compliance needs, such as data sensitivity levels, encryption methods, service accounts, API keys, and adherence to standards like HIPAA or ISO 27001. Store this information in easily accessible formats, such as shared spreadsheets or wikis, to encourage cross-team collaboration.
Engage Subject Matter Experts
To gain deeper insights, identify the business and IT owners responsible for each workload. SMEs play a crucial role in uncovering details that automated tools might overlook.
Use interviews or review sessions to validate the data collected during automated discovery. SMEs can flag potential technical blockers, such as specific stored procedures, or reveal informal integrations between systems that might not show up in automated scans. They can also share how workloads behave in unusual situations, like during network outages or dependency failures.
To ensure smooth collaboration, create a RACI matrix (Responsible, Accountable, Consulted, and Informed) to define roles clearly throughout the migration planning process. Before scheduling any migration waves, confirm the availability of SMEs, testers, and developers for troubleshooting and post-migration validation. Also, make sure planned migrations don’t clash with maintenance schedules or upcoming upgrades.
The validated insights you gather here will directly shape the next steps in your migration roadmap.
Step 7: Create a Phased Migration Roadmap
Once you've assessed and prioritised your workloads, the next step is to design a phased migration roadmap. This approach helps manage complexity and minimise risk by breaking the migration into smaller, manageable waves. Each wave consists of workloads that share dependencies or business relationships, ensuring a smoother transition with less disruption.
Large-scale migrations typically unfold in three overarching phases: Assess, Mobilise, and Migrate/Modernise [17]. Within the migration phase itself, allocate one to three months for an initialisation stage. This stage focuses on setting up standard operating procedures and creating runbooks. Following this, move into the implementation stage, where servers are migrated on a larger scale [17]. Your roadmap should clearly outline these phases, define milestones, and include contingency plans.
Define Phases and Milestones
Start by organising workloads into waves. Each wave is made up of move groups
, which are the smallest sets of servers that need to migrate together to avoid any disruption [18]. Group these workloads based on shared dependencies, such as common databases or maintenance schedules [18].
Wave planning is an ongoing process, not a one-off task. Do not try to plan all waves at once.- AWS Prescriptive Guidance [18]
For the first five waves, keep things small - fewer than 10 servers per wave. This allows your team to learn quickly and build confidence [18]. Focus on low-complexity, non-critical applications, especially those in development or test environments. As your team becomes more experienced, you can scale up. For example, a standard team of four architects can typically handle up to 50 servers per week using rehost patterns [18].
Plan four to five waves ahead but remain flexible. Adjust future waves based on lessons learned during earlier ones [18]. Each wave should generally take four to eight weeks and follow a standard process: detailed assessment, infrastructure build and testing, data transfer, cutover, and closure (including a review of lessons learned) [19]. To minimise disruptions, schedule cutovers during off-peak hours or maintenance periods.
Establish Testing and Contingency Plans
For every migration step, it’s essential to define a rollback strategy. Set a strict time limit for rollback execution to avoid prolonged outages. This ensures your team focuses on quick recovery rather than troubleshooting under pressure.
Test recovery procedures in development and QA environments before moving to production. Simulate potential failures, such as network interruptions, to confirm that workloads can recover automatically. Maintain a risk register that lists all technical, operational, and organisational risks, along with mitigation strategies and assigned responsibilities [3].
Lower the Time-to-Live (TTL) for DNS records well in advance of migration. This adjustment enables faster traffic redirection during cutovers. Additionally, factor in a contingency buffer to account for unexpected technical challenges or newly identified dependencies. Finally, establish clear retirement criteria to confirm that no residual traffic remains and that performance meets the required SLAs.
For tailored advice on creating a migration roadmap, consider consulting Hokstad Consulting (https://hokstadconsulting.com). They offer expert guidance to align the migration plan with your business objectives.
Conclusion
Deciding which workloads to prioritise for migration isn’t about rushing everything into the cloud. It’s about making thoughtful, informed choices. As the Microsoft Azure Cloud Adoption Framework puts it:
A comprehensive workload inventory is the foundation of a solid cloud adoption plan... You can't make decisions about how or whether to migrate a system if you don't know it exists or understand its characteristics.[2]
The step-by-step process outlined here - from evaluating cloud readiness to creating a phased migration roadmap - helps lower risks and ensures your efforts align with business goals. Organisations that adopt a structured approach have reported 37% faster time-to-market for new features, 57% less downtime, and 34% fewer security incidents [1]. These numbers highlight the efficiency gains and cost savings that can be achieved.
Stakeholder involvement plays a key role in achieving these results. While automated tools can gather a lot of useful data, subject matter experts are essential for verifying findings and identifying hidden dependencies. Engaging business teams also ensures that migration timelines align with operational needs, minimising disruptions during busy periods.
Migration planning isn’t a one-time task - it’s an ongoing process. Start small by migrating non-critical workloads to gain experience and confidence. Gradually move on to more complex systems, defining each migration wave in detail while remaining open to adjustments based on new insights. Keep a risk register, prepare rollback strategies, and build in contingency time to handle unexpected challenges.
For organisations seeking expert help with workload assessment and migration planning, Hokstad Consulting offers tailored support. Their expertise can help you align your cloud strategy with business goals and fine-tune your infrastructure for long-term success.
FAQs
How do I decide which workloads to migrate first?
To effectively prioritise workloads for migration, start by evaluating them through a few key lenses: risk, complexity, dependencies, and business importance. A smart first step is tackling low-risk, low-complexity workloads - like test or development environments. These are ideal for gaining hands-on experience while keeping potential disruptions to a minimum.
Begin by creating a detailed inventory of your applications. Assess each one's complexity and identify those with fewer dependencies. These simpler workloads should take precedence early on, allowing you to build confidence in the process. As your team becomes more comfortable, you can gradually transition to more critical workloads. This phased method helps manage risks effectively while keeping business priorities firmly in focus.
What data should I collect before sizing workloads in the cloud?
Before you start sizing workloads for cloud migration, it's essential to collect some key information. Here's what you'll need:
- Application details: Gather the names, descriptions, and types of applications involved.
- Business criticality: Understand how critical each application is to business continuity and revenue generation.
- Dependencies: Identify both internal and external relationships between workloads.
- Performance requirements: Note requirements for availability, data integrity, and overall performance.
- Current infrastructure: Document the hardware, software, and configurations currently in use.
- Cost analysis: Assess the total cost of ownership and estimate potential savings from the migration.
This data forms the foundation for a smooth and efficient cloud migration process.
How can I find hidden dependencies before a cutover?
To spot hidden dependencies before a cutover, it's essential to carry out a detailed application dependency analysis and mapping. This means identifying all the components that support your application and understanding how they interact. Pre-migration dependency mapping is a great way to uncover hidden connections, organise dependency sequences, and lower risks such as downtime or data loss. By digging into these details, you can ensure the migration process runs more smoothly and avoids unexpected hurdles.