
GitOps simplifies Kubernetes deployments by using Git as the single source of truth, ensuring your infrastructure aligns with the desired state. This pull-based model enhances security, reduces manual intervention, and creates an audit trail for compliance. Here's what you'll learn:
- Prepare Your Pipeline: Shift from direct cluster deployment to updating Git repositories with manifests.
- Automate Updates: Use CI pipelines to commit manifest changes to GitOps repositories.
- Set Up GitOps Tools: Install operators like Argo CD to sync cluster states with Git.
- Enforce Policies: Enable automated reconciliation and self-healing to maintain consistency.
- Add Validation and Rollbacks: Implement checks and rollback mechanisms for safer deployments.
GitOps ensures faster, safer, and more consistent deployments by combining CI/CD with declarative infrastructure management.
::: @figure 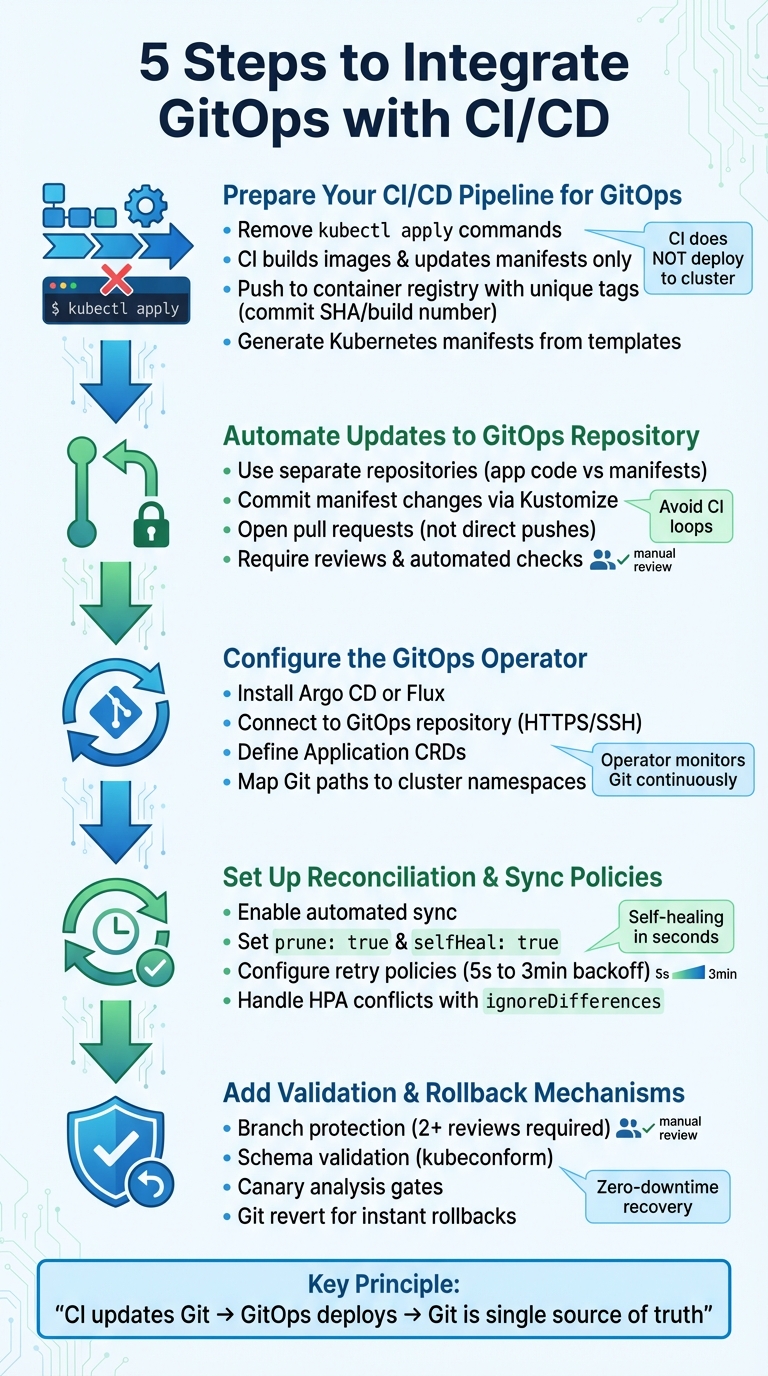 {5 Steps to Integrate GitOps with CI/CD Pipeline}
:::
{5 Steps to Integrate GitOps with CI/CD Pipeline}
:::
🚀 GitOps CI/CD Pipeline w/ GitHub Actions + ArgoCD & Kubernetes | End-to-End
Step 1: Prepare Your CI/CD Pipeline for GitOps
To adopt GitOps effectively, you need to rethink how your CI/CD pipeline operates. GitOps follows a pull-based model, meaning your CI pipeline's job is limited to building and updating configuration files in Git. Unlike traditional pipelines that handle both building and deploying in a single flow, GitOps separates these responsibilities. The CI system focuses on creating artefacts and updating manifests, while the GitOps operator takes care of deployment.
The key principle: CI does not deploy directly to the cluster. Instead, CI updates Git. GitOps deploys. [1]
This requires removing any direct interaction between your CI pipeline and the cluster. Forget about commands like kubectl apply at the end of your build process. Instead, the pipeline should stop after pushing container images to a registry and updating manifest files in a GitOps repository.
Set Up Image Builds and Testing
The primary role of your CI pipeline is building container images and running automated tests. This involves compiling the application code, performing unit and integration tests, running security scans, and finally pushing the container image to a registry. Use a unique tag for each image, such as a Git commit SHA or build number, to ensure traceability.
Rather than deploying the image directly, the pipeline should update the Kubernetes manifest repository with the new image tag. With this approach, your CI system only needs write access to Git and push access to the container registry. It eliminates the need for cluster administrator credentials, reducing security risks significantly.
Once the image build and testing are complete, the next step is to generate Kubernetes manifests that link your CI pipeline to the GitOps deployment process.
Generate Kubernetes Manifests
Manifest generation acts as the bridge between your CI pipeline and GitOps. Start by creating a template file (e.g., kubernetes.yaml.tpl) in your application repository. This file should include placeholders for variables like image tags and project identifiers. During the CI build, tools such as sed can replace these placeholders with the relevant values from the current build.
For instance, Google Cloud's documentation outlines a process where Cloud Build uses sed to replace placeholders like GOOGLE_CLOUD_PROJECT and COMMIT_SHA in a template file. This generates a kubernetes.yaml file, which is then committed to a dedicated env
repository's candidate branch [2]. Your CI pipeline should handle cloning the GitOps repository, updating the manifest file with the new image tag, committing the changes, and pushing them back to Git. This change triggers the GitOps operator, which detects the update and deploys the configuration to your cluster - all without the CI system directly interacting with production infrastructure.
Step 2: Automate Updates to the GitOps Repository
Once you've generated updated manifests, the next step is to automatically commit them to the GitOps repository. This process ensures frequent updates are handled efficiently while maintaining oversight and validation. Previously, your CI pipeline handled building and testing images; now, it takes on the responsibility of managing manifest updates in Git. For this to work, the CI pipeline needs write access to the GitOps repository to commit these updates seamlessly.
Commit Changes to the GitOps Repository
The easiest way to handle this is by cloning the repository, updating the necessary files, and pushing the changes back. Tools like Kustomize simplify this process. Instead of manually editing files, you can use the command kustomize edit set image <image-name>=<new-tag> to update image references programmatically. This updates the kustomization.yaml file directly, helping to avoid syntax issues [4].
To avoid unnecessary CI loops, keep your application source code and Kubernetes manifests in separate repositories [3]. Why? If both reside in the same repository, a commit could trigger a build, which then commits a manifest change, leading to another build. Separating them also allows for tailored security policies - for example, developers might have merge access to the application repository, while the GitOps repository could require platform team approval for production changes.
Automating this commit process lays the groundwork for safer, validated updates through pull request workflows.
Use Pull Request Workflows
Pushing changes directly to the main branch skips essential review and validation steps. A better practice is configuring your CI pipeline to open a pull request against the GitOps repository instead [3][4][5]. This creates a checkpoint where both automated checks and human reviews can occur before any changes are applied to production.
To reinforce this process, protect the main branch of the GitOps repository by requiring at least one review and ensuring all checks pass [5]. Automated pull requests can trigger validation tools like kubeconform -strict or flux check to verify manifest syntax [5]. You can also use a CODEOWNERS file to automatically assign reviewers - such as the Platform team for infrastructure changes or the Security team for sensitive configurations [5].
For added clarity, include metadata in the pull request body. This could list old and new image versions, a link to the CI build, and labels like image-update to help reviewers quickly understand the nature of the change. For low-risk updates, such as patch version upgrades, you can configure GitHub Actions to auto-merge the PR once all checks are successful. These controlled workflows ensure updates are consistent, secure, and thoroughly validated.
Step 3: Configure the GitOps Operator for Continuous Deployment
With your CI pipeline now pushing updates, the GitOps operator takes over by continuously applying these changes to your Kubernetes cluster. Essentially, the operator monitors your Git repository for changes and ensures the cluster's state aligns with the desired configurations defined in your repository.
Install and Configure the GitOps Operator
Argo CD is a widely used GitOps operator known for its reliability. Installing it is straightforward. Start by creating an argocd namespace to separate administrative tools from your applications. Then, apply the official manifest using the following command:
kubectl apply -n argocd -f https://raw.githubusercontent.com/argoproj/argo-cd/stable/manifests/install.yaml
For production environments, it's better to use the High Availability (HA) manifest (ha/install.yaml) to ensure redundancy for the controller and server replicas.
To retrieve the initial admin password, run:
kubectl -n argocd get secret argocd-initial-admin-secret -o jsonpath="{.data.password}" | base64 -d
Make sure to change this password immediately or configure Single Sign-On (SSO) for better security. To access the web interface, use port forwarding with:
kubectl port-forward svc/argocd-server -n argocd 8080:443
Then, navigate to localhost:8080 in your browser.
Next, connect Argo CD to your GitOps repository. You can either use HTTPS with a Personal Access Token for simplicity or SSH with cryptographic key pairs for enhanced security. To enable immediate synchronisations, configure webhooks in your Git provider. Store webhook secrets in the argocd-secret to prevent unauthorised events.
Once Argo CD is connected and secured, it's time to define your application configurations to map repository paths to your cluster environments.
Define Application Configurations
After setting up Argo CD, you’ll need to define Applications using Custom Resource Definitions (CRDs). These CRDs map specific paths in your Git repository to target clusters and namespaces. Place these Application manifests in a dedicated argocd/ directory within your GitOps repository.
For projects with multiple environments - such as development, staging, and production - you can use ApplicationSets. These allow you to generate multiple Applications from a single template, based on directory structures or a list of clusters. This setup simplifies multi-environment deployments and aligns well with the CI/CD pipeline updates you've implemented.
Organise your repository to keep configurations manageable. Use a base/ directory for shared manifests and overlays/<environment>/ directories for environment-specific settings, such as replica counts or resource limits. This Kustomize-based structure avoids duplication and keeps everything tidy.
For more complex setups, like microservices architectures, consider the App of Apps
pattern. This involves creating a parent Application that manages multiple child Applications, enabling you to bootstrap an entire cluster from a single entry point.
Finally, configure synchronisation policies for better control. Enable Self-Healing to automatically revert any manual changes and Pruning to remove resources no longer defined in your repository. Use AppProjects to enforce restrictions on repositories, clusters, and namespaces. This ensures that cluster-scoped resources or sensitive namespaces are not accidentally altered or accessed.
Step 4: Set Up Reconciliation and Sync Policies
After configuring your GitOps operator, the next step is to fine-tune the reconciliation process between your Kubernetes cluster and Git. This ensures that the cluster's state consistently aligns with what’s defined in Git, even if manual changes are made. Essentially, this setup acts as a safeguard, linking pipeline updates to the automated application of changes.
Enable Automatic Sync with Health Checks
To automate updates, define the syncPolicy in your Application manifest. Set automated: {} to allow Argo CD to apply changes whenever discrepancies between Git and the cluster are detected. Include prune: true to remove resources deleted from Git and selfHeal: true to undo any manual changes made directly in the cluster [6].
Self-heal is what makes GitOps truly declarative. Without it, Git is just documentation. With it, Git becomes the enforced source of truth.– Nawaz Dhandala, OneUptime [7]
Self-healing ensures manual changes are reversed in seconds [8]. To avoid accidental deletion of all resources during manifest generation failures, keep allowEmpty: false enabled as a safety measure [6]. For production environments, introduce retry policies with exponential backoff (starting at 5 seconds and doubling up to a maximum of 3 minutes). This approach handles temporary network issues without requiring manual intervention [6]. You can also limit automated syncs to specific timeframes, such as business hours, to minimise disruptions outside of working hours [8].
Once sync automation is in place, the next step is to optimise rollout strategies for seamless deployments.
Configure Rollout Strategies and Drift Detection
With automated sync and validation in place, focus now shifts to managing deployments under dynamic conditions. To handle controller conflicts, particularly with Horizontal Pod Autoscalers (HPA), use ignoreDifferences to exclude fields like /spec/replicas from reconciliation. This prevents endless sync loops between Argo CD and the HPA [6]. Enable PruneLast: true to ensure resources are only removed after all other resources have successfully synced, reducing the risk of race conditions [6].
For large-scale applications, enable ApplyOutOfSyncOnly=true to sync only the resources that have changed. This reduces the load on the Kubernetes API server [9]. If you encounter issues with large manifests exceeding annotation size limits, switch to ServerSideApply=true for better handling of fields and conflicts [9]. Additionally, set Validate=true to run kubectl --dry-run=server before applying changes. This step catches schema errors early, avoiding potential disruptions [8].
Step 5: Add Validation, Testing, and Rollback Mechanisms
With reconciliation and sync policies in place, the next critical step is to establish safeguards that minimise the risk of faulty deployments and enable swift recovery when issues arise. These measures ensure your GitOps workflow stays dependable, even under challenging conditions.
Add Validation Gates
Validation gates serve as checkpoints to catch and block problematic changes before they can be deployed. Start by enforcing branch protection in Git. This includes blocking direct pushes to production, requiring at least two approving reviews, and ensuring all status checks - like validate-flux-manifests - are passed before changes are merged [10]. Additionally, a CODEOWNERS file can help direct changes to the appropriate teams, making sure that only qualified reviewers assess infrastructure modifications before reconciliation takes place [10].
Set up a multi-stage pipeline to strengthen these defences. Begin with schema validation tools like kubeconform, followed by security scans and staging integration tests [10][11]. For deployments that carry higher risks, introduce canary analysis gates. These gates compare key metrics - such as error rates and latency - between a small-scale canary deployment and the existing baseline. A full rollout should only proceed if the canary deployment passes these automated checks [11]. By layering these validation steps, you can identify configuration errors, security issues, or performance drops before they reach end users.
Once these gates are established, resolving deployment problems becomes much more manageable.
Use Git-Based Rollbacks
When a validation gate fails or a deployment issue surfaces, Git-based rollback mechanisms provide a quick way to restore stability. Using git revert, you can create a commit that undoes problematic changes while maintaining a complete audit trail. Once the revert commit is pushed, the GitOps operator will automatically roll back to the last stable state.
For scenarios requiring zero downtime, consider techniques like blue-green deployments or gradual canary rollbacks. To make rollbacks predictable, ensure each commit represents a single logical change. Additionally, include healthChecks in your manifests so the GitOps operator can verify workload readiness before finalising any deployment. For precise rollback points, tag images with immutable identifiers, such as a commit SHA or timestamp. These practices make recovery seamless and reliable.
Best Practices for GitOps and CI/CD Integration
Bringing GitOps and CI/CD together requires teams to rethink their approaches to security, collaboration, and operations. In this setup, CI handles building, testing, and creating artefacts, while GitOps takes care of deployment and maintaining the desired cluster state. By clearly separating these responsibilities, you reduce credential sprawl and ensure Git remains the single source of truth. These practices build on earlier steps, bolstering both security and operational efficiency.
Prioritise security from the start. Avoid storing secrets in Git, even if they're encoded. Instead, use external tools like HashiCorp Vault or AWS Secrets Manager, integrating them with operators such as the External Secrets Operator. Require GPG-signed commits to verify the authenticity of changes, and apply Role-Based Access Control (RBAC) using the principle of least privilege for Kubernetes clusters and Git repositories. For GitOps agents, use repository-specific deploy keys with read-only permissions instead of Personal Access Tokens. Also, disable default local admin accounts after setting up Single Sign-On (SSO) using OIDC or SAML.
For smoother collaboration, adopt pull request workflows. This ensures all changes - whether infrastructure or application-related - are reviewed before implementation, fostering better communication between developers and operations.
CI does not deploy directly to the cluster. Instead, CI updates Git. GitOps deploys[1]
Organise your repositories with clear structures, such as directories for /apps, /infrastructure, and /environments. This makes navigation easier and simplifies access control. Apply branch protection rules to prevent direct pushes to main branches. These rules should enforce mandatory reviews and require all CI checks to pass before merging changes.
Scalability hinges on quick feedback loops. Use Git webhooks to trigger immediate reconciliation in tools like Argo CD or Flux, reducing the typical 3-minute polling delay to near-instant updates [12]. Enable GitOps controllers to self-heal
by automatically undoing unauthorised or manual changes made directly to the cluster. In production environments, define sync windows to prevent automated updates during peak business hours or other high-risk periods.
Comparison of CI/CD Approaches: Traditional vs GitOps-Integrated
The table below highlights the differences between traditional CI/CD and a GitOps-integrated approach:
| Aspect | Traditional CI/CD | GitOps-Integrated CI/CD |
|---|---|---|
| Source of Truth | Varies (scripts, manual processes, CI config) | Git repository (declarative manifests) |
| Deployment Model | Push-based (CI system pushes to cluster) | Pull-based (in-cluster agent pulls from Git) |
| Security | CI system requires high-level cluster credentials | Agent resides in-cluster; no external cluster access needed |
| Drift Detection | Manual or non-existent | Continuous and automated reconciliation |
| Rollback Speed | Manual intervention or re-running pipelines | Instant via a Git revert |
| Auditability | Scattered logs across various tools | Centralised, immutable history in Git commits |
Tools and Frameworks for GitOps
The right tools can make GitOps integration more manageable and efficient.
- Argo CD: Ideal for multi-cluster continuous delivery, with pull-based synchronisation, a user-friendly interface, and SSO integration. It also supports multi-cluster RBAC.
- FluxCD: A lightweight option focused on developers, offering features like automated image updates and OCI artefact support.
- Kyverno and Open Policy Agent (OPA): These tools enforce
Policy as Code
standards for security, such as preventing containers from running as root or limiting image registries. - Trivy and Grype: Use these to scan container images and infrastructure-as-code templates for vulnerabilities directly within your CI pipeline.
- Sealed Secrets: Enables secure, one-way encryption, allowing you to store secrets in Git safely.
- Velero: Provides backup solutions for Kubernetes cluster state and persistent volumes, ensuring disaster recovery.
For organisations in the UK, GitOps aligns well with GDPR compliance by providing an audit trail of every change, with signed Git commits and centralised logs formatted to UK standards (DD/MM/YYYY). Tools like Prometheus and Grafana can help monitor reconciliation times, as spikes may indicate resource constraints or unauthorised changes.
Conclusion
Bringing GitOps into your CI/CD workflow reshapes how Kubernetes deployments are managed. By following the five steps - preparing your CI/CD pipeline, automating updates to the GitOps repository, configuring the GitOps operator, setting up reconciliation policies, and adding validation mechanisms - you establish a deployment process that distinctly separates build processes from deployment tasks. This approach allows Git to act as the single source of truth while removing the need for CI/CD tools to hold cluster credentials, improving overall security.
With this system in place, automated corrections ensure the live environment always aligns with the desired state stored in Git. This self-healing capability automatically reverses unauthorised manual changes without requiring human intervention.
Each Git commit provides a complete audit trail, supporting compliance with UK regulations. Additionally, rollbacks are simplified - just revert the commit in Git to restore the previous stable state instantly.
The biggest risk when adopting GitOps is not the technology itself. It is disrupting the workflows your team already relies on[13].
To minimise disruption, start with a phased approach. Install GitOps tools in observation mode to monitor drift before enabling full synchronisation. This gradual transition allows teams to adapt while preserving their current workflows.
The pull-based model has become the go-to standard for Kubernetes operations. By adopting GitOps, organisations benefit from faster delivery cycles, reduced cloud infrastructure costs through automation, and the reliability of managing infrastructure declaratively with version control. These practices round out the step-by-step guide, enabling your CI/CD pipeline to fully harness the potential of GitOps.
FAQs
What changes do I need to make to my CI pipeline for GitOps?
To get started with GitOps, set up your CI pipeline to push deployment manifests, Helm charts, or Kubernetes configurations to a dedicated Git repository. This repository acts as your single source of truth. Then, integrate a GitOps tool like Flux or ArgoCD. These tools automate synchronisation and trigger deployments whenever changes are detected in the repository.
Make sure to include validation steps, such as pre-commit hooks or security checks, to maintain the integrity of your configurations. Also, take advantage of Git’s version control to enable rollback capabilities, ensuring your deployments remain reliable and easy to manage.
How do I stop CI/CD triggering endless rebuild loops with GitOps?
To prevent endless rebuild loops in GitOps, make sure deployments occur only when there are deliberate changes. Configure your GitOps tool to identify and reconcile actual deviations without repeatedly applying unchanged configurations. Use automated synchronisation with self-healing mechanisms and define specific sync windows. Also, ensure your CI pipeline commits only purposeful updates, ignoring trivial or irrelevant changes to avoid triggering unnecessary deployments.
What’s the safest way to handle secrets in a GitOps workflow?
The best way to handle sensitive information is to keep secrets out of Git repositories entirely. Instead, rely on dedicated secret management tools such as HashiCorp Vault or AWS Secrets Manager. To reduce the chance of accidental exposure, you can use tools like gitleaks with pre-commit hooks to catch issues before they’re pushed.
It’s also crucial to encrypt secrets both at rest and during transmission, apply strict access controls using Role-Based Access Control (RBAC), and set up automated secret rotation. These steps help limit the risk of unauthorised access or data leaks.