
If my cluster cannot run old Pods and new Pods at the same time, zero-downtime deploys can fail. Cluster autoscaling helps by adding nodes when surge Pods cannot be scheduled, but it only works if I set sane rollout rules, accurate requests, working readiness checks, and enough headroom.
Here’s the short version:
- I need
RollingUpdatewithmaxUnavailable: 0and a positivemaxSurgeif I want new Pods started before old ones stop. - I need enough spare capacity for the larger of:
- surge Pods from the rollout, or
- extra demand from traffic spikes.
- The default
maxSurgeis 25%, rounded up. So 40 replicas can mean 10 extra Pods during a rollout. - Cluster Autoscaler reacts to Pending Pods based on CPU and memory requests, not traffic by itself.
- If requests are wrong, autoscaling can add the wrong amount of capacity, or fail to help at all.
- Readiness probes decide when a Pod should get traffic. Startup probes stop slow-starting apps from failing too soon. Graceful shutdown gives old Pods time to finish in-flight work.
- PDBs do not control Deployment rolling updates, so they are not a substitute for rollout settings.
- Before release, I should check:
- selectors and Service endpoints
- replica spread across nodes or zones
- node-group min/max limits
- quotas
- rollback readiness
- During release, I should watch:
- Ready and available replicas
- EndpointSlices
- Pending Pods
- scheduler events
- error rate and latency
- A simple target for planned releases is 10–20% free allocatable CPU and memory before the rollout starts.
A quick example makes the risk clear. If each Pod requests 750m CPU and 1.5 GiB RAM, then a 10-Pod surge may need 7.5 vCPU and 15 GiB of extra allocatable capacity. If that room is not there, the rollout can stall while new nodes come up.
So when I plan zero-downtime releases, I do not just think about Deployment YAML. I think about capacity, scheduling, probes, shutdown, quotas, and rollback signals as one set of controls.
Kubernetes Scaling Guide (2025): HPA, Cluster Autoscaler & More
Deployment and autoscaling prerequisites
Your workload needs strategy.type: RollingUpdate so Kubernetes swaps Pods bit by bit instead of replacing everything in one go. That matters during rollouts, because old Pods can keep serving traffic while new Pods start up and wait for room on the cluster.
You also need enough replicas to keep at least one healthy Pod up during a rollout or a node failure. If replica counts are too low, a rollout can get stuck: new Pods sit pending, old Pods disappear, and traffic starts to wobble. These checks help make sure the autoscaler can add node capacity without the rollout grinding to a halt.
It’s also worth checking that the Deployment selector and the Service selector point at the same Pods. If they don’t, you can end up with running Pods that never receive Service traffic. That kind of mismatch is easy to miss until something breaks.
Check selectors and endpoints with:
kubectl get service web -o yaml
kubectl get endpointslice -l kubernetes.io/service-name=web
kubectl get pods -l app=web --show-labels
Cluster Autoscaler makes scale-up decisions from requested CPU and memory, not actual usage.[5][6] So if your requests are off, the autoscaler reacts to the wrong signal. Set requests from observed usage, and include startup peaks, not just steady-state load. Use limits as ceilings, not guesses.
Check scheduling, replica spread, and rollback readiness
If several replicas land on the same node, they can all fail at once. When availability across failure domains matters, spread replicas across nodes or zones. DoNotSchedule applies that spread rule strictly, but there’s a catch: Pods can stay pending when cluster capacity is tight. That’s why it’s smart to test topology constraints against node pool limits before relying on them in production.
Bad requests can also throw the autoscaler off course. It might stay idle when it should add nodes, or it might add nodes that still don’t fix the scheduling issue. Use this checklist to spot the common problems that block scheduling or send traffic to the wrong place.
| Check | Pass condition |
|---|---|
| Strategy |
RollingUpdate configured; ReplicaSet history retained for rollback |
| Replica count | Enough replicas to tolerate one Pod or node disruption |
| Deployment selector | Matches Pod template labels exactly |
| Service | Selector matches intended Pods; Ready endpoints confirmed |
| Requests | CPU and memory requests reflect measured demand; limits are intentional ceilings |
| Replica spread | Topology constraints or anti-affinity tested against node pool limits |
| Autoscaler status | Node group can scale up; minimum and maximum bounds allow surge headroom |
| Monitoring | Rollout status, readiness, endpoint health, and scheduler events are monitored |
| Rollback | Last known good revision is available and tested |
Next, tune maxSurge, maxUnavailable, readiness probes, and disruption protection. Once these prerequisites are in place, you can work out the capacity buffer needed for surge Pods and traffic spikes.
Plan capacity buffers for surge Pods and traffic spikes
::: @figure 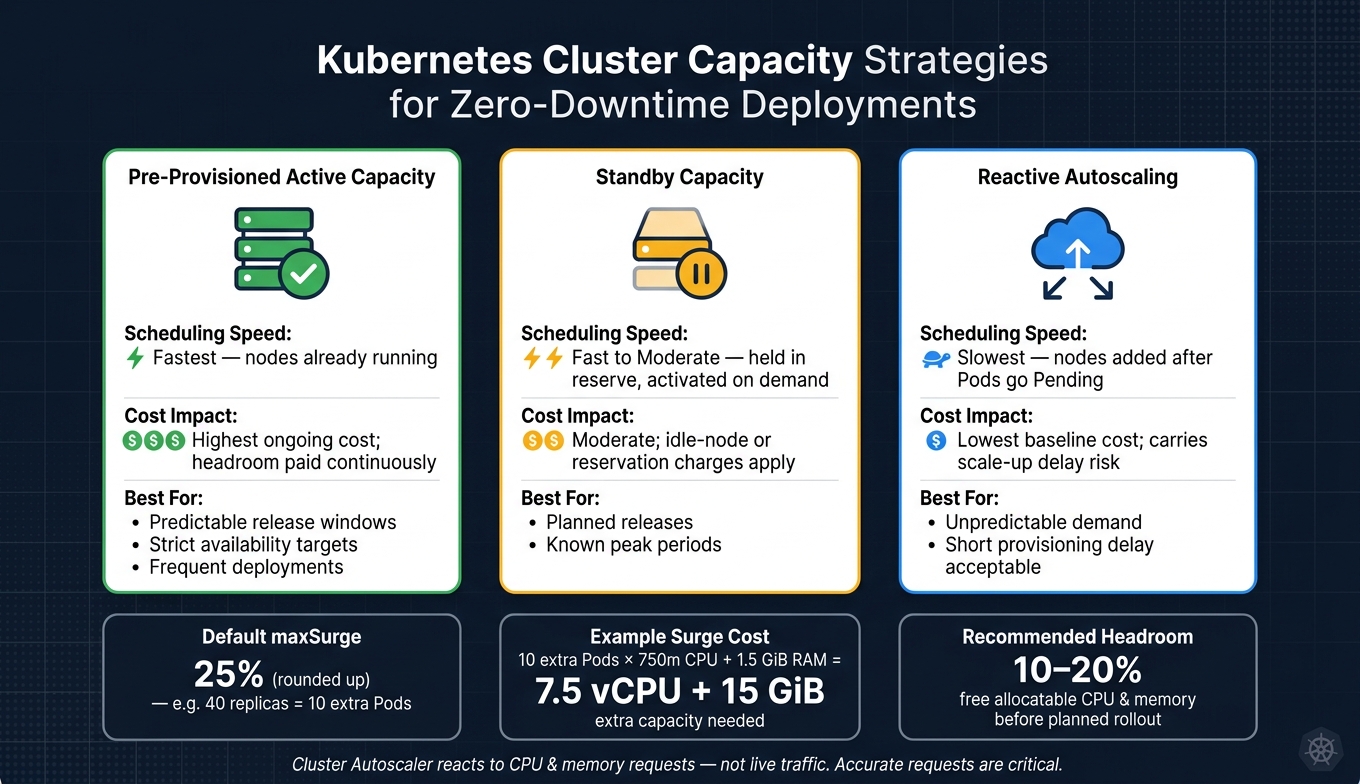 {Cluster Capacity Strategies for Zero-Downtime Kubernetes Deployments}
:::
{Cluster Capacity Strategies for Zero-Downtime Kubernetes Deployments}
:::
Before a rollout starts, size the buffer based on the larger of two needs:
- the resources needed for surge Pods
- the resources needed for the expected traffic increase
Start with maxSurge. In Kubernetes, the default is 25% of the desired replica count, rounded up.[1][2] So if a Deployment has 40 replicas and maxSurge: 25%, it can create up to 10 extra Pods for a short period. If each Pod requests 750 millicores of CPU and 1.5 GiB of memory, the rollout may need up to 7.5 vCPU and 15 GiB of extra allocatable capacity. And that's just the starting point.
Of course, that only helps if the node group, quotas, and region can take the hit. A rollout stays safe when new Pods can be scheduled before old Pods are removed. Check the current node count, the set minimum and maximum sizes, and any cloud-provider quotas for vCPU, instance counts, and regional capacity. GKE, for example, supports both per-zone and total node-pool limits, so a node group's maximum can be lower than it first appears.[4][8] It's also worth checking that the chosen instance type is available in the target region and zones. If there's a shortage in one area, scheduling can fail even when the autoscaler itself is working fine. Namespace ResourceQuota objects add another hard limit; adding nodes does not increase what a namespace is allowed to use.[7]
Use allocatable capacity, not the headline vCPU and memory figures. That means accounting for OS and Kubernetes reservations, DaemonSets, and pod-density limits. Where you can, set up matching capacity across more than one instance family. If one family is tight in a zone, the rollout is less likely to get stuck.
Use the table below to compare capacity options. For most production services, a sensible middle ground is to keep enough active capacity for the normal maxSurge need, then rely on reactive scaling for spikes beyond that.
| Capacity approach | Scheduling speed | Cost impact | Zero-downtime use case |
|---|---|---|---|
| Pre-provisioned active capacity | Fastest - nodes are already running and schedulable | Highest ongoing cost; headroom is paid for continuously | Predictable release windows, strict availability targets, frequent deployments |
| Standby capacity | Fast to moderate - capacity is held in reserve and activated on demand | Moderate; lower than full pre-provisioning, but idle-node or reservation charges apply | Planned releases and known peak periods |
| Reactive autoscaling | Slowest - nodes are added after Pods pend | Lowest baseline cost, but carries scale-up delay risk | Unpredictable demand where a short provisioning delay is acceptable |
Balance rollout safety against infrastructure cost
Running a cluster at or near 100% resource use before a release may look efficient on paper, but it often backfires. When every node is crammed full, surge Pods have nowhere to go. Then the rollout stalls while the autoscaler scrambles to add nodes. In practice, keeping some headroom during a release window is often cheaper than dealing with the mess of a shaky deployment.
A sensible internal target is to leave 10–20% of allocatable CPU and memory unscheduled before a planned rollout. That target should come from measured workload behaviour, not one blunt cluster-wide percentage.
After each deployment, record:
- peak node count
- peak requested CPU and memory
- time from Pod creation to scheduling
- whether any Pods stayed unschedulable
Then compare planned surge with observed surge. Note what actually caused the limit: CPU, memory, topology rules, or quota. Use that evidence to adjust node-group maxima, active buffer size, or release timing instead of keeping extra capacity around all the time just in case.
Once the buffer is sized, configure rolling updates, readiness checks, and disruption budgets so that capacity is used safely.
Configure rolling updates, readiness checks, and disruption protection
Capacity buffers only help if the rollout uses them in the right order. These settings work as a set. One setting on its own won’t do the job.
Use rollout settings that let new Pods start first
A good place to start is maxUnavailable: 0 with a positive maxSurge, such as 1 or 25%. Kubernetes allows maxUnavailable: 0 only when maxSurge is above zero.[2] That setup tells Kubernetes to create replacement Pods before it removes the existing ones. If the new Pods can’t schedule or don’t become ready, the rollout stops there.[2][1]
Here’s a practical starting point for a four-replica web service:
apiVersion: apps/v1
kind: Deployment
metadata:
  name: web
spec:
  replicas: 4
  minReadySeconds: 30
  strategy:
    type: RollingUpdate
    rollingUpdate:
      maxUnavailable: 0
      maxSurge: 1
  selector:
    matchLabels:
      app: web
  template:
    metadata:
      labels:
        app: web
    spec:
      terminationGracePeriodSeconds: 60
      containers:
        - name: web
          image: example/web:2.4.0
          ports:
            - containerPort: 8080
          startupProbe:
            httpGet:
              path: /startup
              port: 8080
            periodSeconds: 5
            failureThreshold: 12
          readinessProbe:
            httpGet:
              path: /ready
              port: 8080
            periodSeconds: 5
            failureThreshold: 2
A few of those values do more work than they seem to at first glance. minReadySeconds: 30 means a newly ready Pod must stay ready for 30 seconds before Kubernetes counts it as available. maxUnavailable: 0 stops the controller from deliberately lowering the available Pod count. maxSurge: 1 permits one extra Pod above the target count. And terminationGracePeriodSeconds: 60 gives the application time to shut down cleanly before Kubernetes forcefully ends it.[2][9] The rest follows normal Deployment behaviour.
That’s what turns reserved capacity into rollout headroom you can actually use.
One small detail matters a lot with small Deployments: maxSurge rounds up, while maxUnavailable rounds down.[2] If you need steady, predictable behaviour, use exact Pod counts like maxSurge: 1 rather than percentages.
Make health checks and shutdown behaviour reflect real traffic
Rollout settings only help when probes and shutdown behaviour match what your service does under live traffic. Readiness decides when traffic can move to a Pod. Shutdown decides how the old Pod leaves.
A readiness probe should check whether the Pod can actually handle requests, not just whether the process has started. An endpoint like /ready should confirm that database connections work, connection pools are up, and any required cache loading has finished. A /healthz endpoint that only proves the process is alive isn’t enough. The Pod should stay in Service endpoints only while it can handle production traffic.[9]
Use a startup probe for apps with slow or uneven startup times. Common cases include JVM warm-up, model loading, or cache priming. While the startup probe is still failing, Kubernetes skips readiness and liveness checks. That helps avoid restarting a container that is slow, but otherwise healthy.[9] Set failureThreshold × periodSeconds so it sits comfortably above the documented worst-case startup time. In the example above, failureThreshold: 12 and periodSeconds: 5 allow up to 60 seconds for startup.
Shutdown matters just as much. When the Pod gets SIGTERM, it should stop taking new requests, finish in-flight work, close connections, and exit before the grace period runs out. If you’ve measured drain time at 45 seconds, then a 60-second grace period gives you some breathing room. Pick that number from observed shutdown behaviour, not from a copied default.[9]
Use PodDisruptionBudgets correctly alongside readiness controls
A PodDisruptionBudget (PDB) limits voluntary disruptions, such as node maintenance and approved evictions. It does not make Pods healthy, and it does not protect against node crashes.[3] One point often trips people up: Kubernetes workload controllers are not bound by PDBs during a Deployment rolling update, so a PDB is not a stand-in for maxUnavailable: 0.[3]
These controls each handle a different part of the problem:
| Control | Primary purpose | When it acts | What it does not guarantee |
|---|---|---|---|
| Readiness probe | Determines whether a Pod should receive traffic | During normal operation and whenever health changes | That the process is alive or that spare capacity exists |
| Startup probe | Protects slow initialisation from premature health failures | During container startup, before other probes take effect | That the application can serve every production request |
| Termination handling | Drains traffic and completes in-flight work before exit | When a Pod is deleted, replaced, or evicted | That crashes cannot happen or that clients retry safely |
| PodDisruptionBudget | Limits voluntary Pod disruptions | During eligible eviction operations, such as planned node maintenance | It does not control Deployment rollouts or protect against involuntary failures |
Don’t set minAvailable: 100% or maxUnavailable: 0 across the whole workload. That blocks voluntary evictions and makes node drains stall.[10] It’s also worth checking the PDB selector carefully, so it matches only the Pods you intend and doesn’t accidentally include other workloads in the same namespace.
With these disruption controls in place, the next step is to watch the rollout under live load and track readiness, endpoints, and rollback signals.
Run releases under load and monitor the rollout
Once your rollout settings are set, the release window becomes the last checkpoint. Autoscaling only helps if it can keep up with surge Pods. The catch is that new capacity still takes time to appear after Pods go Pending. So it helps to treat a release like an operation with three phases: before, during, and after.
Pre-release checks: traffic, headroom, and autoscaler status
Start by recording your baseline: request rate, latency, errors, CPU and memory, throttling, queue depth, and saturation. Check too that the Deployment has the replica count you expect, along with the right resource requests, topology spread, maxSurge, maxUnavailable, readiness probes, minReadySeconds, and the last known good revision.
Then look at capacity. Count schedulable nodes and compare allocatable CPU and memory with current workload requests plus the surge Pods you expect to add. Work out headroom from the replica count, maxSurge, and per-Pod requests. If the numbers do not add up, fix capacity before the rollout starts.
That might mean:
- adding capacity in advance
- lifting the node pool minimum for a short period
- delaying the deployment instead of hoping reactive scale-up will catch up
Also make sure the release window is set up properly. There should be a named release owner, an incident commander or escalation contact, clear rollback authority, and fixed start and stop times in UK date and 24-hour time format. Have the right dashboards, alerts, logs, tracing views, and deployment commands ready. Set agreed limits for latency, error rate, saturation, Pending Pods, readiness failures, and the maximum time a rollout step can run before you pause it.
Reject the deployment if Pending Pods do not have a clear cause, if the autoscaler is unhealthy, or if nobody is available to respond to rollback signals.
During release: watch readiness, endpoints, and rollback signals
During the rollout, live signals should guide every pause or rollback call.
Run kubectl rollout status deployment/<name> throughout the rollout.[1] Watch updated, ready, and available replicas together. A Pod can be marked Running and still not serve traffic. Only Ready endpoints matter.
At the same time, check Service endpoints or EndpointSlices. Keep an eye on Pending Pods, scheduling latency, node pressure, autoscaler activity, and any provisioning errors.
Pause the rollout when new Pods stay Pending beyond the agreed limit, readiness keeps failing, or the available replica count stops moving up. One common case is waiting for a node to become ready. Roll back when error rate stays above the agreed limit for a sustained interval, p95 or p99 latency shows a clear regression against the baseline, or serving capacity drops below the safety margin. Use kubectl rollout undo deployment/<name> and confirm the previous revision is healthy before you close the release.[1]
Here’s the key split to spot fast:
Pending Pods with
insufficient CPUorinsufficient memoryevents point to a capacity problem. Pods that schedule but fail readiness or crash point to an application problem.
Mix those up and you lose time. Worse, you can make the situation harder to fix.
Post-release review and next steps
After the last new Pod becomes available, check that traffic is still reaching healthy endpoints.
Only close the release when all intended replicas are updated and available, old Pods are gone, and Service endpoints are healthy.
Then compare post-release telemetry with the pre-release baseline: latency, error rate, saturation, and restart counts. Keep rollback on the table until the agreed observation period has passed. Only after that should the release be marked closed.
If you added temporary capacity, scale it down bit by bit and confirm that normal headroom is still there.
Finally, record what happened in practice: actual surge size, provisioning duration, Pending Pod duration, readiness delay, and any manual capacity changes. Those numbers give you the basis for tuning resource requests, maxSurge, maxUnavailable, node pool minimums, or release-window policy next time.
FAQs
How quickly can Cluster Autoscaler add nodes during a rollout?
Cluster Autoscaler usually needs a few minutes to add nodes during a rollout. It first spots pods that can't be scheduled, then works with your cloud provider to provision the extra infrastructure.
That lag matters because node scaling is slower than pod-level scaling. So if traffic jumps or a rollout puts more pressure on the cluster, you need enough baseline capacity to keep things steady while the new nodes come online.
A common way to handle this is overprovisioning. For example, you can run low-priority pause pods that act like placeholders. When workload demand goes up, those pods get bumped off, which frees space at once while Cluster Autoscaler adds more nodes in the background.
What causes Pods to stay Pending during deployment?
Pods usually stay Pending for two main reasons: resource limits or scheduling clashes.
That means Kubernetes can't place the pod on any current node. In most cases, the cluster doesn’t have enough spare CPU or memory, or the pod’s resource needs don’t match what the nodes can offer.
It can also happen when VPA recommends resource settings that are larger than any single node can handle. In that case, pods may be evicted and then fail to start again.
Check:
- Resource requests and limits
- Autoscaler logs
- Whether the cluster has enough spare capacity
If one of those is off, the pod can get stuck in Pending for longer than you'd expect.
How do I choose a safe maxSurge value?
Start with 1 or 25% of your target replica count. That gives Kubernetes space to spin up new pods before it removes old ones, which helps keep the service fully available during the rollout.
Set maxUnavailable to 0 so your running capacity doesn’t dip below the target count. Then test these cautious settings in staging under production-like load, and tune them based on latency and error rates.