
Azure ARM templates are a powerful tool for implementing disaster recovery across multiple Azure regions. They allow you to automate and standardise deployments, ensuring consistent infrastructure setup and faster recovery in case of outages. Multi-region disaster recovery focuses on maintaining system availability during large-scale disruptions by replicating resources in secondary Azure regions. Here's what you need to know:
- Why Use ARM Templates? They simplify and automate the deployment process, reduce manual errors, and enable faster failovers.
- Key Approaches: Choose between active-active (high availability) and active-passive (cost-effective) architectures based on your workload's criticality.
- Core Azure Services: Use Azure Front Door for traffic management, Geo-Redundant Storage (GRS) for data replication, and Azure SQL Database for failover groups.
- Automation Tools: Integrate ARM templates with Azure DevOps or CLI for streamlined deployments and testing.
- Testing and Maintenance: Regularly test failover scenarios and monitor replication health to ensure your disaster recovery setup is ready.
This guide explores how to design, deploy, and maintain a multi-region disaster recovery plan using Azure ARM templates, tailored to meet business needs and compliance requirements.
Disaster Recovery in Microsoft Azure
Need help optimizing your cloud costs?
Get expert advice on how to reduce your cloud expenses without sacrificing performance.
Designing Multi-Region Disaster Recovery Architectures
::: @figure 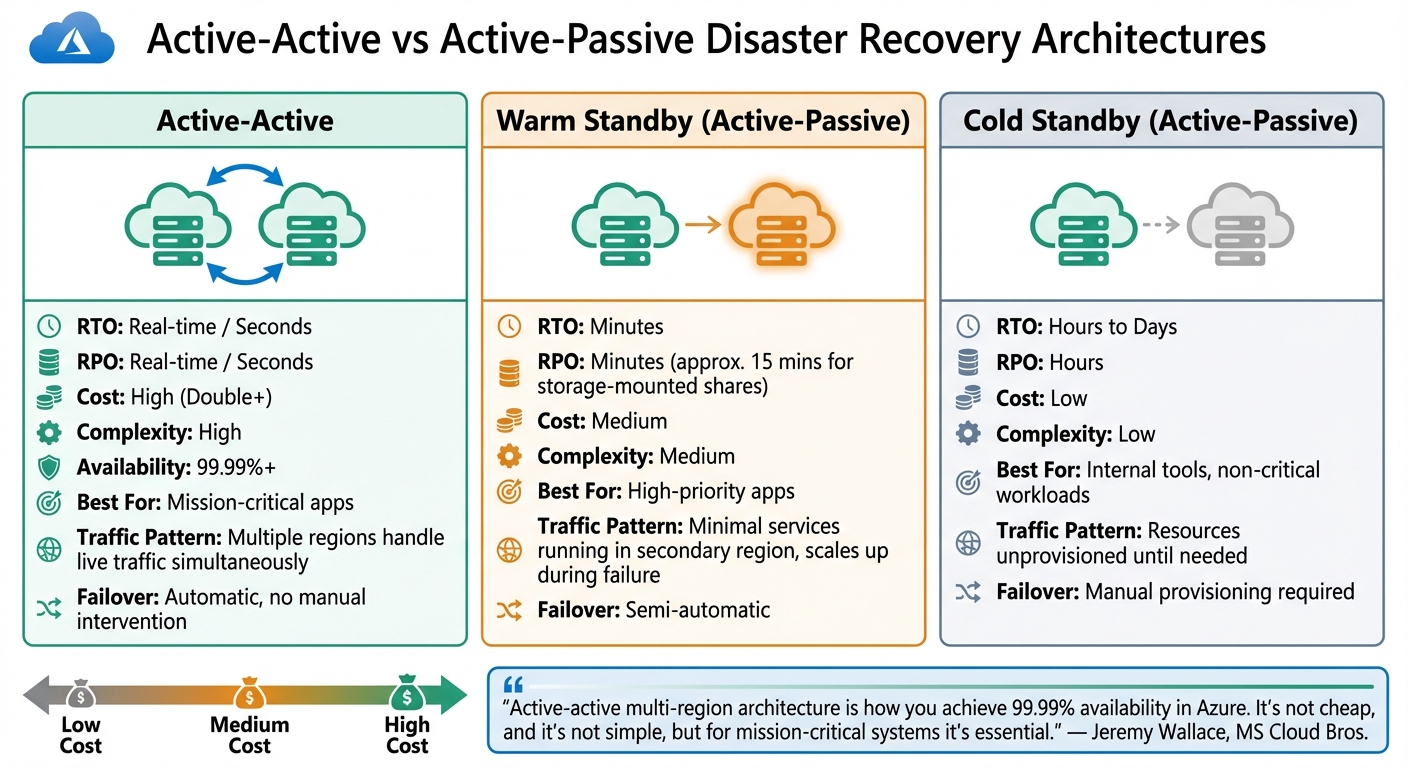 {Azure Multi-Region Disaster Recovery Architecture Comparison: Active-Active vs Active-Passive Deployment Strategies}
:::
{Azure Multi-Region Disaster Recovery Architecture Comparison: Active-Active vs Active-Passive Deployment Strategies}
:::
Active-Passive vs Active-Active Deployments
When planning your disaster recovery setup, the decision between active-active and active-passive architectures hinges on your recovery goals and budget. In an active-active configuration, multiple regions handle live traffic simultaneously. This approach ensures near-zero recovery time objectives (RTO) and recovery point objectives (RPO), with availability exceeding 99.99%. If one region experiences an outage, the others automatically take over the workload without any manual intervention. This makes active-active setups ideal for mission-critical systems where downtime is simply unacceptable.
Active-active multi-region architecture is how you achieve 99.99%+ availability in Azure. It's not cheap, and it's not simple, but for mission-critical systems it's essential.- Jeremy Wallace, MS Cloud Bros [7]
For a more cost-effective solution, active-passive architectures offer flexibility. A warm standby configuration keeps minimal services running in the secondary region, scaling up only during a failure. This typically achieves RTO and RPO within minutes. Meanwhile, cold standby keeps resources unprovisioned until they're needed, resulting in recovery times measured in hours or even days. While this approach is more economical, it’s better suited for less critical workloads. For UK-based organisations managing GDPR requirements, active-passive setups often use asynchronous replication, with storage-mounted shares achieving an RPO of around 15 minutes [3].
| Feature | Active-Active | Warm Standby | Cold Standby |
|---|---|---|---|
| RTO | Real-time / Seconds | Minutes | Hours to Days |
| RPO | Real-time / Seconds | Minutes | Hours |
| Cost | High (Double+) | Medium | Low |
| Complexity | High | Medium | Low |
| Best For | Mission-critical apps | High-priority apps | Internal tools |
These deployment choices form the foundation for integrating Azure's disaster recovery tools, which are covered in the next section.
Core Components of a Multi-Region Architecture
Building a reliable multi-region design relies on a combination of Azure services working in tandem. To manage global traffic, Azure Front Door and Azure Traffic Manager are key options. Front Door operates at Layer 7, offering load balancing and Web Application Firewall (WAF) features, while Traffic Manager uses DNS-based routing [3][8]. Front Door’s health probes check the status of origins every 30 seconds, enabling quick failover detection [3].
For data resilience, Geo-Redundant Storage (GRS) or Geo-Zone-Redundant Storage (GZRS) ensures your data is replicated six times across two regions. For relational databases, Azure SQL Database uses Auto-failover Groups to support active-passive setups, while Azure Cosmos DB facilitates multi-region writes, making it a strong choice for active-active configurations. Additionally, global services like Microsoft Entra ID and Azure Key Vault are designed with built-in redundancy, ensuring no single point of failure for identity and secrets management [5][1].
| Component Type | Recommended Service | DR Role |
|---|---|---|
| Traffic Routing | Azure Front Door / Traffic Manager | Global endpoint and failover orchestration |
| Database | Azure SQL Database / Azure Cosmos DB | Geo-replication and multi-region data access |
| Storage | Azure Blob Storage (GZRS) | Asynchronous data replication across regions |
| Identity | Microsoft Entra ID | Global authentication availability |
| Secrets | Azure Key Vault | Replicated management of keys and certificates |
Choosing the right combination of these services ensures your architecture aligns with your organisation's needs.
Choosing the Right Strategy for Your Business
Your disaster recovery strategy should reflect the importance of your workloads. For UK organisations, workload tiering can guide decisions, balancing cost and compliance. Tier 0 (Mission Critical) workloads demand active-active configurations, with RTO in seconds and near-zero RPO [1]. Tier 1 (Business Critical) workloads are well-suited to warm standby setups, achieving recovery in minutes. Tier 2 (Business Operational) workloads can rely on cold standby, with RTO and RPO measured in hours. Finally, Tier 3 (Administrative) workloads may only require basic backup and restore processes [1].
Compliance considerations, such as GDPR, often influence architecture choices. Data residency requirements typically mean using regions like UK South, UK West, or EU zones. To keep costs manageable in multi-region setups, options like Reserved Instances and Azure Hybrid Benefit can help reduce expenses [1]. Additionally, using Archive or Cool storage tiers can cut costs for long-term data retention. The challenge lies in striking the right balance between resilience and budget constraints.
Implementing Azure ARM Templates for Multi-Region Deployments
Defining Resource Groups and Templates
When structuring Azure Resource Manager (ARM) templates for multi-region deployments, a modular approach is key. A main template serves as the orchestrator, linking to nested templates that handle specific regional setups, such as virtual networks or virtual machines [2][10]. This setup simplifies testing and enhances reliability.
For simultaneous deployments across multiple resource groups, consider using a subscription-level template with the subscriptionDeploymentTemplate.json schema. This approach lets you create resource groups and initiate nested deployments in various regions within a single process [10]. To avoid hardcoding region names, use the [resourceGroup().location] function as the default value for your location parameter. This ensures resources are dynamically assigned to the correct region [2].
The copy element is particularly helpful for deploying identical resources across multiple regions. By passing an array of region objects (each containing location and prefix) as a parameter, you can iterate through all specified regions with a single resource definition [12]. To generate unique resource names, combine uniqueString(resourceGroup().id) with copyIndex() [11]. For consistent cross-region deployments, store linked templates in Azure Blob Storage and use parameters like _artifactsLocation to dynamically construct URIs. This ensures the main template can retrieve nested templates regardless of the target region [2][10].
Once your modular templates are ready, the next step is deploying these resources efficiently using automation tools.
Deploying Resources with Azure CLI and PowerShell
You can deploy multi-region resources using three main methods: scripted iteration, nested templates, or subscription-level templates [10]. Scripted iteration is ideal for straightforward setups, while nested templates are better suited for handling complex dependencies.
Using Azure CLI, start by creating resource groups for each region:
az group create --name MyRG-West --location westus
Then deploy resources with:
az deployment group create --resource-group MyRG-West --template-file azuredeploy.json
For PowerShell, similar commands are:
New-AzResourceGroup -Name MyRG-East -Location eastus
New-AzResourceGroupDeployment -ResourceGroupName MyRG-East -TemplateFile azuredeploy.json
Before deployment, verify that each target region supports the required resource types using az provider list (CLI) or Get-AzureRmResourceProvider (PowerShell) [2].
| Deployment Method | Best For | Key Advantage |
|---|---|---|
| Scripted (CLI/PowerShell) | Simple, linear deployments | Quick and easy for smaller setups [10] |
| Nested Templates | Complex, multi-resource group setups | Simplifies dependency management [10] |
| Subscription-Level Templates |
Subscription factorysetups |
Combines resource group and resource creation [10] |
For cross-region dependencies, ensure that target resource groups are pre-created or use the dependsOn property when defining them within the same subscription-level template [10]. To avoid issues with regional or sovereign cloud environments, dynamically retrieve service endpoints using the reference() and resourceId() functions instead of hardcoding namespaces like .blob.core.windows.net [2].
For more complex environments, automating deployments with Azure DevOps can further streamline the process.
Automating Deployments with Azure DevOps

Azure DevOps pipelines transform manual deployments into automated, repeatable workflows. This not only simplifies the process but also ensures disaster recovery setups can be quickly re-established. A multi-stage YAML pipeline is a common approach, starting with a Compile
stage and followed by multiple Deploy
stages for each target region [13]. Use variable groups to maintain consistency - create a Common
group for shared settings like subscription details and region-specific groups for parameters such as location and ResourceGroupName [13].
Running deployment stages as parallel jobs can significantly cut deployment times. For instance, a team refactored a 1,000-line nested ARM template into smaller, individual templates. By integrating these with Azure DevOps pipelines and running 10 parallel jobs via Azure CLI, they reduced the deployment time for a new region from about 60 minutes to just 30–35 minutes. This approach also resolved race conditions that had previously caused issues [14]. Parallel deployments reduced deployment times by roughly 60% compared to serial execution [14].
For governance, Azure DevOps Environments allow you to set up Approvals and Checks
, ensuring that deployments to production regions require manual sign-off or meet specific branch policies [13]. Use service connections to link Azure DevOps with your Azure subscriptions, enabling automated resource group creation and template deployment without manual credential management [13]. Combining parallel execution, modular templates, and approval gates creates a reliable and efficient deployment pipeline for multi-region disaster recovery architectures.
Data Replication and Traffic Management
Once your resources are deployed, it’s crucial to ensure data stays synchronised and traffic is routed correctly across regions. This ensures your applications remain available even during regional outages. Below, we’ll cover how to configure traffic management, set up data replication, and meet recovery objectives effectively.
Configuring Azure Traffic Manager or Azure Front Door
Azure provides two key services for managing traffic in multi-region setups: Traffic Manager and Front Door. Each operates at a different layer:
- Traffic Manager works at the DNS level (Layer 4), directing users to the healthiest endpoint.
- Front Door functions at the application level (Layer 7), offering global load balancing, SSL offloading, and built-in Web Application Firewall (WAF) protection [18][20].
For active-passive failover setups, use Priority Routing, assigning the primary region as '1' and the secondary as '2' [19][23]. Performance Routing ensures users are directed to the region with the least latency, while Weighted Routing distributes traffic based on pre-set percentages [18][4].
Health probes are key to ensuring smooth failovers. Configure the protocol, interval, and allowed failure count for these probes [18][22]. The failover time for Traffic Manager is calculated as:
TTL + (Retry Count × Probing Interval).
For instance, with a TTL of 10 seconds, a probing interval of 10 seconds, and a retry count of 3, failover completes in 40 seconds [22]. To speed up DNS updates, use a low TTL (30–60 seconds) to avoid caching outdated IP addresses [18][22].
Instead of relying solely on basic '200 OK' checks for your homepage, implement a custom /health endpoint. This endpoint should verify critical backend dependencies like database connectivity [18][20].
| Feature | Azure Traffic Manager | Azure Front Door |
|---|---|---|
| Protocols | Any (HTTP, HTTPS, TCP, UDP) | HTTP, HTTPS only |
| Routing Level | DNS (Layer 4) | Application (Layer 7) |
| SSL Termination | No | Yes (at the edge) |
| WAF Integration | No | Yes (built-in) |
| Caching/CDN | No | Yes |
| Failover Trigger | DNS resolution change | Instantaneous path re-routing |
Data Replication Across Regions
Data replication is just as important as traffic routing. Using automated deployments via ARM templates, you can configure service-specific replication for seamless disaster recovery. Each Azure service has its own replication setup requirements:
- Azure Storage: Enable Blob Object Replication by activating Change Feed and Versioning, setting up destination endpoints, and linking the source and destination with a policy ID [15].
Object replication asynchronously copies block blobs between a source storage account and a destination account.- Azure Storage Documentation [15]
Azure Container Registry (ACR): Geo-replication is achieved by defining a
Microsoft.ContainerRegistry/registries/replicationschild resource in a Premium SKU registry [16].Azure Service Bus: Use the
Microsoft.ServiceBus/namespaces/disasterRecoveryConfigsresource type to configure Geo-Disaster Recovery (Geo-DR). However, note that this only replicates metadata like queues and topics - not the actual messages. Applications must handle message replication independently or use an active-active pattern with distributed locking [9].
A regional outage without proper disaster recovery means lost messages, broken workflows, and potentially significant revenue impact.- Arthur C. Codex, Reintech [9]
- Recovery Services Vaults: ARM templates can set the
storageModelTypetoGeoRedundantand enable thecrossRegionRestoreFlagfor cross-region recovery [17]. Service Bus templates can also define a disaster recovery alias, ensuring a consistent connection string even after failover [9].
| Service | ARM Resource Type for Replication | Replication Scope |
|---|---|---|
| Azure Storage | Microsoft.Storage/storageAccounts/objectReplicationPolicies |
Block Blobs [15] |
| Container Registry | Microsoft.ContainerRegistry/registries/replications |
Container Images/Artifacts [16] |
| Service Bus | Microsoft.ServiceBus/namespaces/disasterRecoveryConfigs |
Metadata (Queues, Topics) [9] |
| Recovery Vault | Microsoft.RecoveryServices/vaults/backupstorageconfig |
Backup/VM Data [17] |
Meeting Recovery Objectives (RPO/RTO)
Your replication strategy must align with your Recovery Point Objective (RPO) and Recovery Time Objective (RTO). For mission-critical workloads (Tier 0), aim for active-active deployments to achieve near-zero RPO and RTO, measured in seconds. Less-critical systems (Tier 3) can rely on backup/restore methods with RTOs of hours or days [1].
Some examples of Azure services and their typical recovery metrics include:
- Azure SQL Database: Active geo-replication and failover groups can achieve an RPO of less than 5 seconds and an RTO of under 30 seconds [21].
- Azure Storage: Geo-redundant options (GRS/GZRS) use asynchronous replication, with an RPO of around 15 minutes [3].
- Azure Site Recovery (ASR): Supports disaster recovery for Azure VMs with RPOs under an hour and RTOs measured in minutes [25].
- Cosmos DB: Multi-region writes ensure near-zero RPO and RTO in seconds [1].
| Azure Service | Replication Mechanism | Typical RPO | Typical RTO |
|---|---|---|---|
| Azure SQL Database | Failover Groups / Geo-Replication | < 5 seconds [21] | < 30 seconds [21] |
| Azure Storage (GRS) | Asynchronous Geo-Replication | ~15 minutes [3] | < 1 hour [24] |
| Azure VM (ASR) | Azure Site Recovery | < 1 hour [25] | Minutes [25] |
| Cosmos DB | Multi-region Writes | Near zero [1] | Seconds [1] |
To maintain your RPO targets, monitor replication lag via the Last Sync Time property and set alerts [1]. Regularly test planned failovers - ideally every quarter - to ensure recovery times meet your RTO goals and data remains intact [1][9]. Unlike unplanned failovers, planned failovers for storage accounts involve no data loss, as they synchronise data before switching roles [24].
Testing and Maintaining Disaster Recovery Setups
Once you've deployed multi-region resources using ARM templates, the work doesn't stop there. Regular testing and upkeep are critical to ensure your disaster recovery (DR) setup is ready when it’s needed. A DR plan is only as good as its performance under real-world conditions, so relying solely on documentation isn’t enough [27]. The next step is to simulate failure scenarios and confirm that every component works as expected.
Testing Disaster Recovery Scenarios
Azure Site Recovery (ASR) offers a test failover feature that lets you validate your DR strategy without affecting production systems. This involves creating virtual machines (VMs) in an isolated network that mirrors your production environment [26]. Always use a separate test virtual network that replicates your production subnets and IP ranges while keeping it completely separate from the live recovery network.
When testing DR scenarios, follow a structured approach. Start with tabletop exercises, move on to dry runs, and then conduct full-scale production-level drills. ARM templates can automate the entire process - from replication and triggering failover to reprotecting, failing back, and reprotecting again [28].
When selecting recovery points, you have two main options: Latest
, which minimises data loss but may increase recovery time, or Latest processed
, which prioritises speed [26][29]. Keep in mind that failovers for VMware VMs running older Mobility service versions or physical servers might take an additional 8 to 10 minutes [26]. After testing, use the Cleanup test failover
feature to remove test VMs and avoid unnecessary costs [26][30].
Monitoring and Health Checks
Testing alone isn’t enough - you also need continuous monitoring to maintain DR readiness. Use a single Log Analytics workspace for both regions to centralise monitoring via Azure Virtual Desktop Insights. However, if the primary workspace becomes unavailable during an outage, consider having a separate workspace for the secondary region [6]. Azure Monitor and Application Insights can be configured to send alerts for performance issues or regional outages [1][19].
For critical systems (Tier 0), service level objectives often require availability levels of 99.999% (five nines) or 99.99% (four nines) [1]. To meet these stringent standards, implement advanced health checks that detect potential problems before they escalate [1]. Periodically activate session host VMs in the secondary region to refresh tokens and apply security updates [6]. Store versioned DR runbooks in Git and ensure they are accessible offline [1].
Performing Failback Procedures
Failback is the final step in the DR cycle and requires careful execution to ensure stability and data consistency before shifting production traffic back to the primary environment [1].
Before starting the failback process, confirm that the primary region has passed all health checks and is fully functional. The secondary region’s VM must be reprotected to synchronise data back to the primary region. At the same time, the original VM in the primary region should be shut down to prevent data corruption or synchronisation errors [29].
In your Recovery Services vault, navigate to Replicated items and verify that the VM is in a protected state with synchronisation complete. Then, initiate failover from the secondary region to the primary region. Select your recovery point - Latest
is ideal for planned failbacks to avoid data loss - and enable the option to Shut down machine before beginning failover
to maintain data integrity [29]. Once failback is complete, reprotect the VM to re-establish replication from the primary region to the secondary region, restoring the full DR cycle.
Best Practices for Multi-Region Deployments with ARM Templates
When setting up multi-region deployments, it's not just about automating processes - it’s about ensuring your disaster recovery architecture is robust, cost-efficient, and secure. A well-thought-out approach can make the difference between a smooth recovery and a chaotic scramble during an outage.
Adopting Naming Conventions and Azure Policies
A consistent naming convention is the backbone of any multi-region deployment. Here's a format to follow:
{resource-type}-{workload}-{environment}-{region}-{instance}
For example: vm-orderapi-prod-eastus-001. This structure clearly identifies the resource type, its purpose, the environment, the region, and the instance number.
If responders can't decipher a resource name quickly in an outage scenario… you are not resilient- Chris Pietschmann, Founder of Build5Nines [31]
To keep names concise and within Azure’s character limits, use standardised region abbreviations like eus for East US or weu for West Europe. For dynamic naming, leverage functions like concat() or [resourceGroup().location]. For larger deployments, consider a dedicated linked template (e.g., namingConventions.json) to centralise your naming logic.
Enforce these conventions using Azure Policy. Start with 'Audit' mode to identify non-compliance, then switch to 'Deny' mode to ensure adherence.
| Resource Type | Recommended Prefix | Max Length | Allowed Characters |
|---|---|---|---|
| Resource Group | rg | 90 | Alphanumeric, hyphens, underscores, periods |
| Virtual Machine | vm | 15 (Windows) / 64 (Linux) | Alphanumeric, hyphens |
| Storage Account | st | 24 | Lowercase letters and numbers only |
| Key Vault | kv | 24 | Alphanumeric, hyphens |
| Virtual Network | vnet | 80 | Alphanumeric, hyphens, underscores, periods |
Clear and enforced naming conventions not only improve organisation but also streamline cost management. They help reduce confusion, speed up recovery during outages, and lower operational risks across regions.
Reducing Costs in Multi-Region Setups
Multi-region deployments can quickly become expensive, so it’s crucial to align spending with business priorities. For instance, mission-critical (Tier 0) systems might require active-active configurations with minimal recovery times, while less critical workloads (Tier 3) can rely on lower-cost backup and restore strategies [1].
A warm standby strategy strikes a balance - deploy secondary regions at partial capacity and use auto-scaling to ramp up resources during failover. This approach keeps costs manageable without compromising recovery times. By parameterising your ARM templates, you can adjust resource settings (like SKU or capacity) for each environment, ensuring you don’t deploy full-scale production resources unnecessarily.
Using modular ARM templates can also help control costs. By adhering to the single responsibility principle, you can reuse components like networking or monitoring across regions without duplicating templates. This simplifies management and highlights areas for cost optimisation.
For expert guidance, Hokstad Consulting's cloud cost engineering services can identify underused resources, optimise your architecture, and implement scaling policies that balance resilience with cost efficiency. Their expertise in automation and DevOps transformation ensures your templates are built with both performance and financial goals in mind.
While cost management is critical, security across regions is equally important to protect your disaster recovery setup.
Maintaining Security and Compliance
Security measures must be uniform across all regions to prevent vulnerabilities during failover. When working with ARM templates, always use the securestring type for sensitive parameters like passwords and avoid setting default values. For more complex data, use secureObject. Store secrets, keys, and certificates in Azure Key Vault and reference them dynamically in your templates.
Azure Policy can enforce security standards, such as restricting deployments to approved regions to meet data residency requirements. Ensure consistent Role-Based Access Control (RBAC) and Managed Identity setups across all regions to enable a seamless and secure failover process. Adding Azure Resource Locks to critical resources can prevent accidental deletions that could disrupt disaster recovery operations.
Encrypt data at rest and in transit, and use protectedSettings in ARM templates to secure sensitive information passed to virtual machines. Limit your exposure by avoiding public IP addresses for VMs unless absolutely necessary. Instead, use tools like Azure Bastion, VPN gateways, or jumpboxes for administrative access.
After a failover or disaster recovery event, rotate any temporary credentials used during the process. To ensure your templates meet security standards, use the ARM template testing toolkit before deployment. It’s also worth noting that resource group metadata is stored in the region where the group is created, so placing resource groups alongside their resources can reduce risks if a region becomes unavailable.
Conclusion and Next Steps
Creating a resilient multi-region disaster recovery setup with Azure ARM templates minimises downtime and provides a repeatable, auditable, and cost-conscious framework for business continuity. By leveraging ARM templates, you ensure consistent deployments across regions, avoid configuration drift, and enable rapid failover to backup regions in minutes rather than hours.
Key Takeaways
The main strength of using ARM templates for disaster recovery lies in Infrastructure as Code (IaC). These version-controlled templates eliminate the risks of manual configuration errors. Dynamic references, such as [resourceGroup().location], allow seamless deployments across different regional endpoints.
Tiered recovery strategies are essential for aligning protection levels with business priorities, helping to manage costs effectively. For instance, mission-critical systems may require active-active configurations with minimal recovery times, while non-essential workloads can rely on simpler, lower-cost backup methods. This flexible approach is vital, especially since comprehensive cross-region disaster recovery strategies can increase monthly Azure costs by approximately 40% [32].
Partnering with Hokstad Consulting
Once your disaster recovery strategy is outlined, expert guidance can simplify implementation. For UK businesses, Hokstad Consulting offers specialised services in cloud cost optimisation and DevOps automation. Their expertise can reduce infrastructure spending by 30–50%, with services such as cloud cost audits to identify underused resources, automated ARM template deployment for consistent recovery, and governance frameworks to ensure compliance with GDPR and industry standards. Hokstad operates on a No Savings, No Fee
model, meaning their success is tied directly to your cost reductions. Their managed retainer services also provide ongoing performance optimisation and cost management, ensuring your disaster recovery architecture remains efficient and economical.
Next Steps to Get Started
To turn these strategies into action, consider the following steps:
- Categorise your workloads by criticality - from Tier 0 (mission-critical) to Tier 3 (administrative). Define specific Recovery Time Objectives (RTO) and Recovery Point Objectives (RPO) for each tier [1]. This ensures your disaster recovery investments match the actual business impact.
- Transition manual configurations to ARM templates, using parameters for locations instead of hardcoding values. This keeps templates reusable and adaptable across regions [2].
- Integrate ARM templates into CI/CD pipelines using Azure DevOps. Automate traffic redirection with tools like Azure Traffic Manager or Front Door [4].
- Version and store your disaster recovery runbooks offline to ensure they remain accessible even if the primary cloud control plane is unavailable [1].
- Conduct quarterly failover drills to test your runbooks and team readiness. A disaster recovery plan is only as good as its execution, and regular testing ensures it’s ready when needed.
FAQs
When should I choose active-active vs active-passive DR?
When deciding between options, it boils down to what your organisation values most: availability, cost, or simplicity.
- Active-active setups operate systems across multiple regions at the same time. This approach ensures near-zero downtime, making it ideal for mission-critical systems. However, it comes with higher costs and added complexity.
- Active-passive, on the other hand, maintains a backup system in another region that's only activated during a failure. This is a more cost-effective choice but comes with longer recovery times, making it better suited for applications that aren't as time-sensitive.
Choose based on the balance your organisation needs between uptime and budget.
How do ARM templates avoid hardcoding region settings?
ARM templates simplify region settings by using parameters and functions, avoiding the need for hardcoding. For example, parameters like arrays combined with functions such as copyIndex() enable dynamic region assignments based on user inputs. This makes it easier to set up flexible, multi-region deployments without manually specifying regions for each instance.
What should I test in a quarterly failover drill?
During a quarterly failover drill, it's important to focus on these critical areas to ensure your disaster recovery plan is up to the mark:
- Recovery Steps and Timings: Check that the recovery processes align with your set objectives and timelines.
- Failover Functionality: Confirm that systems seamlessly switch to the secondary region without issues.
- Data Synchronisation: Ensure data replication is accurate and maintains integrity throughout the process.
- Application Availability: Test all applications and their dependencies to verify they function correctly after the failover.
- Automation and Monitoring: Make sure all scripts, workflows, and alerts operate as expected to support the recovery.
Consistent testing like this keeps your disaster recovery plan reliable and ready to handle unexpected disruptions.