
If scanning is not tied to your asset list, CI/CD, and fix deadlines, it will miss systems and leave old findings open.
I’d boil this guide down to four points:
- Set scope first: include VMs, ESXi hosts, Kubernetes, registries, code dependencies, IaC, secrets, and public-facing apps.
- Match tools to the job: host scanners for servers, Trivy for containers and Kubernetes, SAST/SCA/DAST for code and apps, and IaC checks for Terraform and Helm.
- Automate the loop: discover assets, run scans on a schedule and on change events, send findings to one place, then re-scan after fixes.
- Use fixed rules for release and remediation: block Critical and High issues, create tickets for Medium and Low, and track deadlines in Jira, ServiceNow, or a vulnerability register.
For UK teams, timing and audit records matter too. I’d run scans in Europe/London time, keep heavier jobs in off-hours such as 02:00–05:00, and keep dated reports in a consistent format like 07/08/2026 for ISO 27001 and Cyber Essentials evidence. Common targets in the piece include 24 hours for critical triage, 72 hours for high triage, and fix windows such as 5 working days for exploitable critical issues on production web apps.
A short version: know what you own, scan it at the right time, send every finding to one system, and don’t close tickets until a re-scan shows the issue has gone.
This article walks through that model in plain steps, from scope and tool choice to CI/CD gates, waivers, SLAs, and monthly review.
Choose tools that fit a private cloud environment
Once the scope is fixed, the next step is picking scanners that suit each asset class and network boundary. In a private cloud, how a tool runs matters just as much as what it scans. You want tools that run on-premises, work well across segmented networks, and keep scan data inside UK-controlled environments.
Match scanner types to each asset class
Different assets need different scanners. Host scanners are the right fit for VMware VMs, Hyper-V guests and bare metal. Trivy works well for container images, Kubernetes workloads, manifests and private registries. For application and pipeline risk, use SAST, DAST, SCA, IaC and secret-scanning tools.
Use SAST for insecure code, DAST for runtime web and API testing, SCA for third-party libraries, IaC scanning for Terraform, Helm and Ansible, and secret detection on every push.
Compare deployment, coverage and cost before rollout
Before rollout, check three things: on-premises deployment, offline updates and licensing. Those three filters help cut the shortlist down before you compare deployment model, coverage and cost.
| Tool | Primary focus | Deployment | Private cloud suitability | Licensing / cost model |
|---|---|---|---|---|
| Nessus Professional | Host and network | On-prem scanner / virtual scanner | Strong - offline plugin feeds and segmented-network deployment | Per scanner, unlimited IPs |
| Greenbone / OpenVAS | Host and network | On-prem appliance or VM | Strong - fully on-prem with offline or scheduled updates | Per asset or appliance |
| Trivy | Containers, Kubernetes, IaC, secrets, SCA | Container, CI job or Kubernetes Operator | Strong - runs inside a private cluster and scans private registries | Open source (free) |
| SonarQube | SAST and code quality | Self-hosted | Strong - on-prem with Git integration | Varies by edition |
| OWASP ZAP | DAST | Container / self-hosted | Strong - automated in private staging | Open source (free) |
| Checkov | IaC | CI job / self-hosted | Strong - fits Git-based workflows | Open source (free) |
Convert pricing to annual GBP, including VAT where relevant.
When to bring in implementation support
If your stack needs to cover mixed estates and strict data boundaries, it makes sense to get specialist help before rollout. Bring in Hokstad Consulting when you need help designing a private-cloud scanning stack, tying it into DevOps workflows and automating reporting and remediation.
Need help optimizing your cloud costs?
Get expert advice on how to reduce your cloud expenses without sacrificing performance.
Build the automated scanning workflow end to end
A well-designed automated scanning workflow should run as a repeatable loop: discover assets, trigger scans, centralise findings, remediate, and re-scan to confirm the fix. Then the loop runs again as the estate changes. Start by automating discovery and triggers, because the rest of the workflow falls apart if your asset data is patchy or out of date.
Automate discovery, scheduling and scan triggers
Pull inventory from vSphere, Kubernetes, DHCP/DNS and the CMDB. Using these sources together cuts down blind spots and helps you spot assets that a one-source setup would miss. Classification should tag assets by environment, criticality and ownership, so scan policies and remediation routes land with the right team.
Sync this inventory every 15 minutes for vSphere and continuously for Kubernetes.
Once discovery is in place, add both scheduled and event-driven triggers. Keep heavier authenticated host scans in the 02:00–05:00 GMT/BST window for production networks. A solid starting cadence is weekly authenticated scans for production hosts, with daily scans for development and staging.
Then add event-driven triggers so scans run on their own when:
- a new VM is registered in vSphere
- a container image is pushed to your private registry
- a deployment is promoted to production
- a configuration management tool such as Ansible or Terraform applies a material change [4][2][1]
Adjust workflow patterns for VMware, Kubernetes and bare metal
The workflow should then shift based on the estate type.
In VMware/vSphere/NSX estates, deploy scan engines as virtual appliances inside NSX segments. That gives them reach across east-west traffic without forcing scans through external firewalls. Use vCenter tags and NSX security groups to decide which VMs map to which scan policy. [5][7]
In Kubernetes and OpenShift, the workflow leans more on image scanning at build time, backed by admission controls. Run Trivy on every image build and push. If CRITICAL or HIGH vulnerabilities show up, fail the pipeline. Then back that up with admission controls, so images above your severity threshold are blocked before they hit production. [6][8][9]
For bare-metal and traditional private networks, scheduled authenticated host scans are still the main control. Use exclusion lists and lighter scan profiles for legacy systems that can't handle aggressive scanning.
Route results to one place for triage and re-scans
Export JSON, CSV or SARIF into a single system of record for triage and ticketing. Normalise fields across tools into one schema that covers CVE ID, CVSS score, known exploitability, asset identifier, asset criticality tier, environment and ownership. Without that step, cross-tool triage becomes a mess.
Re-scans should be automated too. When a ticket is marked as fixed, automation should kick off a targeted re-scan of the affected asset or image using the same scan policy that found the issue. The ticket should move to closed only when the vulnerability no longer appears.
For critical vulnerabilities - CVSS ≥ 9.0 on Tier-1 production assets - the re-scan should finish before any change is promoted to production. [3] That gives you evidence-based closure, which also helps with internal audit work such as ISO 27001. For UK teams, that means a clear documented trail instead of manual sign-off. [3]
Feed these verified results into CI/CD gates and remediation rules.
Integrate scanning into CI/CD and enforce remediation rules
::: @figure 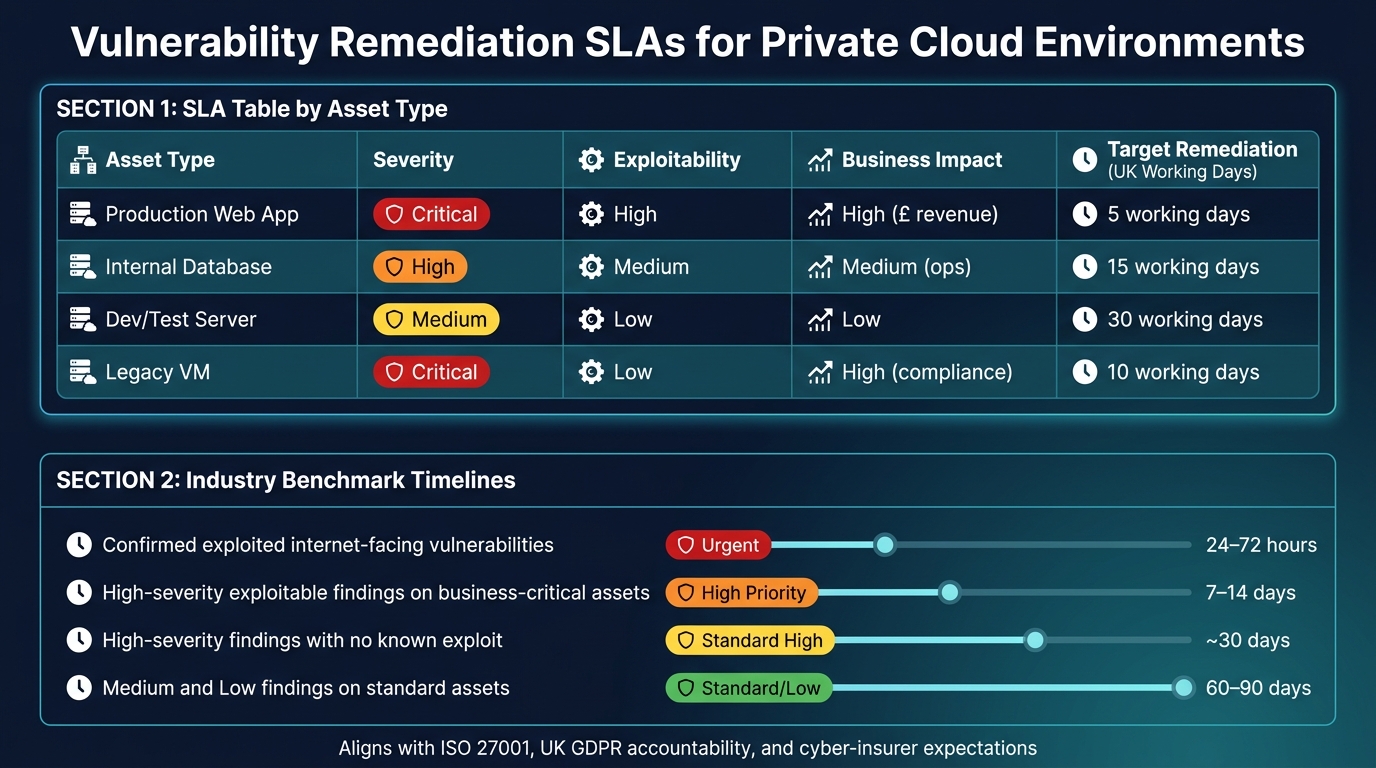 {Vulnerability Remediation SLAs for Private Cloud: Severity & Asset Type Guide}
:::
{Vulnerability Remediation SLAs for Private Cloud: Severity & Asset Type Guide}
:::
With findings in one place, the next step is simple: make scanning part of every delivery cycle, not a separate security review that turns up later. Run scans at each stage, block Critical and High findings, and turn lower-risk issues into tickets. Start with lightweight checks early, then keep DAST for staging. That way, findings stay tied to the build instead of drifting into a separate security backlog.
Add scans to GitLab, GitHub Actions and Jenkins pipelines
Each scan type belongs at the point where it helps most. At commit and merge request stage, run secrets detection along with lightweight SAST and SCA. Developers get fast feedback before code lands in the shared repository. At build stage, run container image scanning and IaC checks with tools such as Trivy or Checkov. Then run DAST against a staging environment before any release candidate moves forward. This catches runtime issues like injection flaws or misconfigurations that static tools won't spot. [12][16]
For self-hosted runners and private registries, make sure runners can reach your internal Git server, vulnerability scanners and registry. Store credentials in the CI/CD secrets store and inject them only into the stages that need them. In GitLab, the built-in SAST, Dependency Scanning, Secret Detection, Container Scanning and DAST templates in .gitlab-ci.yml cover most of this with little setup. In GitHub Actions, separate workflow files on push and pull_request events keep things tidy. In Jenkins, a declarative Security stage with parallel steps for SAST, SCA and secrets, followed by a Container Scan stage before the image is pushed, follows the same model. [14][15][16]
Once scans are in the pipeline, you need clear rules on what stops a release and what becomes follow-up work.
Use policy as code to set severity thresholds and release gates
Put release rules into policy as code. Every rule should point to a named owner and a fixed exception path. A common setup uses Open Policy Agent (OPA) or GitLab's security approval rules to say that any pipeline targeting production must include sast, sca, container_scan and dast stages. It must also fail if any stage reports a Critical or High finding without an approved exception. [10][11]
Set scanners to fail on Critical and High findings. Let Medium findings move through the pipeline, but trigger a ticket-creation job that opens a Jira or ServiceNow ticket with the vulnerability details and a target fix date: 30 working days for medium and 90 working days for low. [13] This split helps teams keep shipping while still making sure serious issues don't slide through.
Exceptions need rules as well. A policy-as-code waiver file, such as security-waivers.yaml, can allow a known finding to pass, but only if it includes a documented justification, a compensating control and a hard expiry date. Once that date passes, the finding should be flagged again. Open-ended waivers are a bad habit. They pile up fast and weaken the whole model.
That means every team works to the same release rule, no matter which pipeline they use.
Track remediation with clear priorities and deadlines
Prioritise remediation by exploitability, criticality and financial impact (£), then keep one live record for owner, status and deadline.
Use one SLA model across teams so deadlines don't vary from one group to another. The table below is a practical starting point for common asset types in a UK private cloud:
| Asset type | Severity | Exploitability | Business impact | Target remediation date (UK) |
|---|---|---|---|---|
| Production web app | Critical | High | High (£ revenue) | 5 working days |
| Internal database | High | Medium | Medium (ops) | 15 working days |
| Dev/test server | Medium | Low | Low | 30 working days |
| Legacy VM | Critical | Low | High (compliance) | 10 working days |
Industry norms, reflected in cyber-insurer expectations, set 7 to 14 days for high-severity exploitable findings on business-critical assets, about 30 days for high-severity issues with no known exploit, and 60 to 90 days for medium and low findings on standard assets. [13] For confirmed exploited internet-facing vulnerabilities, many frameworks expect remediation within 24 to 72 hours. [13] Matching your internal SLAs to these benchmarks also gives you a clearer audit trail for ISO 27001 and UK GDPR accountability.
Keep one authoritative record in Jira, a GRC tool or a vulnerability register, so each finding has an owner, status and deadline that teams can check during planning and release reviews.
If your team is dealing with fragmented pipelines - mixing GitLab, GitHub Actions and Jenkins across VMware and Kubernetes estates - Hokstad Consulting can help design a consistent policy-as-code model that applies the same rules across all three platforms, including self-hosted runner set-ups and network path design for private cloud environments.
Conclusion: Put automated scanning on a repeatable operating model
Automated vulnerability scanning delivers value only when it runs as a repeatable operating model. Scope, tools, workflows, reporting, and remediation all need to stay connected as the estate changes. That only holds up when delivery stages and security policy move together, not in separate lanes.
Tie each scan to the delivery stage where the risk shows up. Run checks at commit for fast feedback, at build for container and IaC checks, in staging for DAST, and use policy gates for Critical and High findings. Once that workflow is part of day-to-day delivery, the next step is simple: show that it is cutting manual effort.
Manual remediation still takes up most of the work. That is why automation matters. It cuts the back-and-forth between teams and keeps SLA tracking linked to fixes that have actually been verified.
Track a small set of measures and review them on a set rhythm:
- Scan coverage
- Mean time to remediate by severity
- Gate failures
Review these monthly with engineering and quarterly with security and business stakeholders, then adjust thresholds based on what the data shows. With those measures in place, implementation support can speed up rollout across larger estates.
If your private cloud spans VMware, Kubernetes, and bare metal across multiple teams or sites, Hokstad Consulting can help design the workflow, integrate the tooling into CI/CD, and keep the operating model efficient as the estate grows.
FAQs
How do we avoid missing assets?
Use automated discovery tools to keep a constant view of your private cloud. They should map virtual machines, containers, serverless functions, databases, storage, and shadow IT. Run these tools every day, or set them to trigger on their own when new assets appear or existing ones change.
It also helps to standardise tagging across platforms. Back that up with regular governance reviews, network scanning, and configuration databases so your inventory stays accurate and easy to see.
Which scans should run in CI/CD?
Use a layered approach in your private cloud CI/CD pipeline:
- SAST and SCA at the commit or build stage
- IaC and container scanning before deployment
- DAST in staging or pre-production
This setup helps you catch code, dependency, configuration, and runtime issues early. It also keeps security checks steady across the pipeline without getting in the developer’s way.
How should we handle scan exceptions?
Use a formal, documented process to maintain security and compliance. For accepted risks or false positives, use specific exception files such as .trivyignore or security-waivers.yaml, with clear justifications and expiry dates.
If a vulnerability has no exploitable path, or fixing it would require major architectural changes, the security team should approve a formal waiver. Define all exceptions, waivers, and suppression rules clearly for audit purposes.