
When migrating data, ensuring accuracy and consistency is critical. Manual checks can’t handle the complexity of large-scale migrations, and errors like missing records or corrupted data can lead to financial losses or reputational harm. Automated testing provides a way to verify 100% of data, reducing defects by 92% and cutting validation efforts by up to 80%.
Key Takeaways:
- Data Integrity Goals: Focus on record completeness, accuracy, uniqueness, referential consistency, structural integrity, and semantic checks.
- Automation Benefits: Tools like Great Expectations or QuerySurge can handle billions of rows, ensuring data correctness during every migration phase.
- Validation Workflow: Pre-migration profiling, real-time checks during transfer, and post-migration reconciliation are essential steps.
- Cost of Errors: Fixing data issues post-migration can cost up to 10 times more than addressing them during the process.
By combining automated checks with clear validation metrics, organisations can ensure a smooth migration while avoiding costly mistakes.
Snowflake Data Migration Testing Automation - Ensuring Seamless Transition and Data Quality

Defining Data Integrity Goals for Migration
When planning a data migration, setting clear data integrity goals is essential to ensure a smooth and accurate transition. These goals serve as the foundation for your validation process. Without well-defined, measurable criteria, disagreements about whether the migration meets expectations can stall progress during critical phases, such as the final cutover.
A migration is only as good as what you can prove about it.[4]
Start by profiling the source data. This means establishing a baseline that includes record counts, unique values, and aggregate sums. This baseline acts as your benchmark throughout testing, helping you measure success and identify discrepancies.
Key Data Integrity Metrics
To ensure a successful migration, focus on these six dimensions of data integrity:
- Record completeness: Confirm that every record from the source is present in the target system by reconciling row counts.
- Field accuracy: Use checksums like MD5 or SHA-256 to verify that data values remain unaltered and untruncated during migration.
- Uniqueness: Check primary key counts to ensure no duplicate records are introduced.
- Referential consistency: Validate that parent–child relationships are maintained by verifying foreign key constraints.
- Structural integrity: Ensure schemas, indexes, and data types are correctly migrated.
- Semantic integrity: Compare key performance indicators (KPIs) and report outputs between the source and target systems to confirm that the data supports the intended business logic.
The table below summarises these metrics and their validation techniques:
| Metric | Measurement Technique | Validation Goal |
|---|---|---|
| Completeness | Row count reconciliation | Ensure no records are dropped or added |
| Accuracy | Checksum/hash comparison | Verify no byte-level corruption or truncation |
| Referential consistency | Foreign key validation | Maintain parent–child links |
| Numeric precision | Aggregate reconciliation | Ensure sums and averages match exactly |
| Uniqueness | Primary key count | Prevent unexpected duplicates |
| Semantic | KPI/report comparison | Confirm business logic produces identical results |
It’s worth noting that encoding mismatches, such as converting from Latin1 to UTF-8, account for 22% of post-migration quality issues [8].
Aligning Goals with Business Requirements
Metrics are most effective when they tie directly to business outcomes. For example, simply matching row counts is meaningless if critical reports, like financial month-end summaries, don't align. As dbSeer explains:
The validation standard here is not just structural parity but data parity against the business metrics leadership uses to run the organisation.[4]
To address this, establish tolerances that reflect business priorities. For instance, allow a small variance (e.g., 0.1%) in non-critical fields but adopt a zero-tolerance policy for discrepancies in financial aggregates. Document these tolerances in a validation rulebook, alongside your transformation rules and mandatory fields.
For regulated industries, additional considerations come into play. Ensure compliance with requirements like audit trail continuity, PII encryption, and data lineage tracking to meet standards such as GDPR. Involving business stakeholders in user acceptance testing (UAT) is also crucial. Tasks like processing sample transactions or generating standard reports help ensure that technical validation aligns with real-world business needs.
With these business-aligned metrics in place, you’ll be ready to move forward and design an effective automated testing strategy.
Planning and Preparing for Automated Testing
Building a solid foundation for automated testing requires clear data integrity metrics. Poor planning is often the main reason migrations go over budget and miss deadlines [3].
Mapping Source and Target Data
Start by profiling the source system to uncover data patterns and anomalies, such as NULL values, duplicates, or inconsistent formats [3]. This profiling is critical for creating accurate source-to-target mappings and defining transformation logic before any data is transferred.
Develop a source-to-target mapping (STM) document that covers every field, its data type, and any transformation rules. For example, you might need to convert date formats (DD/MM/YYYY to YYYY-MM-DD) or handle currency conversions [2]. Automated tests should be designed to verify these transformations, ensuring the output in the target system matches expectations. Be especially cautious with platform-specific data types. For instance, Oracle's NUMBER type requires precision and scale checks in the target system to avoid rounding issues [11].
Some mapping risks can lead to silent errors. For example, case sensitivity differences between systems like Teradata (case-insensitive) and Snowflake (case-sensitive) can cause join operations to fail without obvious errors [11]. Similarly, cloud warehouses may define primary and foreign keys for query optimisation but not enforce them, potentially allowing duplicate records that could corrupt the data model [11].
Once mappings are in place, choose a testing tool that suits your specific requirements.
Selecting the Right Testing Tools
The right testing tool depends on your environment rather than brand loyalty. Key features to look for include support for diverse data sources, thorough validation (schema, aggregate, and row-level checks), and seamless CI/CD integration to prevent faulty data from entering production [3][13].
| Tool | Type | Key Strength |
|---|---|---|
| Great Expectations | Open Source | Declarative expectations; integrates with dbt and Airflow [3] |
| Data Validation Tool (DVT) | Open Source | Supports 15+ connection types; multi-level validation [13] |
| QuerySurge | Commercial | Built for large-scale migration testing [3] |
| Datafold | Commercial | Column-level data diffing; CI/CD regression testing [3] |
| Monte Carlo | Commercial | ML-powered anomaly detection and observability [3] |
Open-source tools are generally more cost-effective but may require extra engineering effort. Commercial tools often come with dashboards and dedicated support, which can speed up complex projects. Before committing to a tool, run a proof of concept (POC) with a representative data sample to ensure it can handle your environment's specific challenges [12].
Building a Test Plan
With mappings and tools in place, a detailed test plan connects preparation to execution. A well-rounded test plan includes three phases: pre-migration, migration, and post-migration.
Pre-migration involves profiling and creating baselines, such as record counts, aggregate sums, and schema compatibility checks, before moving data. During the migration phase, use real-time monitoring techniques like row count matching and checksum validation to catch any issues in transit [3][14]. In the post-migration phase, perform full data reconciliation, including field-level comparisons, KPI validation, and user acceptance testing (UAT) with key stakeholders.
Have a rollback strategy ready to address data integrity breaches. Define clear triggers, such as rolling back if data loss exceeds 0.01% [3]. Test the rollback process thoroughly before the live migration to avoid surprises. As Newt Global aptly puts it:
A migration pipeline without a validation layer is just a data move - not a migration.[15]
Building and Running Automated Validation Rules
::: @figure 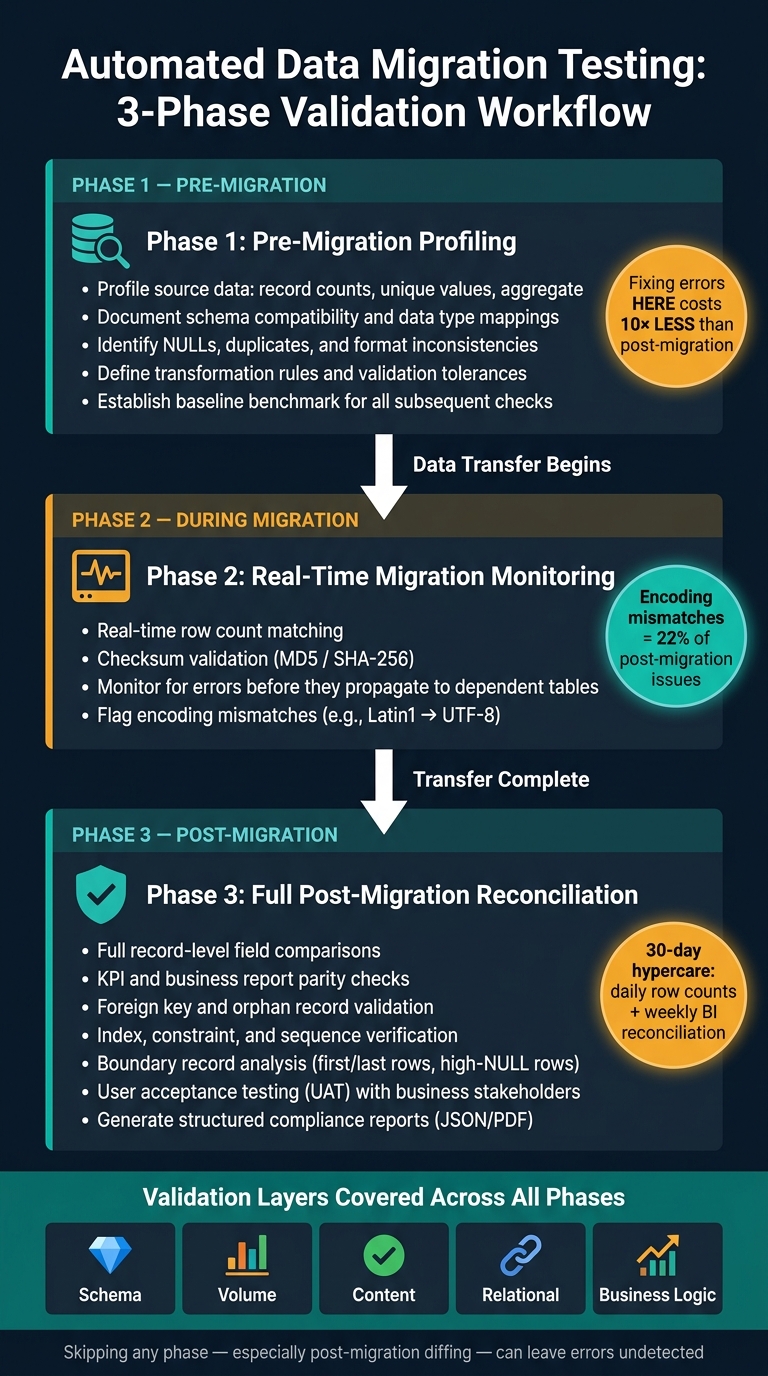 {Automated Data Migration Testing Workflow: 3-Phase Validation Process}
:::
{Automated Data Migration Testing Workflow: 3-Phase Validation Process}
:::
Automated rules are an essential part of maintaining data integrity during migration. Once you've documented your mappings and selected the right tools, the next step is creating checks to ensure your data has been transferred correctly. Each validation layer targets specific types of errors.
Core Automated Checks
Record count validation is a basic check that compares the total number of rows in the source and target datasets. This method can quickly identify data loss during transfer, but it has its limitations. As Augusto Rosa, a Snowflake SME, explains:
Simple checks like matching row counts are not enough; they prove almost nothing. Even checksums can mask critical, offsetting errors. You must go deeper.[5]
To go deeper, checksum validation (using algorithms like MD5 or SHA-256) ensures that record values remain unaltered [3][6][9]. Additionally, primary-key-based field comparisons can help detect subtle issues such as truncated text or character encoding mismatches [3][1].
For numeric data, aggregate reconciliation is key. By comparing metrics like SUM, AVG, MIN, and MAX between the source and target, you can verify that figures such as quarterly revenue totals are consistent [3][4][9]. Finally, null and constraint detection flags unexpected NULL values or violations of NOT NULL rules that may have emerged during the transformation process [3][9][11].
| Validation Layer | Key Automated Checks | Primary Goal |
|---|---|---|
| Schema | Data type mapping, length checks, constraints | Structural compatibility [4][9] |
| Volume | Row counts, file size comparison | Completeness [3][6] |
| Content | Checksums, field-level comparisons | Accuracy and parity [3][6][9] |
| Relational | Foreign key resolution, orphan record detection | Referential integrity [1][4][9] |
| Business | KPI parity, aggregate sums, report comparisons | Semantic consistency [4][9] |
Once these basic checks are in place, it's time to address scalability and unique error scenarios.
Testing at Scale and Handling Edge Cases
When datasets grow to multi-terabyte sizes, a full row-by-row comparison becomes impractical. Instead, deterministic sampling can be used. By applying modulo operations on ID columns, you can select representative subsets for validation, ensuring efficiency without compromising coverage [3][6][9].
Standard rule-based checks are effective for identifying known issues, but they may miss unexpected problems like distribution drift or schema changes. Data observability platforms leverage machine learning to catch these unknown unknowns.
For instance, they might flag a column where NULL values suddenly increase from 5% to 20% [3]. This approach moves beyond checking for anticipated errors to identifying anomalies you didn't foresee.
Testing boundary records is another critical step. Examine the first and last rows, as well as rows with high NULL density, to uncover issues like truncation or precision loss (e.g., timestamps losing microsecond accuracy during the transfer) [6][11]. Additionally, ensure auto-increment or sequence values are reset to the current maximum ID to avoid production INSERT failures [6].
Running Tests in Phases
Organising validation tests into phases helps catch issues early, reducing the cost of fixing errors later. Resolving data problems post-migration can cost 10× more than addressing them during the initial profiling stage [3].
- Pre-migration: Establish a clean baseline by profiling the source data. Document record counts, unique value distributions, aggregate statistics, and pre-existing anomalies [3][4][16]. This baseline serves as the benchmark for all subsequent checks.
- During migration: Monitor row counts and checksums in real time to catch errors early, before they propagate across dependent tables [3][9].
- Post-migration: Conduct full reconciliation, including record-level comparisons, KPI checks, index and constraint verification, and boundary record analysis, before approving any business cutover [6][4].
To streamline the process, define a known gap
classification for expected discrepancies, such as intentional rounding adjustments or differences in data retention policies [18]. Clearly labelling these as KNOWN_GAP instead of DIFF prevents unnecessary alerts and helps your team focus on actual defects.
Validation isn't just a technical check; it's a gatekeeper the business controls. To open this gate, you need to provide proof.- Augusto Rosa, Snowflake SME [5]Need help optimizing your cloud costs?
Get expert advice on how to reduce your cloud expenses without sacrificing performance.
Analysing Test Results and Fixing Defects
When your automated tests finish running, the results can vary widely. The challenge is to avoid the dreaded wall of red
- where so many test failures appear that teams start ignoring them altogether, undermining confidence in the process.
Triaging and Classifying Failures
Failures should be sorted into four categories: Schema, Record-Level, Referential, and Business Logic. Assign each a severity level - Critical, High, Medium, or Low - so the team can focus on the issues that truly block progress.
Start by checking the health of the upstream pipeline. Many apparent data mismatches are often caused by orchestration issues, not actual errors in your transformation code [18]. Once you confirm the pipeline is functioning correctly, you can trust that the failures represent real data problems.
The assumption that data migrates cleanly is one of the most persistent and costly myths in data engineering.- dbSeer Editorial Team [4]
After categorising the failures, tackle them one by one, prioritising the most critical.
Fixing Issues Without Causing Regressions
Make changes incrementally to isolate their effects. Begin with structural fixes, such as correcting schemas, adjusting data type mappings, or normalising encodings, before moving on to content-specific issues. When reloading data, disable triggers and constraints temporarily to prevent unintended cascading effects. Once the data is loaded, re-enable these constraints and validate them [4].
For databases like Snowflake, where primary and foreign key constraints are defined but not enforced, you’ll need to implement explicit checks for duplicates. The database won’t automatically block invalid records for you [11].
After structural changes, reset sequence values to align with the current maximum in the target system. This step is crucial to avoid production errors [6].
Each fix should be applied individually, followed by immediate validation to confirm its impact.
Rerunning Tests to Confirm Fixes
Preserving data integrity requires not just careful fixes but also thorough retesting. Rerun the entire automated test suite - not just the test that initially failed - to ensure no regressions occur. This is the only way to reliably catch unintended side effects where one fix might disrupt another part of the system.
Data validation is not optional and it is not something you eyeball. Build a systematic validation pipeline that checks volume, structure, content, and application behavior.- Nawaz Dhandala, Author, OneUptime [6]
Incorporating this retesting loop into your workflow pays off. For example, in 2025, a leading insurance company partnered with TestingXperts during a cloud migration. They ran over 2,300 automated tests, achieving a 40% reduction in regression testing effort and a 30% drop in bad data incidents reaching production [10]. Their success hinged on consistently rerunning the full test suite, rather than spot-checking individual fixes.
Integrating Continuous Data Integrity Validation
After setting up an automated test suite, the next step is ensuring your data remains reliable long after migration. Continuous validation becomes part of your workflow to maintain data quality over time. Once fixes are confirmed and tests are re-run, this ongoing process helps safeguard data health.
Adding Validation to CI/CD Pipelines
Think of data validation as a critical checkpoint, much like unit tests, that prevents production deployment if issues are detected [3][17].
A two-layered approach works well here. The first layer involves tools like dbt to perform internal checks. These include verifying null values, ensuring uniqueness constraints, and maintaining referential integrity. The second layer focuses on external validation by running automated, cell-by-cell comparisons between the source and target systems. This highlights any discrepancies in the data [5]. Together, these layers address both structural errors and subtle changes in content. By embedding these checks into your continuous integration process, you create a repeatable validation cycle, which is explored further below.
Setting Up Repeatable Validation Cycles
A one-time successful migration doesn’t guarantee data quality in the long term. Over time, you might encounter schema changes, unnoticed data corruption, or failures in incremental data loads. To mitigate these risks, implement a 30-day hypercare period. During this time, perform daily row count checks and weekly business intelligence (BI) reconciliation to catch any issues early [11].
For massive datasets where full checksums aren’t feasible, deterministic sampling can be a practical alternative. For example, you could apply a modulo filter on ID columns to generate consistent samples that remain comparable across multiple validation runs [6]. After the hypercare phase, shift from migration-specific checks to continuous monitoring. This includes keeping an eye on data freshness, volume, and distribution changes over time [3].
Once these cycles are in place, the next focus should be on capturing and presenting results for compliance and audit needs.
Documenting Results for Compliance
Validation efforts only hold weight if their outcomes are well-documented and accessible to stakeholders and auditors. After every validation run, generate structured reports - in formats like JSON or PDF - that summarise pass/fail rates, detail specific failures, and list the checks performed [6][17].
Store these reports in a centralised data-quality repository. This repository should log essential details like run times, metadata about the checks, and data lineage. Additionally, maintain a known gaps log
to document accepted discrepancies, such as intentional model changes or differences in retention policies. This helps auditors differentiate between deliberate variations and real defects [18].
A migration is only as good as what you can prove about it... It completes when you can demonstrate that what arrived matches what left: in count, structure, content, and business meaning.- dbSeer [4]
For industries with strict regulations, your documentation should also confirm that encryption, PII masking, and role-based access controls remain intact in the new system [1][4]. To close the migration process, create formal sign-off certificates. These certificates, approved by business stakeholders, confirm that the legacy system can be decommissioned based on the validation evidence. This not only ensures compliance but also supports long-term business continuity [5].
Conclusion and Key Takeaways
Recap of the Automated Testing Workflow
An effective migration testing workflow follows a series of well-defined stages. It starts with pre-migration profiling, where key baseline metrics are documented. Next comes schema validation to ensure structural compatibility. During the actual transfer, real-time monitoring - using checksums and row counts - keeps the process on track. Once the data reaches its destination, thorough row comparisons and business rule checks ensure no silent alterations have occurred. The final step involves embedding validation into CI/CD pipelines and a hypercare period to catch issues that only arise under live conditions.
Each phase builds on the one before it. Skipping any stage - especially post-migration diffing - can leave errors unnoticed [7]. This systematic approach not only guarantees data integrity but also enhances operational efficiency.
Benefits of Automated Testing in Migrations
When dealing with massive datasets, manual validation is simply not feasible. Automation speeds up the process and identifies issues that manual checks might miss, such as encoding mismatches or precision errors [4][1].
The financial case for automation is equally strong. Poor data quality costs organisations an average of £10.2 million annually [4], and fixing defects after deployment can be 10 to 50 times more expensive [8]. Skipping proper validation often leads to budget overruns and delays [3], making automated testing critical to protecting both timelines and project value.
The assumption that data migrates cleanly is one of the most persistent and costly myths in data engineering.- dbSeer [4]
How Hokstad Consulting Can Help
While the benefits of automated testing are clear, implementing a robust strategy takes more than just tools - it requires expertise across the entire migration lifecycle. Hokstad Consulting specialises in strategic cloud migration, DevOps transformation, and custom automation. They help organisations design config-driven test pipelines, integrate data quality checks into CI/CD workflows, and apply AI-driven techniques to detect anomalies that traditional tests might miss. For teams aiming to migrate to the cloud without compromising data integrity, this combination of technical skill and hands-on experience can make all the difference.
FAQs
Which data integrity checks matter most for my migration?
To maintain data integrity during migration, it's essential to go beyond simply counting rows. A more thorough, layered validation process can help ensure everything is transferred correctly.
Contract-Driven Checks: Before migration begins, define detailed field-level schemas, identify mandatory fields, and establish business rules. This allows for automated checks to confirm data accuracy and completeness during the process.
Structural Validation: Make sure that schemas, indexes, and constraints align perfectly between the source and target systems. Pay special attention to identifying issues like duplicate entries or orphaned records, which can cause problems later.
Content Verification: Perform detailed cell-by-cell comparisons to detect potential errors, such as truncated data, incorrect code mappings, or precision discrepancies. This step ensures the migrated data is not only complete but also accurate.
How can I validate billions of rows without comparing every record?
Validating massive datasets without examining each record individually can lead to overlooked errors. Begin with broad checks such as comparing row counts, calculating the sums of numeric columns, and assessing minimum, maximum, and average values to identify potential issues quickly. For a more precise approach, implement checksums or hash comparisons, which can flag changes without requiring a full, record-by-record analysis. If deeper reconciliation is necessary, consider processing the data in batches or concentrating on boundary records to save time and resources.
What should I automate in CI/CD after the migration goes live?
After completing your migration, set up automated reconciliation scripts to regularly compare key metrics - such as row counts and checksums - between your source and target systems. This helps spot missing records or any transformation errors early.
Make regression testing a priority. Focus on unit, integration, and end-to-end tests to ensure your systems maintain functional parity across the board.
Also, implement performance monitoring to catch latency issues or bottlenecks. This step is essential for preserving data integrity and keeping your system stable over time, especially when integrated into your CI/CD pipeline.