
Automating infrastructure deployment can save you time, reduce errors, and ensure consistency. By combining ARM templates with Azure DevOps, you can build repeatable, automated workflows for managing Azure resources. Here’s the process in a nutshell:
- ARM Templates: JSON files that define Azure infrastructure in a declarative way. They ensure consistent deployments and support parameterisation for custom configurations.
- Azure DevOps: A platform that automates deployments using pipelines, version control, and approval workflows. It integrates seamlessly with ARM templates for efficient management.
Key benefits include:
- Automated deployments with multi-stage pipelines.
- Centralised version control using Azure Repos.
- Compliance support with detailed audit trails.
- Cost management through environment-specific configurations.
To get started:
- Structure and validate your ARM templates.
- Use parameter files for environment-specific settings.
- Set up Azure Repos for version control.
- Build YAML pipelines for automated deployments.
- Secure secrets with Azure Key Vault.
- Monitor and refine pipelines for better performance.
This integration simplifies infrastructure management while improving reliability and governance for UK businesses.
::: @figure 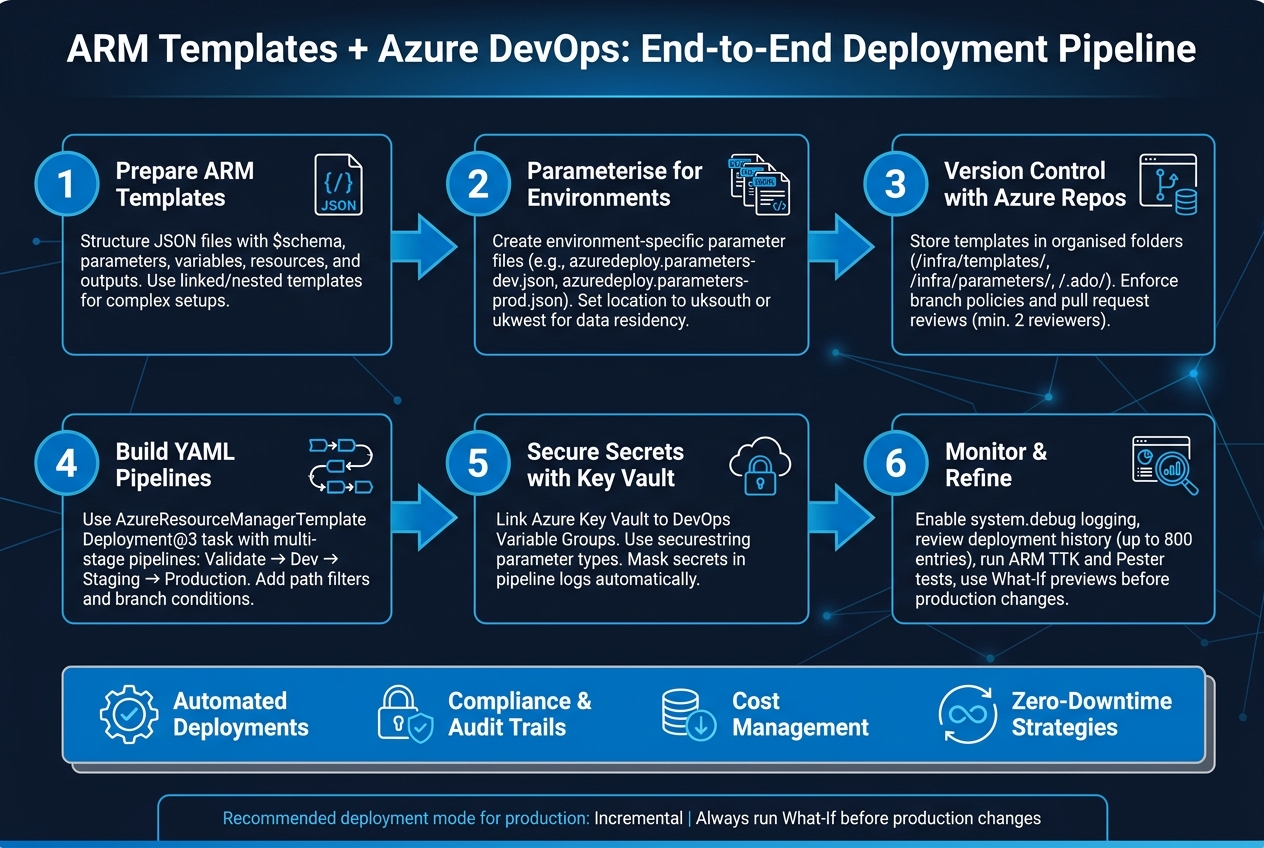 {ARM Templates + Azure DevOps: End-to-End Deployment Pipeline}
:::
{ARM Templates + Azure DevOps: End-to-End Deployment Pipeline}
:::
Azure DevOps: ARM Template Deployment Automation with CI/CD Pipelines| Automate Azure Infrastructure
Need help optimizing your cloud costs?
Get expert advice on how to reduce your cloud expenses without sacrificing performance.
Preparing ARM Templates for Deployment
Getting your ARM templates ready is a crucial first step for smooth deployment automation with Azure DevOps. Even if a template works perfectly when deployed manually, it might fail in pipelines if it's not well-organised. To avoid such issues, it's important to structure, parameterise, and validate your templates properly before integrating them into your automation workflows.
ARM Template Structure and Key Components
An ARM template is essentially a JSON file with several key sections: $schema, contentVersion, parameters, variables, resources, and outputs. Here's what each section does:
-
$schema: Specifies the template language version for Azure to use. -
contentVersion: Tracks major template changes with a version number like1.0.0.0. -
parameters: Defines input values (e.g., VM size, resource names) provided during deployment. Each template can include up to 256 parameters [6]. -
variables: Stores reusable values, helping maintain consistency across the template. -
resources: Lists the Azure services being deployed, such asMicrosoft.Storage/storageAccounts. -
outputs: Returns values after deployment, like an IP address or connection string.
For larger or more complex infrastructure setups, consider breaking your template into linked templates (separate files) or nested templates (embedded within the main template). This approach makes your templates easier to manage, encourages reusability across projects, and simplifies multi-file solutions in DevOps. When working with linked templates stored in Azure Repos, use the relativePath property to reference child templates. This avoids hardcoded paths, which can cause failures in pipelines.
Using Parameter Files for Environment-Specific Configurations
When deploying to multiple environments, use parameter files to customise configurations instead of modifying the main template. A clear naming convention, such as azuredeploy.parameters-dev.json for development or azuredeploy.parameters-prod.json for production, makes it easy to identify which file corresponds to which environment.
For organisations in the UK, the location parameter is particularly important. By setting this to uksouth or ukwest, you ensure that resources are deployed within UK data centres. This is especially critical for sectors like finance or healthcare, where data residency requirements are a top priority. In Azure DevOps, the AzureResourceManagerTemplateDeployment@3 task allows you to specify the appropriate parameter file using the csmParametersFile input, making it simple to switch configurations between pipeline stages.
To keep sensitive data like passwords or connection strings secure, never store them as plain text. Instead, use the secureString type and reference secrets from Azure Key Vault with the reference syntax. This keeps credentials out of your repository and ensures they don’t appear in deployment logs.
Validating ARM Templates Before Deployment
Skipping validation is a common mistake, but it can lead to costly errors. Azure provides two key ways to validate your templates before deploying anything:
- Validation Mode: By setting
deploymentModetoValidationin theAzureResourceManagerTemplateDeployment@3task, you can check the template's JSON syntax and schema without creating resources [1]. - What-if Operation: Using the
Get-AzResourceGroupDeploymentWhatIfResultPowerShell command, you can preview changes, including what will be created, modified, or deleted. This gives you a clear picture of what to expect [3].
For added safety, consider creating a custom PowerShell script to parse the what-if results. This script can automatically fail the pipeline if the template attempts to delete critical resources, which is particularly useful in production environments where accidental deletions could have serious consequences. To further safeguard your pipeline, enable the 'Fail on Standard Error' setting to stop the process if validation errors occur [3].
Setting Up Azure Repos for ARM Templates
Once you've validated your templates, the next step in your automation pipeline is version control. Azure Repos offers a centralised repository for your Infrastructure as Code (IaC), complete with Git history, branch protection, and collaboration tools.
Creating and Organising Azure Repos
To get started, head to Repos in the Azure DevOps portal, open the repository drop-down menu, and select New repository [7]. It's important to establish a clear and logical folder structure from the beginning.
Here’s a practical layout to consider:
| Folder | Contents |
|---|---|
/infra/templates/ |
ARM template files (e.g., azuredeploy.json) |
/infra/parameters/ |
Parameter files for each environment (e.g., azuredeploy.parameters-prod.json) |
/.ado/ |
Pipeline YAML definitions |
/infra/scripts/ |
Scripts for pre- and post-deployment tasks |
Make sure to initialise the repository with a README.md file that explains the purpose of the infrastructure, along with a .gitignore file to prevent sensitive or temporary files from being committed [7].
Branching and Pull Request Policies
Use short-lived feature branches (e.g., users/username/add-storage-encryption) to isolate changes before merging them into the main branch [8]. Microsoft’s guidance on branch strategies is straightforward:
Keep your branch strategy simple... Use feature branches for all new features and bug fixes; Merge feature branches into the main branch using pull requests; Keep a high quality, up-to-date main branch.[13]
To maintain code quality, disable direct pushes to the main branch. Instead, enforce pull requests with at least two reviewers. Studies suggest this is the sweet spot for balancing thorough reviews with workflow efficiency [13]. Set up build validation so that every pull request automatically triggers an ARM template validation run before merging [11][12]. This ensures broken templates are caught early, avoiding disruptions in shared environments.
For ARM templates specifically, enable the Automatically Included Reviewers policy. This ensures that the right team members - those familiar with your infrastructure - are notified whenever changes are proposed [11].
By following these steps, you can seamlessly integrate version control with automated pipelines, creating a strong foundation for managing changes.
Tracking Infrastructure Changes for Compliance
Azure Repos records every commit with a timestamp, author, and commit message [10]. For organisations in the UK, this immutable history serves as valuable evidence for compliance with FCA and NHS data governance standards.
To make this audit trail meaningful, activate the Check for linked work items
policy. This ensures that every infrastructure change is tied to a documented requirement or task in Azure Boards [12]. Pair this with clear and descriptive commit messages. For example, Added storage account encryption for GDPR compliance
is far more informative than updated template
[9]. You can also use Git tags like v1.1.0-beta to mark stable infrastructure releases, making it easy to identify reliable rollback points and further strengthen compliance records [9].
With well-managed Azure Repos, you lay the groundwork for efficient pipelines and dependable zero-downtime deployments.
Building Azure Pipelines to Deploy ARM Templates
Once your templates are versioned and your repository is well-organised, the next logical step is automating deployments with Azure Pipelines. This tool takes care of the heavy lifting - validating, testing, and deploying your ARM templates whenever changes are committed.
Creating a YAML-Based Pipeline
Using a YAML-based pipeline gives you complete control over the deployment process while keeping the configuration alongside your infrastructure code. To set one up, you'll need three key components:
- Trigger: Determines which branch initiates the pipeline.
- Pool: Specifies the agent to run the tasks.
- Stages: Contains the actual deployment tasks.
For deploying ARM templates, the AzureResourceManagerTemplateDeployment@3 task is essential. This task requires several inputs, including:
-
azureResourceManagerConnection: Your Azure service connection. -
subscriptionId: The subscription ID for deployment. -
resourceGroupName: The target resource group. -
csmFileandcsmParametersFile: Paths to your ARM template and parameter files.
Before configuring this task, ensure your pipeline can interact with your Azure subscription by creating an Azure Resource Manager service connection in your DevOps project settings.
To avoid unnecessary pipeline runs, use path filters in the trigger block so that it only activates when infrastructure-related files are updated (e.g., skipping changes to files like README.md). You can also add conditions like eq(variables['Build.SourceBranch'], 'refs/heads/main') to ensure deployments are only triggered from the main branch.
Once your pipeline is set up, securing sensitive data becomes critical.
Managing Secrets Securely in Pipelines
Hardcoding sensitive information like passwords or connection strings in a YAML file is a major security risk. Instead, store these values securely in Azure Key Vault and link them to an Azure DevOps Variable Group. This approach centralises secret management and ensures secure access during pipeline execution.
To enable this, set the Key Vault's enabledForTemplateDeployment property to true and grant the deployment identity the Microsoft.KeyVault/vaults/deploy/action permission. In your ARM templates, always declare sensitive parameters using the securestring type, and avoid setting default values to minimise the risk of accidental exposure.
When passing secrets to the deployment task, use the overrideParameters input like this: -adminPassword $(secretVariable). Azure Pipelines will automatically mask these values in logs, but ensure that secrets are not echoed in any output to maintain security.
Configuring Deployment Modes for Incremental Updates
The AzureResourceManagerTemplateDeployment@3 task supports three deployment modes, each with specific use cases:
| Deployment Mode | Effect on Existing Resources | Use Case |
|---|---|---|
| Incremental | Leaves existing resources untouched unless specified in the template | Ideal for regular CI/CD updates; safest for production environments. |
| Complete | Removes resources not defined in the template | Use with caution when strict environment parity is needed. |
| Validation | Checks the template for errors without deploying resources | Useful as a pre-deployment check. |
For most teams, Incremental mode is the best choice for production. It updates only the resources defined in the template while leaving others intact, reducing the risk of accidental deletions. A well-structured pipeline typically includes a validation stage first, followed by an Incremental deployment if validation succeeds.
To further safeguard your deployments, incorporate a What-If operation before applying changes. This preview step shows which resources will be created, modified, or removed, helping you avoid unexpected disruptions - especially in shared or customer-facing environments where downtime can be costly.
Optimising for Zero-Downtime and Cost Efficiency
Once you have a solid deployment pipeline in place, you can take it further by fine-tuning for zero-downtime operations and better cost management.
Using Multi-Stage Pipelines
Multi-stage pipelines are a game changer for controlled deployments. By breaking down the process into stages like Build, Dev, Staging, and Production, you can ensure that any misconfiguration gets caught early - before it ever reaches production.
For added control, use environment approvals with the ManualValidation@1 task. This feature allows you to pause the pipeline for up to three days, giving stakeholders ample time to review and approve before moving forward.
Deployment jobs add another layer of reliability. They keep a record of deployment history and enable advanced rollout strategies such as rolling and canary. To further safeguard your deployments, include a conditional Rollback stage. If health checks fail, the pipeline can automatically revert to a stable state without requiring manual input [15]. This structured setup makes it easier to choose and implement the right deployment pattern.
Deployment Patterns for Zero-Downtime
Zero-downtime deployments rely on strategies that shift traffic seamlessly. Here are three effective options:
| Strategy | Best For | How Traffic Is Handled |
|---|---|---|
| runOnce | Simple, low-risk deployments | All traffic transitions at the same time |
| rolling | Virtual Machine scale sets | Instances are replaced in batches using maxParallel [16]
|
| canary | AKS or Kubernetes workloads | Traffic is shifted gradually (e.g., 10%, then 20%) [16] |
For a balanced approach, consider the rolling strategy. It offers a mix of simplicity and safety. Use lifecycle hooks like preDeploy, routeTraffic, and postRouteTraffic to carefully sequence your deployment. During the postRouteTraffic phase, run a smoke test on your service's health endpoint. This step ensures everything is functioning as expected before marking the deployment successful [18]. It’s a proactive way to catch potential issues early.
Adding Budget Awareness to Deployments
Zero-downtime is great, but keeping costs under control is just as important. You can achieve this by tailoring resource configurations for each environment. Use environment-specific parameterisation in your ARM templates and pipelines. For example, assign cost-effective SKUs like Standard_LRS for Dev and Staging environments, while reserving higher-availability options such as Standard_GRS for Production [17][19]. This approach can significantly lower your Azure costs without requiring manual adjustments.
Tagging also plays a key role in cost management. Leverage the deployment().properties.template.contentVersion function to tag every resource with the template version that created it [20]. This makes it easy to track which code version is responsible for a specific resource in the Azure portal, simplifying audits and cost attribution - especially useful for organisations in the UK.
Another cost-saving tip: avoid assigning public IP addresses unless absolutely necessary. Instead, use Azure Bastion or inbound NAT rules for administrative access [14]. This not only reduces your monthly bill but also minimises your system's attack surface.
Monitoring and Improving ARM Pipelines
Monitoring Deployment Logs and Metrics
Azure DevOps offers several tools to keep an eye on your deployments. One handy feature is setting the pipeline variable system.debug to true, which enables detailed logging. This includes diagnostic data such as CPU, memory, and disk usage for the agent and its child processes. This extra layer of detail can be invaluable when a deployment fails without obvious error messages [23].
The Azure Portal further enhances visibility by maintaining a deployment history for each resource group, with up to 800 entries stored. Each deployment comes with a unique Correlation ID, which is critical if you need to open a support ticket with Microsoft. You can find this ID in the portal or retrieve it using the CLI with the command az deployment group show --query properties.correlationId. Additionally, Azure DevOps Environments provide a centralised dashboard that summarises deployed commits and work items across environments such as Dev, Test, and Production [24][25]. These tools make diagnosing errors much easier and set the stage for effective troubleshooting.
Troubleshooting Common Deployment Errors
ARM deployment errors generally fall into three categories. Understanding which category an error belongs to can save you a lot of time:
| Error Type | When It Occurs | Common Causes |
|---|---|---|
| Validation | Before deployment starts | Syntax errors, misspelled properties |
| Preflight | At the start of deployment | Invalid parameter values, naming issues |
| Deployment | During resource creation | Missing dependencies, quota limits, regional availability [21][22] |
For runtime errors, the Azure Portal provides Operation details, which include the statusMessage and error code for the failed resource [24]. Some frequent errors to watch for include:
-
DeploymentQuotaExceeded: Indicates you've reached the 800-deployment limit for a resource group. Clear older entries to resolve this [27]. -
AuthorizationFailed: Often caused by a service principal lacking the Contributor role at the required scope [26]. -
AADSTS7000222: This error signals an expired service principal secret. To fix it, go to Project Settings > Service Connections and select Rotate secret [26].
Once you've identified the issue, you can refine your pipelines using tools like automated tests and What-If previews to prevent similar problems in the future.
Refining Templates and Pipelines Over Time
Improving pipelines is an ongoing process. By analysing metrics and addressing errors, you can gradually enhance performance and reliability. A good starting point for this is the ARM Template Test Toolkit (TTK). This PowerShell-based tool checks templates against Microsoft's best practices, such as avoiding hardcoded locations or outdated API versions [28]. You can also use Pester tests to validate both the JSON structure of templates before deployment and the actual infrastructure afterwards - for example, confirming that required ports are open [2].
Adding a What-If preview step to your pipelines is another effective strategy. This feature lets you see what changes will occur before they’re applied, giving you a chance to catch issues early [4]. You can also use the deploymentOutputs attribute in the AzureResourceManagerTemplateDeployment task to capture details like IP addresses, which can then be passed to downstream testing tasks [2].
If managing these refinements feels overwhelming, consider working with experts. Hokstad Consulting specialises in turning deployment data, cost insights, and pipeline feedback into actionable improvements, helping organisations fine-tune their DevOps pipelines and cloud infrastructure for better results.
Conclusion: Streamlining Deployments with ARM Templates and Azure DevOps
Using ARM templates alongside Azure DevOps takes the guesswork out of deployments, replacing manual processes with a more structured and reliable approach. This guide covered everything from organising templates and managing parameter files to building effective YAML pipelines, securing secrets with Azure Key Vault, and monitoring deployments for better results. These steps work together to ensure consistency and control over your infrastructure.
By defining your infrastructure as code, you prevent configuration drift and maintain a clear audit trail - particularly important for UK businesses dealing with data residency and governance requirements [2][5].
Some key practices to keep in mind include leveraging incremental deployment mode to minimise risks, running What-If operations before making changes in production, and implementing approval gates for sensitive environments. These steps make deployments smoother and reduce stress for your engineering teams.
If your pipelines aren’t delivering the desired performance, Hokstad Consulting offers expert support. They specialise in helping UK businesses optimise their pipelines, break down complex ARM templates into reusable modules, and cut cloud costs by 30–50% through smarter automation. Their flexible engagement model also includes retainer-based support for ongoing needs.
Mastering ARM template deployments requires effort, but the rewards - quicker releases, fewer mistakes, and reduced operational expenses - make it a worthwhile pursuit.
FAQs
Should I use linked or nested ARM templates?
For smaller or medium-sized solutions, sticking with a single template makes management straightforward. However, for more intricate deployments that demand modular and reusable components, you might want to consider linked or nested templates.
Linked templates: These are referenced via a URI, making them a good choice for reusability across different projects. However, they require storage access and a SAS token to function properly.
Nested templates: These are embedded directly within the main template, keeping all the logic in a single file. This setup simplifies management but is less suited for sharing across multiple projects.
The decision comes down to what you prioritise: easier maintenance within a project or the ability to reuse components across various projects.
How do I add What-If and fail-safe checks in Azure DevOps?
To incorporate What-If analysis and fail-safe checks into your Azure DevOps pipelines, you can utilise the platform's built-in features like the What-If operation and environment-based approval gates.
For What-If Analysis
Integrate a PowerShell task into your pipeline and include the -WhatIf parameter to preview changes before they are applied. Alternatively, you can use the Azure CLI command az deployment group what-if to simulate and review potential changes to your resources.
For Fail-Safe Checks
Set up Approvals and Checks within your pipeline environment. These allow you to define manual approval gates or dynamic checks, ensuring that critical steps are reviewed or validated before the pipeline proceeds further. This adds an extra layer of security and control to your deployment process.
What permissions does the pipeline need for Key Vault secrets?
To enable your pipeline to access Key Vault secrets, you’ll need to grant the service connection or service principal Get and List permissions in the Key Vault access policies. If the secrets are being referenced in an ARM template or a Bicep file, the deploying identity must also have the Microsoft.KeyVault/vaults/deploy/action permission.
For improved security, it's recommended to assign the Key Vault Secrets User role through Access Control (IAM) rather than using broad access policies. This approach helps minimise unnecessary permissions while maintaining functionality.