
Argo Rollouts is a Kubernetes controller that simplifies and improves application deployments. It enables advanced strategies like canary and blue-green deployments, offering precise traffic control, automated rollbacks, and integration with metrics providers like Prometheus or Datadog. This approach reduces risks during updates by gradually shifting traffic between application versions, monitoring performance, and automatically responding to issues.
Key Features:
- Traffic Management: Gradual traffic shifts using weights, headers, or mirroring.
- Automated Rollbacks: Metric-based rollback to minimise disruptions.
- Resource Efficiency: Dynamic scaling to optimise cluster usage.
- Integration Options: Compatible with service meshes (e.g., Istio) and ingress controllers (e.g., NGINX).
To get started, you'll need a Kubernetes cluster (v1.15+), the Argo Rollouts controller, and tools like kubectl-argo-rollouts. For advanced features, integrate a traffic manager or service mesh.
Argo Rollouts is ideal for teams seeking safer, controlled deployments in Kubernetes environments while maintaining high availability and performance.
Tutorial: Progressive Delivery with Argo Rollouts
Prerequisites for Argo Rollouts
::: @figure 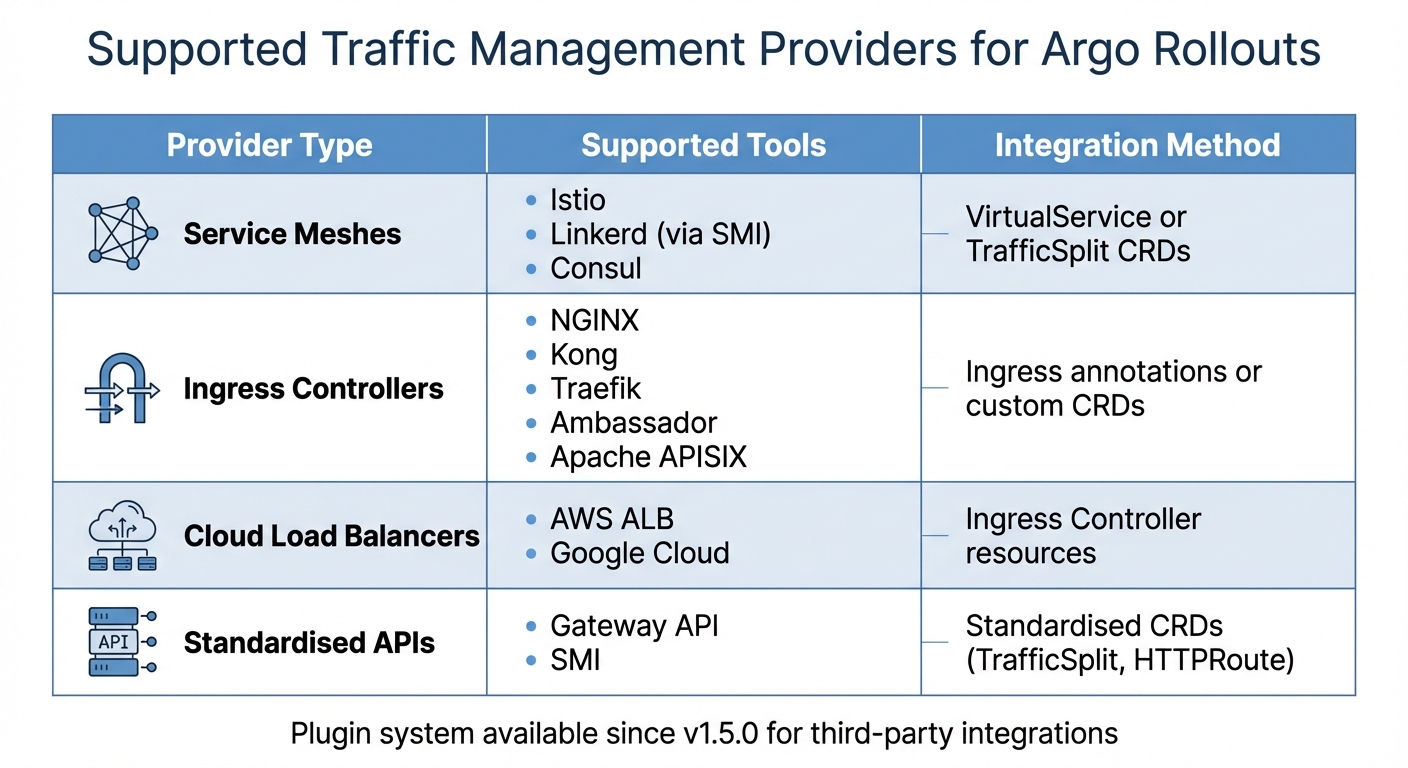 {Argo Rollouts Supported Traffic Management Providers and Integration Methods}
:::
{Argo Rollouts Supported Traffic Management Providers and Integration Methods}
:::
Required Tools and Environments
To get started with Argo Rollouts, you'll need a functioning Kubernetes cluster running v1.15 or higher. While v1.14 is technically supported, older versions require the --validate=false flag during installation to avoid compatibility issues [8].
Next, install the Argo Rollouts controller along with its Custom Resource Definitions (CRDs) - these include Rollout, AnalysisTemplate, AnalysisRun, and Experiment. These components are essential for monitoring and managing your deployments [1][3]. If you're planning to use advanced traffic management features like percentage-based splits or header routing, you'll also need an integrated Ingress controller or Service Mesh. Without these, traffic management will be limited to basic pod-based distribution [5][6].
For managing rollouts directly from the command line, install the kubectl-argo-rollouts plugin. This tool allows you to check rollout statuses, promote changes, or roll back deployments as needed [8]. Additionally, if you're setting up automated canary analysis, you'll need to integrate with metric providers such as Prometheus, Datadog, or New Relic to validate traffic shifts effectively [1][3].
For local Istio testing on Minikube, ensure your environment has 8 GB of memory and 4 CPUs allocated [9]. Keep in mind that standard Kubernetes Service objects manage traffic based on replica counts. For example, in a 5-pod deployment, the smallest canary weight possible is 20% unless you're using a dedicated traffic manager [4].
Once your environment meets these requirements, you can move forward with installing and configuring the Argo Rollouts controller.
Installing and Configuring Argo Rollouts
To install Argo Rollouts, use the install.yaml file for a cluster-wide setup or namespace-install.yaml for a namespace-limited installation. If you're working in an environment with restricted permissions, note that CRDs are not included in the namespace-specific manifest. In such cases, you'll need to install them separately using kubectl apply -k [8].
For GKE users, remember to grant your account permissions to create cluster roles by running kubectl create clusterrolebinding before proceeding with the installation [8]. After installation, confirm everything is working by running kubectl argo rollouts version - this checks the status of both the controller and the plugin [8].
The controller operates only during deployments and doesn’t store external state. If you upgrade the controller while a rollout is in progress, the process will pause and resume automatically, ensuring there’s no downtime [8]. Additionally, the controller is compatible with standard Kubernetes Deployment resources, so you can adopt it gradually without disrupting your current workloads [3].
Supported Traffic Management Providers
Argo Rollouts integrates with a variety of traffic management tools, including service meshes, ingress controllers, and cloud-native load balancers. Here's an overview of the supported options:
| Provider Type | Supported Tools | Integration Method |
|---|---|---|
| Service Meshes | Istio, Linkerd (via SMI), Consul | VirtualService or TrafficSplit CRDs |
| Ingress Controllers | NGINX, Kong, Traefik, Ambassador, Apache APISIX | Ingress annotations or custom CRDs |
| Cloud Load Balancers | AWS ALB, Google Cloud | Ingress Controller resources |
| Standardised APIs | Gateway API, SMI | Standardised CRDs (TrafficSplit, HTTPRoute) |
Since version 1.5.0, Argo Rollouts has introduced a plugin system that allows third-party traffic routers to integrate seamlessly. To configure a traffic provider, you'll need to define canaryService and stableService in your Rollout specification. Then, include a trafficRouting block that specifies the provider you’re using. For example, in Istio deployments, the controller automatically adjusts VirtualService weights to manage traffic between versions. Similarly, for SMI-compatible service meshes like Linkerd, it creates and manages a TrafficSplit Custom Resource to control traffic percentages.
When using a traffic manager, the controller ensures that the stable ReplicaSet remains fully scaled (100%) throughout the rollout. This guarantees that the stable version can handle all traffic in case a rollback is needed [6].
Once your traffic provider is set up, you can move on to defining the traffic routing strategy in your Rollout specifications.
Configuring Traffic Management Strategies
After installing Argo Rollouts and setting up your traffic provider, the next step is to define how traffic shifts between versions during deployments. This process builds on the earlier environment and provider configurations, enabling controlled and progressive deployments. The main approaches - weighted canary deployments, header-based routing, and traffic mirroring - each offer distinct ways to manage traffic during rollouts.
Setting Up Canary Deployments with Traffic Weights
Canary deployments rely on the spec.strategy.canary section in your Rollout manifest to manage traffic distribution. This is done through steps that specify how traffic is split. For example, a setWeight step defines the percentage of traffic directed to the canary version, while a pause step temporarily halts the rollout. Pauses can be time-bound (e.g., pause: {duration: 10m}) or indefinite, requiring manual approval (pause: {}) [7][4].
If you're not using a traffic management provider, Argo Rollouts simulates traffic weights by adjusting the number of replicas. For instance, in a five-pod deployment, the smallest division is 20% [7][4]. However, for more precise traffic splits - like 1% or 5% - you'll need to integrate with tools like Istio, NGINX Ingress, AWS ALB, or SMI-compatible meshes. These tools manage traffic directly at the data plane level [6][10].
For better resource efficiency, you can enable dynamicStableScale: true in your configuration. This feature reduces the stable ReplicaSet's size as the canary version scales up [7][11].
Configuring Header-Based Routing
Header-based routing allows you to send specific requests to the canary version by matching HTTP headers, regardless of the overall traffic weight. This approach is particularly useful for targeting specific user groups [6][11].
To set this up, define both canaryService and stableService in your Rollout spec. Then, in the trafficRouting section, reference your traffic router (e.g., an Istio VirtualService) and list the route name in managedRoutes. The order of these routes determines their priority. In your steps array, include a setHeaderRoute step. This step should specify the route name and a match block with headerName and headerValue. The headerValue can match headers using exact, regex, or prefix, depending on your traffic router's capabilities.
You can also combine header-based routing with setWeight: 0 to ensure that only targeted requests reach the canary, while all other traffic stays with the stable version. To handle this targeted traffic, use setCanaryScale to ensure the canary has enough pods, as the controller might scale it down to zero otherwise.
Using Mirrored Traffic for Testing
If you need to test under real-world conditions without affecting users, traffic mirroring (or shadowing) is a great option. This method duplicates a portion of live traffic and sends it to the canary version while the stable version continues to handle user responses. Since the canary's responses are ignored, this approach allows for performance and correctness testing without risking user experience [6][11].
Traffic mirroring requires a service mesh, such as Istio. To configure it, include a setMirrorRoute step in your Rollout strategy. Specify the route name, the percentage of traffic to mirror, and a match block to define which requests to duplicate (e.g., by method, path, or headers). Always include a match predicate; without it, Argo Rollouts might not enable mirroring. Add the mirror route to managedRoutes to ensure it is handled correctly during the rollout.
Keep an eye on resource usage when mirroring high traffic percentages, as this can significantly increase server and service mesh load. When testing is complete, disable mirroring by adding a setMirrorRoute step with only the route name, leaving out match rules or percentages.
Need help optimizing your cloud costs?
Get expert advice on how to reduce your cloud expenses without sacrificing performance.
Traffic Management with Service Meshes
How Argo Rollouts Integrates with Service Meshes
Service meshes like Istio and Linkerd are known for their advanced traffic control capabilities. Argo Rollouts takes full advantage of these by automatically managing essential mesh resources like Istio's VirtualServices, DestinationRules, or SMI TrafficSplit. This means you don’t need to manually update these resources during deployments - the Rollout controller does it for you, streamlining the entire process [13].
The integration dynamically adjusts traffic weights in mesh resources to align with the setWeight steps defined in your Rollout's canary strategy [14]. For Istio, there are two main methods: host-level splitting and subset-level splitting. Host-level splitting directs traffic between separate Kubernetes Services and is ideal for north–south (ingress) traffic. On the other hand, subset-level splitting routes traffic between subsets within a DestinationRule, making it better suited for east–west (service-to-service) interactions. This approach avoids the complexity of managing multiple DNS entries [15].
One key advantage of service meshes is their ability to shift traffic in very small increments, as little as 1%, enabling highly controlled rollouts. Without a traffic manager, canary weight adjustments are restricted by replica counts, but meshes allow for much finer control [6,7]. They also support detailed routing for HTTP, TLS, and TCP traffic, providing flexibility and precision [14]. These controls go hand-in-hand with robust failure handling, which we'll explore next.
Traffic Splitting and Failure Recovery
Service meshes excel in traffic splitting and handling failures quickly. With Argo Rollouts, the controller ensures a fully scaled stable ReplicaSet is always available, allowing for immediate rollback if something goes wrong [6].
For detecting issues automatically, Argo Rollouts uses AnalysisTemplates and AnalysisRuns to monitor metrics providers like Prometheus [3]. If any metrics - such as error rates or latency - exceed predefined thresholds, the rollout aborts automatically, redirecting all traffic back to the stable version [3]. This works seamlessly with the service mesh, which instantly resets traffic weights to prioritise stability.
To ensure traffic isolation, the controller injects the rollouts-pod-template-hash into Service selectors or DestinationRule labels. This keeps canary and stable traffic entirely separate, ensuring each version only receives its allocated share of requests [13]. For more complex routing scenarios, such as using headers or traffic mirroring, you can configure route precedence through the managedRoutes field to ensure rules are applied in the right order [6].
Best Practices for Service Mesh Integration
To get the most out of Argo Rollouts with service meshes, certain configuration tips can make deployments even more reliable. For instance, if you're using Argo CD for GitOps, set ignoreDifferences for VirtualService HTTP routes and enable ApplyOutOfSyncOnly=true to maintain traffic weights during updates [15].
In multicluster Istio setups - where the Rollout controller resides in a different cluster from your primary Istio cluster - you’ll need to create a remote secret and label it with istio.argoproj.io/primary-cluster="true". This allows the Rollout controller to manage VirtualServices across clusters [15]. If you're combining Istio with AWS ALB, enabling Ping Pong
mode can prevent traffic disruptions when rollouts are aborted [15].
While the CNCF has archived the SMI Spec, Argo Rollouts continues to support it, allowing integration with Linkerd by managing the TrafficSplit CRD [17,4]. However, the recommended approach is to adopt the Gateway API and the Argo Rollouts Gateway API Plugin [13]. Interestingly, you can use multiple traffic routing solutions simultaneously - for example, Linkerd (via SMI) for internal traffic and NGINX for ingress traffic [12].
Lastly, for consistent traffic management during deployments, it’s a good idea to use a Horizontal Pod Autoscaler (HPA) rather than manually scaling replicas. The HPA ensures that the rollout has enough capacity to handle 100% of traffic when needed, keeping performance smooth throughout the process [6].
Monitoring and Validating Traffic Shifts
Connecting Metrics Providers
Argo Rollouts leverages AnalysisTemplates to integrate with various metrics providers, allowing you to validate the success of your rollouts [16]. These templates define essential details such as the metrics provider, the queries to execute, and the conditions that determine whether a deployment should proceed or roll back. The platform supports over 10 metrics providers natively, including Prometheus, Datadog, New Relic, Wavefront, Kayenta, and InfluxDB [1].
To set this up, you’ll need to include authentication details like OAuth2 credentials, API tokens, or AWS SigV4. Key metrics to monitor include:
- Success rate: The percentage of non-5xx HTTP responses.
- Latency: Ensure the 95th percentile latency stays below a defined threshold (e.g., 1,000 ms).
- Custom KPIs: Any business-specific performance indicators.
Before deploying, validate your queries directly within the provider's interface (e.g., the Prometheus GUI) to confirm they return the expected data. For Prometheus users, range queries with the all() function (e.g., all(result, # < 1000)) can ensure all data points in the monitoring window meet the criteria. If you're working with internal metrics providers using self-signed certificates, set insecure: true to bypass TLS verification [16]. This integration allows you to perform real-time rollout validation effectively.
Validating Traffic Shifts
During live deployments, the Argo Rollouts kubectl plugin becomes an essential tool. Running the following command:
kubectl argo rollouts get rollout <name> --watch
provides a live visual feed of your rollout's progress, showing details like ReplicaSets, Pods, and AnalysisRuns [4]. For deeper insights, examine traffic router resources such as SMI TrafficSplit or Istio VirtualService [6][13]. The .status.PauseConditions field in the Rollout object highlights if a rollout is paused, whether due to manual intervention or a scheduled pause. For simpler deployments without a traffic manager, monitor pod ratios to track traffic shifts. If issues arise, follow the troubleshooting steps outlined below to address them promptly.
Troubleshooting Common Issues
In scenarios without a traffic manager, traffic weights are determined solely by the number of replicas. As noted by the Argo Project:
Without a traffic manager, the Rollout had a limitation in that it could only achieve a minimum canary weight of 20%, by scaling 1 of 5 pods [4].
To address this limitation, you’ll need to install a supported traffic manager such as Istio or NGINX.
| Issue | Cause | Troubleshooting Step |
|---|---|---|
| Coarse Traffic Splitting | Missing Traffic Manager | Install a supported ingress/service mesh (e.g., Istio, NGINX) [4]. |
| High Resource Usage | Stable ReplicaSet at 100% | Enable dynamic stable scaling by setting dynamicStableScale: true [7]. |
| SMI Error State | TrafficSplit name conflict | Ensure the TrafficSplit isn’t manually created or use a unique name [13]. |
| Degraded Status | Aborted rollout | Re-apply the stable version manifest to fast-track recovery [4]. |
| Plugin RPC Error | Binary/socket communication issues | Verify ConfigMap registration and plugin executable location [17]. |
If a rollout enters a Degraded
state following an abort, you can re-apply the stable manifest or use the set image command to restore the previous version. The controller will detect this as a rollback and prioritise the stable ReplicaSet [4]. For users leveraging SMI, ensure that any TrafficSplit resource is managed by the Rollout controller, as manually created TrafficSplits with conflicting names can cause errors [13]. Lastly, if automated analysis fails, double-check that your AnalysisTemplate's successCondition and failureCondition expressions align with the response format of your metrics provider [18].
Conclusion
Key Takeaways
Argo Rollouts offers a powerful way to limit release exposure and automate deployment decisions using metrics-based analysis. While native Kubernetes rolling updates lack precise traffic control and automated rollback capabilities, Argo Rollouts fills this gap by integrating with service meshes and ingress controllers. This enables advanced routing features like header-based routing and traffic mirroring [1][6].
The use of AnalysisTemplates allows for automated promotion or rollback decisions by analysing real-time performance data [1][3]. Additionally, dynamic stable scaling helps reduce infrastructure costs by scaling the canary dynamically, all while maintaining precise traffic control [6][7]. A good starting point is Blue-Green deployments, especially for shared resources such as queues or databases. From there, teams can transition to Canary strategies with traffic managers to achieve greater flexibility in high-traffic production environments [2][5].
Before adopting these strategies, ensure your application can handle multiple versions running simultaneously. It's also essential to have metrics in place that can evaluate deployment success within a 5–15 minute window. Without this, the advantages of automated rollbacks are significantly reduced [19]. For traffic adjustments finer than 10–20%, consider integrating a supported traffic provider like Istio, NGINX, or AWS ALB. These tools offer greater precision compared to basic pod-count ratios and are key to achieving seamless, zero-downtime deployments [6][4].
These features provide the foundation for implementing best practices with expert guidance.
How Hokstad Consulting Can Help
Hokstad Consulting specialises in metrics integration, service mesh configurations, and GitOps implementation. With expertise in DevOps transformation and cloud infrastructure optimisation, they help businesses design automated CI/CD pipelines that incorporate progressive delivery strategies. This approach not only speeds up deployment cycles but can also reduce operational costs by as much as 50%.
Whether you're transitioning to a service mesh architecture, integrating Argo Rollouts into your Kubernetes setup, or establishing metrics-driven rollback policies, Hokstad Consulting offers tailored solutions for public, private, and hybrid cloud environments. Their DevOps services and infrastructure monitoring ensure your traffic management remains efficient and reliable. Visit Hokstad Consulting to explore how their team can support your progressive delivery journey.
FAQs
What are the advantages of using Argo Rollouts for managing traffic in Kubernetes?
Argo Rollouts offers detailed control over traffic management in Kubernetes, simplifying the process of achieving safer and more dependable deployments. With tools like percentage-based traffic shifting, header-based routing, and traffic mirroring, it supports incremental delivery methods, helping to lower the risks tied to releasing new application versions.
Additionally, it works effortlessly with ingress controllers and service meshes, allowing traffic to transition gradually to updated application versions. This method helps reduce downtime and ensures updates are seamless for users.
How does Argo Rollouts work with service meshes like Istio to manage traffic?
Argo Rollouts works effortlessly with service meshes like Istio, offering precise traffic control during progressive delivery. It achieves this by managing Istio's VirtualService resources, enabling traffic to be split between the canary and stable versions of an application.
You can configure traffic splitting either at the host level by adjusting weights in the VirtualService or at the subset level for a more controlled and gradual traffic flow. This setup allows teams to test and deploy updates safely, reducing the risk of user disruption - a key advantage for modern deployment practices.
What do I need to set up Argo Rollouts in a Kubernetes environment?
To get started with Argo Rollouts in Kubernetes, the first step is to install the Argo Rollouts controller along with its Custom Resource Definitions (CRDs). The easiest way to do this is by applying the install.yaml manifest. This will automatically create a dedicated namespace called argo-rollouts and deploy the necessary controller. If you prefer a more customised setup, you can manually apply the CRDs to a specific namespace instead.
For those using Kubernetes versions v1.14 or earlier, remember to add the --validate=false flag when applying the CRDs. This helps avoid any compatibility problems. If you're working in a managed Kubernetes environment, such as Google Kubernetes Engine (GKE), you might also need to assign cluster-admin privileges to your account to create cluster-wide roles.
Before diving into rollouts, ensure your kubectl environment is properly configured and that the argo-rollouts plugin is installed. Depending on your traffic management needs, you might also need to set up additional tools like ingress controllers, service meshes, or monitoring systems (e.g., Prometheus) to take advantage of advanced features.