Spot instances on AWS, Azure, and GCP let you save 70–90% on compute costs compared to on-demand rates. But these savings come with a catch: instances can be interrupted at short notice. To succeed, you need to design your workloads to handle interruptions and manage costs effectively. Here's what you need to know:
- Workload Suitability: Use spot instances for tasks that can tolerate interruptions (e.g., batch jobs, CI/CD agents, machine learning training). Diversify instance types and zones to reduce interruption risks.
- Resilience: Keep workloads stateless and store data externally. For long-running tasks, checkpoint progress every 5–15 minutes.
- Cost Management: Track actual savings, monitor fallback to on-demand instances, and set budget alerts to avoid surprises.
- Interruption Handling: Implement clean shutdown processes within 25 seconds and use provider tools for interruption notifications.
- Governance: Apply consistent tagging, IAM/RBAC policies, and ensure compliance with data residency requirements.
Each cloud provider has unique features for spot instances:
- AWS: Use the
price-capacity-optimizedallocation strategy, enable Capacity Rebalancing, and automate with tools like Node Termination Handler. - Azure: Choose between
Capacity-only
orPrice or Capacity
eviction policies; scale with VMSS and use the Scheduled Events API. - GCP: Opt for Spot VMs over Preemptible VMs, enable 120-second preemption notices, and use Managed Instance Groups for automatic replacements.
Pro tip: Combine spot instances with on-demand or reserved capacity for a balanced cost-saving strategy. Mixed deployments can cut compute costs by 59% on average, as seen with UK companies like ITV, which saved £150,000 annually.
For multi-cloud setups, ensure unified policies, consistent tagging, and cross-cloud cost tracking. Tools like OpenCost or Kubecost can simplify cost monitoring across providers. Designing for interruptions is key to unlocking the full potential of spot instances.
::: @figure 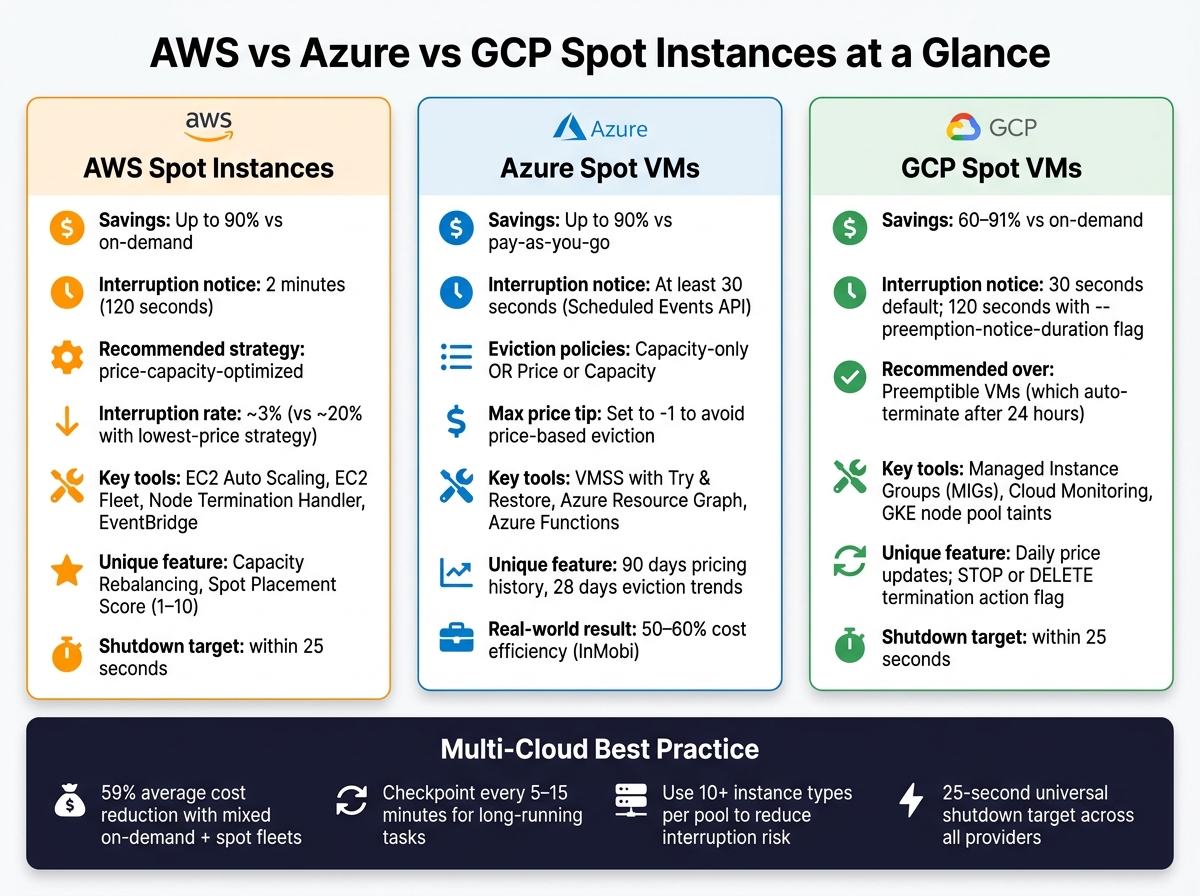 {AWS vs Azure vs GCP Spot Instances: Cost Savings & Key Features Compared}
:::
{AWS vs Azure vs GCP Spot Instances: Cost Savings & Key Features Compared}
:::
Cloud Spot Instances: Pricing Models, Strategy, and Technical Architecture | Uplatz
Need help optimizing your cloud costs?
Get expert advice on how to reduce your cloud expenses without sacrificing performance.
Core Checklist for Spot Instance Readiness
Before diving into spot instances on any cloud provider, there are five critical areas to address. Getting these right can save you from costly mistakes.
Workload Suitability
Focus on workloads that can tolerate interruptions, are stateless, and have flexible timing. Examples include batch processing jobs, CI/CD pipeline agents, and machine learning training tasks.
To keep interruption rates below 5% [2], diversify your setup by using at least 10 instance types and spreading across multiple Availability Zones. Ensure your shutdown process can complete in under 25 seconds to align with AWS's 2-minute and Azure/GCP's 30-second notification windows.
Once you’ve identified suitable workloads, confirm that your architecture can handle unexpected interruptions without breaking.
Resilience and Architecture
If the current instance disappears in the next five seconds, what do you lose? If the answer is anything beyond CPU cycles, the architecture needs work.- Cloud and Clear Editorial [2]
Keep all state stored externally using distributed caches, object storage, or external databases. For long-running tasks like batch or ML jobs, checkpoint progress every 5–15 minutes to external storage to minimise lost work during interruptions [2].
For production web workloads, it’s wise to maintain a 20–30% on-demand capacity alongside your spot fleet. This ensures smooth handling of mass eviction events without significant disruptions [2].
A well-thought-out architecture not only safeguards your data but also helps avoid unnecessary costs by reducing rework.
Cost Management
Track actual savings rather than theoretical discounts. This means comparing the on-demand equivalent cost to your actual spending, including any fallback to on-demand instances. Make sure spot spending is integrated into your FinOps dashboards, and set budget thresholds in GBP to flag unexpected cost spikes early.
Monitor key metrics like fallback frequency (how often workloads revert to on-demand) and pod rescheduling latency (aim for under 60 seconds). If fallback frequency increases, it may be a sign that your instance pool needs more variety [3].
Interruption Handling
Every workload running on spot instances needs an interruption handler. This is code that reacts to eviction notices and ensures a clean shutdown. Poll the metadata endpoint every 5 seconds or subscribe to provider notifications [2].
Design your shutdown process in four phases:
- Stop accepting new work
- Drain active connections
- Save progress to external storage
- Close database connections
Ensure the entire sequence completes within 25 seconds to work across all cloud providers. Treat AWS's additional 90-second buffer as extra breathing room, not a guarantee [2].
Governance and Security
Apply consistent IAM and RBAC policies across your spot fleets, just as you would for on-demand instances. On Azure, use user-assigned managed identities to maintain consistent authentication tokens when Spot VMs are replaced [5].
Resource tagging is crucial for accurate cost allocation. Without it, attributing spot savings to specific teams or projects becomes guesswork. For UK organisations handling sensitive data, ensure your instance pools stay within compliant regions, such as eu-west-2, to meet UK and EU data residency requirements [2].
AWS Spot Instances Checklist
This AWS-specific checklist provides guidelines on configuring, managing interruptions, and monitoring Spot Instances to balance cost savings with efficient performance.
Configuration Best Practices
Start by selecting the right allocation strategy. AWS recommends the price-capacity-optimized strategy, which prioritises instance pools with the most available capacity before considering cost. As Jagdeep Phoolkumar, Senior Specialist Solutions Architect at AWS, explains:
The price-capacity-optimized allocation strategy should be the first preference and the default allocation strategy for most Spot workloads.[11]
In tests, this strategy showed interruption rates of approximately 3%, compared to around 20% with the lowest-price strategy [11]. Avoid manually choosing instance types; instead, specify your vCPU and memory requirements. This approach allows AWS to select from a mix of newer and older instance generations, improving availability [1][8].
For better fleet management, use EC2 Auto Scaling groups or EC2 Fleet, as these support mixed instance types. Launching individual instances with RunInstances does not provide this flexibility [1][9]. Additionally, set cost thresholds in GBP to align spending with local budgets.
Once your configurations are optimised, the next priority is handling interruptions effectively.
Interruption Management
AWS provides two key signals to prepare for Spot Instance interruptions:
- EC2 Instance Rebalance Recommendation: Alerts you when the risk of interruption increases.
- Spot Instance Interruption Notice: Gives a two-minute warning before the instance is reclaimed [1][14].
To minimise disruption, enable Capacity Rebalancing in your Auto Scaling group. This ensures replacement instances are launched immediately after receiving a rebalance signal, rather than waiting until the instance is interrupted [14][15].
For containerised workloads, tools like the AWS Node Termination Handler can automate node draining in Kubernetes. Similarly, Amazon ECS includes built-in support for Spot Instance draining [12]. You can also use Amazon EventBridge rules to trigger actions during interruptions, such as updating DNS records, removing instances from load balancers, or saving checkpoints to S3 [12][13].
To catch interruption notices reliably, poll the Instance Metadata Service every five seconds [13][14]. However, avoid automatic failovers to On-Demand instances during interruptions, as this can exacerbate capacity issues [1].
Monitoring and Cost Controls
Effective monitoring is essential to managing Spot Instances. Keep an eye on the Spot Placement Score (rated 1–10) to evaluate the likelihood of successful provisioning in specific regions or Availability Zones - a score of 10 indicates high availability [1][8].
For cost management, configure CloudWatch alarms to track key metrics like TargetResponseTime and GroupInServiceInstances. This provides better insights than simply counting interruptions [12]. Additionally, set a maximum hourly spend in GBP for your fleet. This prevents new instances from launching if Spot pricing spikes, helping to control costs [10].
Azure Spot Virtual Machines Checklist
Azure Spot Virtual Machines (VMs) can provide up to 90% savings compared to standard pay-as-you-go pricing [4][5]. But, to make the most of these savings, your configuration choices can directly affect both reliability and cost management.
Spot VM Configuration
When setting up a Spot VM, ensure that the priority is set to Spot
. You’ll also need to decide between two eviction options:
-
Capacity-only
: The VM is evicted only when Azure needs capacity. -
Price or Capacity
: The VM is evicted if capacity is low or if the price exceeds your maximum [5].
For the maximum price setting, use -1 to avoid price-based evictions. This ensures your VM is only stopped when Azure needs the capacity back, and you’ll never pay more than the standard pay-as-you-go rate [7][16]. Keep in mind that prices must be entered in USD, even if billing occurs in GBP [4].
Your choice of eviction policy also affects costs and resource management:
| Policy | Disks | Storage Costs | Quota Impact | Best For |
|---|---|---|---|---|
| Deallocate | Preserved | Charges continue | Counts against quota | Workloads needing specific VM sizes |
| Delete | Permanently removed | No further charges | Freed from quota | Ephemeral, stateless workloads |
If you opt for the Delete policy, using ephemeral OS disks can help reduce storage costs and speed up VM replacements [5]. Avoid B-series (burstable) VMs and promotional VM sizes, as Spot pricing doesn’t apply to these options [4][7].
Once your configuration is set, it’s time to consider how to handle interruptions and scale your deployment effectively.
Interruption and Scaling
Azure provides at least 30 seconds’ notice before eviction through the Scheduled Events API, accessible at the non-routable IP 169.254.169.254 [2][5]. Design your shutdown sequence to complete within 25 seconds to account for potential polling delays [2].
To prepare for evictions:
- Poll the Scheduled Events API frequently to detect the
Preemptsignal early. - Ensure your application can drain connections, save state, and write session data to Azure Blob Storage or Azure Queue Storage within the notice window [2][5].
These practices allow replacement VMs to resume tasks seamlessly. This stateless and checkpoint-based design isn’t limited to Azure - it’s a principle that works across AWS and GCP too, supporting a multi-cloud strategy.
For scaling, use Virtual Machine Scale Sets (VMSS) with the Try & Restore
feature. This automatically attempts to restore evicted instances, helping maintain your target VM count [17]. Setting singlePlacementGroup to false allows scaling up to 1,000 VMs and improves distribution across zones [17]. To minimise simultaneous evictions, diversify your deployment across multiple VM sizes and regions, as capacity-based evictions are often location-specific [5][2].
The benefits of this approach can be transformative. Prasanna Prasad, Senior Vice President of Engineering at InMobi, highlighted the impact of adopting Azure Spot VMs:
Leveraging the Azure Spot VM offerings, we've been able to rewire our application stack to be fully stateless and it's been a real game changer with respect to making it cost efficient... we have been able to realise nearly 50-60 percent cost efficiencies.[4]
Cost and Governance
Effective cost management and governance are crucial when working with Spot VMs.
- Use Azure Resource Graph and Azure Functions to analyse up to 90 days of pricing data and 28 days of eviction trends. This helps identify VM sizes and regions with lower eviction rates and automate VM replacements upon eviction [2][5][7].
- The Azure Portal provides hourly eviction probability bands (e.g., 0–5%, 5–10%) based on the past seven days of data, which can guide your SKU selection [2][5].
To simplify orchestration, assign user-assigned managed identities to your Spot VMs instead of system-assigned ones. This ensures consistent authentication tokens across replacement instances [5]. Additionally, use resource tagging for accurate cost tracking and integrate Spot spending into your FinOps dashboards.
Before deploying to production, test your eviction handling by simulating an eviction using the Azure CLI command az vm simulate-eviction or the equivalent REST API call. This allows you to validate your shutdown and replacement processes without waiting for an actual eviction [16][18].
GCP Spot and Preemptible VMs Checklist
Google Cloud Platform (GCP) provides two types of interruptible compute options: the older Preemptible VM and the newer Spot VM. Spot VMs are the recommended choice for new workloads because they run until reclaimed, unlike Preemptible VMs, which terminate automatically after 24 hours [20]. Both options can save you between 60% and 91% compared to on-demand pricing [2]. This checklist focuses on adapting GCP-specific features and settings to ensure resilience and effective interruption management.
Configuration and Pricing
Spot VM pricing on GCP is updated once daily [2]. These VMs are not eligible for Committed Use Discounts (CUDs) or Sustained Use Discounts (SUDs), meaning the listed price is final [2]. When creating a Spot VM, use the --instance-termination-action flag to control what happens upon termination:
- Set it to
STOPto preserve the boot disk for manual restarts. - Use
DELETEfor workloads that don’t require persistent data, such as CI/CD pipelines [19].
For Google Kubernetes Engine (GKE) deployments (version 1.20+), label Spot node pools with cloud.google.com/gke-spot=true and apply the taint cloud.google.com/gke-spot=true:NoSchedule. This ensures only fault-tolerant workloads are placed on these nodes [22].
When choosing machine types, smaller and more common options like the E2 family (e2-standard-2 or e2-standard-4) are generally easier to obtain as Spot VMs [21]. Some machine types also support live migration, which reduces the chance of termination by moving the VM to different hardware [6].
With these configurations in place, focus on building robust systems to handle interruptions effectively.
Interruption Handling
Handling interruptions is key to maximising the benefits of Spot VMs. GCP provides a default preemption notice of 30 seconds, sent as an ACPI G2 soft-off signal. Design your shutdown logic to complete within 25 seconds to account for any delays [22]. For workloads that need more time, you can enable a 120-second preemption notice using the --preemption-notice-duration=120s flag in gcloud beta [19].
To detect an upcoming preemption, poll the metadata server at http://metadata.google.internal/computeMetadata/v1/instance/preempted every 5–10 seconds. This endpoint returns TRUE when preemption is imminent [20]. Additionally, set up a shutdown script in the instance metadata to execute when the termination signal is received. For GKE, configure terminationGracePeriodSeconds to 25 seconds to give the kubelet enough time to shut down pods properly within the 30-second window [22].
For batch jobs or long-running tasks, don’t rely solely on termination signals. Implement periodic checkpoints - save your work to Cloud Storage every 5–15 minutes. This ensures that preempted tasks can resume from the last save point, reducing the risk of data loss. As with other cloud platforms, make sure all tasks are idempotent to avoid duplicate writes or corrupted data [2].
Monitoring and Cost Controls
Monitoring and cost management are essential to maintaining efficient use of Spot VMs. Use Managed Instance Groups (MIGs) to automatically replace preempted instances and track preemption rates and regional capacity trends with Cloud Monitoring [20].
Set budgets in pounds (£) through the GCP Billing console and configure alerts for unexpected spending spikes. Be aware that premium operating system costs, such as those for Windows or RHEL, are not discounted on Spot VMs and will be charged at standard rates [20]. To avoid capacity issues, consider requesting a dedicated Preemptible CPU
quota for your project [19].
Finally, test your interruption-handling processes by manually stopping or deleting a Spot VM. This will allow you to verify that your checkpointing and recovery systems perform as expected [20].
Multi-Cloud Spot Strategy
When operating across AWS, Azure, and GCP, a unified multi-cloud strategy ensures consistency and avoids the pitfalls of fragmented billing, misaligned tags, and inconsistent interruption handling. While managing spot instances on a single cloud is relatively simple, extending this across multiple providers requires careful coordination.
Unified Policy and Governance
To maintain consistency, start by creating a unified policy for all workloads across clouds. Categorise workloads into two groups: Spot-ready (stateless services, batch jobs, CI/CD pipelines) and On-Demand only (databases, stateful services, payment processing). Apply these classifications uniformly across all providers to avoid confusion.
Take tagging practices a step further by enforcing a multi-cloud governance model. Use tools like Kyverno or OPA to ensure mandatory labels - such as team, cost-centre, and environment - are consistently applied. Without enforcement, tags can drift over time, making cost allocation nearly impossible to track effectively [23].
Additionally, align shutdown procedures with the earlier recommendation of completing shutdown logic within 25 seconds. This ensures smooth operations regardless of provider-specific interruption notices [2].
Cross-Cloud Cost and Capacity Management
To streamline cost management across providers, consolidate your view into pounds sterling (£). While native billing tools from cloud providers often come with delays of 24–48 hours and lack Kubernetes-specific cost insights, open-source tools like OpenCost and Kubecost can fill these gaps. These tools provide a clear, unified perspective that engineering teams can rely on.
Engineering teams respond to dashboards they trust, not cloud console fragmentation.- Code Worm Editorial [23]
Adopt a layered cost model to balance efficiency and reliability:
- Cover 40–60% of your baseline compute with Savings Plans or Reserved Instances.
- Use spot instances for 30–40% of fault-tolerant burst capacity.
- Reserve 10–20% for on-demand capacity to handle critical workloads.
This approach can lead to significant savings. For example, clusters combining on-demand and spot instances can achieve around a 59% cost reduction, while spot-only clusters have reached up to 77% savings [3]. However, be aware of market fluctuations - Azure spot prices reportedly increased by 108% between 2022 and 2023, highlighting the need to diversify across providers [3]. Mixed-fleet architectures have proven effective, with some delivering annual savings exceeding £150,000 while maintaining service continuity [2].
Automation and Optimisation
Managing spot instances manually in a multi-cloud environment is impractical. Automate your CI/CD processes to leverage spot capacity using tools like GitHub Actions Runner Controller (ARC) or the GitLab Runner autoscaler.
A spot interruption during a build wastes time but causes no damage... A spot interruption during a deployment can leave your infrastructure in a partially-applied state.- CloudToolStack Editorial [6]
For Kubernetes environments, employ attribute-based instance selection. This approach uses vCPU and memory ranges to automatically include new instance generations as they become available. Diversify by using at least 10 different instance types per workload pool to minimise the risk of simultaneous interruptions from a single capacity pool [2].
To keep your strategy sharp, conduct quarterly reviews. These should include verifying instance type diversification, ensuring interruption-handling scripts are functioning as intended, and assessing regional spot availability. If your team struggles with the bandwidth for such reviews, Hokstad Consulting offers support through a no-savings, no-fee model, specialising in multi-cloud optimisation and cost engineering.
Conclusion
Spot instances can offer savings of up to 90%, but only if your architecture is designed to handle interruptions. Achieving success with spot instances hinges on thorough preparation rather than just tweaking configurations.
Key to this success is designing stateless workloads, implementing shutdown logic that operates within 25 seconds, and following solid design principles alongside effective cost management strategies.
Spot instances are an architectural commitment, not a configuration setting.- Cloud and Clear UK [2]
Clear governance and detailed tagging are crucial for keeping costs visible as your cloud usage scales.
For expert guidance on refining your multi-cloud strategy, reach out to Hokstad Consulting. They offer a results-driven model where you only pay if savings are achieved.
FAQs
How do I know if my workload is spot-ready?
To determine if your workload is suitable for spot instances, it should meet the following conditions:
- Stateless: Your workload shouldn’t rely on local data or session storage.
- Fault-tolerant: It must be capable of handling interruptions and resuming operations safely.
- Time-flexible: It shouldn’t depend on precise timing to function correctly.
- Quick boot time: The workload should be able to start up in under two minutes.
- Fallback mechanism: There should be an option to switch to on-demand capacity if needed.
Spot instances are not ideal for databases or services that cannot tolerate brief interruptions.
What’s the simplest way to recover quickly after a spot eviction?
To bounce back swiftly after a spot eviction, consider automating your infrastructure with tools like AWS Auto Scaling groups or Kubernetes (such as GKE or EKS). These tools can automatically replace any interrupted capacity, keeping your operations running smoothly.
For individual workloads, focus on fault tolerance by implementing strategies like external state storage, idempotent operations, and periodic checkpointing. Additionally, diversifying your instance types and regions ensures your orchestrator can quickly provision replacements without unnecessary delays.
How can I stop on-demand fallback costs from cancelling out spot savings?
To make the most of spot instance savings without falling into the trap of on-demand fallback costs, it's smart to design an architecture that focuses on capacity availability. Here's how:
- Spread your workloads across 5–10 instance types and multiple availability zones. This approach ensures flexibility and reduces the risk of interruptions.
- Use tools like AWS Auto Scaling Groups to automate this distribution effectively.
- Set your maximum price equal to the on-demand rate. This helps you avoid unnecessary evictions that occur due to price fluctuations.
- Rely on capacity-based interruption models, which tend to be more predictable and reduce the need for expensive on-demand capacity switches.
These strategies work together to keep your costs under control while maintaining performance.