
Multi-tenancy in service meshes allows multiple teams or customers to share infrastructure while maintaining separation and security. Kubernetes alone often falls short in providing robust isolation, making service meshes like Istio essential for addressing gaps. Here’s what you need to know:
-
Multi-Tenancy Types:
- Soft: Shared control plane, suitable for trusted teams.
- Hard: Separate clusters or control planes for untrusted, regulated scenarios.
-
Service Mesh Benefits:
- Secure workload isolation with mTLS and SPIFFE IDs.
- Advanced Layer 7 policies for granular access control.
- Reduced configuration overload with scoped sidecars.
-
Challenges:
- Noisy neighbours consuming excessive resources.
- Cross-tenant security risks via DNS reconnaissance.
- Complex configurations in large setups.
Key Patterns:
1.  **Namespace-per-Tenant**: Cost-efficient but soft isolation.
2.  **Virtual Clusters ([vCluster](https://www.vcluster.com/))**: Moderate cost, stronger isolation.
3.  **Separate Clusters**: Best for compliance but expensive.
-
Security Strategies:
- Enforce mTLS for all communication.
- Apply default-deny policies and limit service discovery.
- Use network policies as a backup layer.
-
Cost Insights:
- Namespace isolation: ~£2,450/month for 50 tenants.
- Virtual clusters: ~£3,100/month.
- Separate clusters: ~£10,100/month.
Balancing cost, security, and compliance is key. Start with namespace isolation and scale to virtual clusters or separate clusters based on trust levels and regulatory needs. Automation and continuous monitoring ensure long-term success.
Core Multi-Tenancy Patterns in Service Meshes
Namespace-Per-Tenant with a Shared Control Plane
A common way to approach multi-tenancy is by assigning each tenant a dedicated namespace while using a single Istio control plane. This setup is cost-efficient, particularly in environments with multiple tenants. For example, in a 50-tenant environment, a shared Amazon EKS control plane costs about £58/month, compared to £2,900/month for 50 separate clusters [5].
This method combines several isolation mechanisms. A mesh-wide AuthorizationPolicy denies all traffic by default, and explicit allow
policies are applied per namespace. Each workload is assigned a SPIFFE identity tied to its namespace and service account (e.g., spiffe://cluster.local/ns/tenant-a/sa/service-1) [1]. Additionally, a Sidecar resource in each tenant namespace limits which services the tenant's Envoy proxies can discover. This keeps the routing table streamlined and prevents tenants from accessing each other's services [2].
The difference between 'namespace-per-tenant' and 'hard multi-tenant isolation' comes down to whether you're relying on convention or enforcement.- Tim Derzhavets [1]
However, this setup is considered soft multi-tenancy. Since the API server and etcd are shared, conflicts with CRDs between tenants can occur. Moreover, a tenant exploiting a kernel vulnerability could theoretically bypass the namespace boundary [4][9].
Tenant-Aware Routing and Traffic Management
Namespace isolation can be enhanced with precise traffic management to ensure requests are routed to the correct tenant services. Two common approaches include header-based routing and JWT-based routing, both implemented using Istio VirtualService rules.
- Header-based routing: An upstream gateway adds an
x-tenant-idheader, andVirtualServicerules use this header to route traffic to the appropriate backend. - JWT-based routing: Verified token claims are used to direct traffic securely.
For shared services like logging or auditing, an EnvoyFilter can inject an x-tenant-identity header derived from the mTLS certificate. This ensures the shared service can identify the tenant it is serving [1].
However, shared meshes carry risks. A misconfigured or malicious tenant could create a VirtualService for a hostname they don’t own, potentially intercepting traffic meant for another tenant [6]. A practical solution is migrating to the Kubernetes Gateway API, which offers safer cross-namespace support and stricter RBAC controls compared to VirtualService. This approach also prepares the system for better ingress-level isolation.
Per-Tenant Ingress and Gateway Isolation
When it comes to external access, securing tenant boundaries becomes critical. Shared ingress gateways expose all tenants, but assigning a dedicated Gateway resource per tenant, supported by its own ingress deployment, offers better isolation. Each tenant can have their own TLS certificate, rate limits, and scoped external entry point [3][10].
This setup is particularly valuable for tenants with distinct compliance requirements or when you need to demonstrate to auditors that Tenant A’s traffic is entirely separate from Tenant B’s. The additional cost is relatively low since it involves running extra ingress pods rather than separate control planes. Operational complexity can be reduced with automation tools like Helm charts or scripts, which can handle the provisioning of a tenant’s namespace, AuthorizationPolicy, Sidecar resource, NetworkPolicy, and Gateway resource during onboarding.
| Pattern | Isolation Strength | Cost | Best For |
|---|---|---|---|
| Namespace-Per-Tenant (Shared Control Plane) | Soft (logical) | Lowest | Trusted internal teams |
| Virtual Clusters (vCluster) | Medium (dedicated API server) | Medium | Mixed-trust SaaS tenants |
| Separate Clusters | Hard (physical) | Highest | Regulated or untrusted tenants |
Deciding between these patterns isn’t just a technical choice; it’s also about balancing cost and risk. For many organisations, starting with namespace isolation, strict mTLS, and default-deny policies provides a strong foundation. Virtual clusters become a worthwhile option when issues like CRD conflicts or API server contention arise at scale [5].
Need help optimizing your cloud costs?
Get expert advice on how to reduce your cloud expenses without sacrificing performance.
Security and Isolation Strategies
Authentication and Authorisation Mechanisms
Mutual TLS (mTLS) plays a key role in securing service-to-service connections. It verifies the identity of workloads using their SPIFFE ID, which encodes details like namespace and service account [1][11]. With strict mTLS enabled, all connections are authenticated and encrypted at the transport layer, ensuring a secure communication channel.
Building on this, Istio's AuthorizationPolicy adds another layer of control. It determines who is making the request (Principal), where it is going (Target), and under what conditions - such as HTTP methods, paths, or JWT claims. This allows for fine-grained control at Layer 7, far beyond what standard Kubernetes RBAC offers [11].
However, RequestAuthentication alone only validates tokens and doesn’t block unauthenticated requests. To enforce stricter access, it should be paired with an AuthorizationPolicy that requires a requestPrincipal [11].
If you enable Istio mTLS peer authentication and create any ALLOW policy on a workload, all traffic not explicitly allowed is denied.- Aareez Asif, Senior Kubernetes Architect, DevOpsil [11]
To avoid policy sprawl as tenants grow, platform teams should manage policies across three layers:
- Mesh-wide baseline policies
- Namespace-level tenant policies (managed via GitOps)
- Workload-specific policies (owned by individual teams)
This layered approach ensures clarity and prevents unmanageable configurations [11].
While identity verification is essential, controlling network and data flow is equally important for effective tenant isolation.
Network and Data Isolation
Identity-based policies are powerful but shouldn’t be the sole defence mechanism. Kubernetes NetworkPolicy provides an additional enforcement layer at Layer 3/4. If a sidecar proxy is misconfigured or bypassed, these network policies act as a critical safety net [1].
NetworkPolicy focuses on controlling TCP connections, while AuthorizationPolicy governs application-layer actions. Together, they create a robust, multi-layered security framework [1].
To enhance tenant isolation further, service discovery scoping can limit what each tenant's proxies can see. By default, Envoy proxies in the mesh can discover all services across namespaces. Using Istio Sidecar resources to restrict this view ensures proxies only access permitted services. This also reduces Envoy proxy memory usage by 50% to 80% in larger meshes [7].
For data isolation, tools like the External Secrets Operator can map specific secrets paths in tools like HashiCorp Vault to individual namespaces. This setup ensures that if one workload is compromised, it cannot access another tenant's secrets [5]. Additionally, setting the mesh’s outboundTrafficPolicy to REGISTRY_ONLY blocks egress traffic to unregistered destinations, adding another layer of control [7].
Compliance Considerations for UK Organisations
These isolation strategies not only boost security but also align with strict compliance requirements in the UK.
For organisations subject to UK GDPR, a well-architected multi-tenancy setup supports the principle of privacy by design.
This ensures that personal data from one tenant remains inaccessible to others [1][5]. Combining cryptographic identity through mTLS with a default-deny authorisation policy provides the technical measures needed to achieve this separation.
Auditors often scrutinise shared components like the control plane. For example, a shared API server and etcd in a namespace-per-tenant model may be flagged as lacking sufficient isolation for regulated workloads [5]. To address this, some organisations, like Stripe Systems Engineering, have adopted virtual clusters (vCluster) alongside enhanced network and secrets isolation. This approach helped them pass a SOC 2 Type II audit while cutting costs by 69% compared to running 50 separate clusters [5].
Here’s a quick comparison of isolation patterns and their compliance suitability:
| Pattern | Compliance Suitability | Key Risk |
|---|---|---|
| Namespace-per-tenant | Weak - suitable for internal teams | Shared API server and etcd |
| Virtual Clusters (vCluster) | Acceptable - SOC 2, HIPAA | Shared kernel and node |
| Separate Clusters | Strong - FedRAMP High, PCI DSS | High cost and operational overhead |
Istio also offers tools like the AUDIT action within AuthorizationPolicy, which generates audit records without blocking traffic. This creates a detailed audit trail, essential for compliance reviews [1]. Additionally, integrating istioctl analyze into GitOps pipelines can help detect policy misconfigurations before they reach production, addressing a common cause of cloud security incidents [1].
For UK organisations navigating complex multi-tenant service mesh setups while adhering to compliance standards, expert advice can make all the difference. The Hokstad Consulting blog offers additional insights into optimising cloud infrastructure and DevOps practices for these environments.
Multitenancy and RBAC with Istio | Kubernetes | Multicluster setup | Demo | IMESH

Operational and Cost Considerations
::: @figure 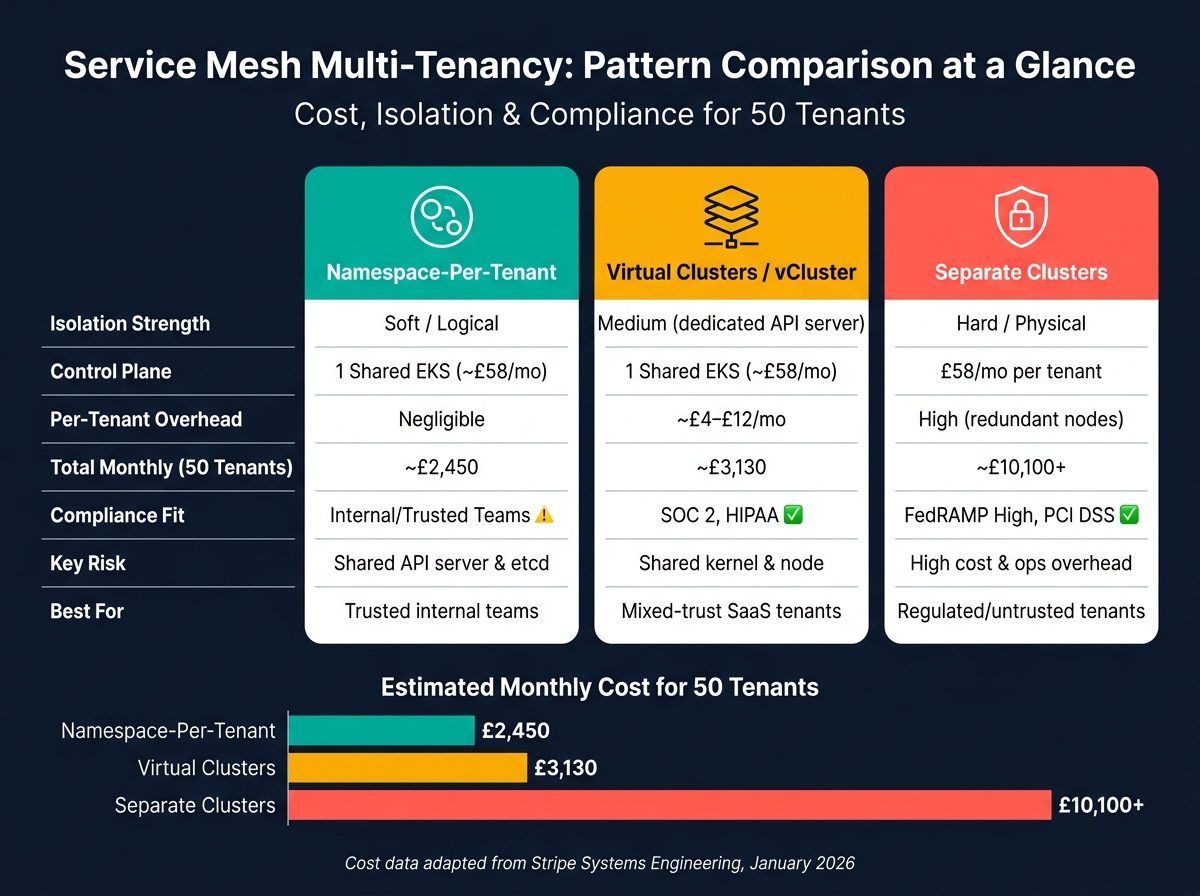 {Service Mesh Multi-Tenancy Patterns: Cost, Security & Compliance Compared}
:::
{Service Mesh Multi-Tenancy Patterns: Cost, Security & Compliance Compared}
:::
Resource Isolation and Performance Optimisation
Multi-tenant meshes often face configuration overload, where every Envoy sidecar proxy is burdened with settings for all services in the mesh - even those it doesn’t need. Imagine a SaaS setup with 100 tenants, each running 10 services. That’s 1,000 service endpoints pushed to every sidecar [12]. This leads to wasted memory, slower updates to the control plane, and extra strain on istiod.
To tackle this, use the Istio Sidecar resource in each tenant namespace. This limits the sidecar’s configuration to only the relevant services, cutting down memory use and processing demands. Combine this with the exportTo field in VirtualService and DestinationRule, setting it to "." (local namespace only). This ensures that configurations don’t spill over between tenants [3].
The goal is to make it so that each tenant can only see and affect their own services while still sharing the underlying infrastructure efficiently.- Nawaz Dhandala [3]
To prevent one tenant from affecting others, set proxy resource limits using pod annotations like sidecar.istio.io/proxyCPULimit. Pair this with namespace-level ResourceQuotas and LimitRanges to manage CPU usage and prevent resource exhaustion. Without LimitRanges, pods without explicit resource requests can quietly consume all available resources on a shared node [13]. For high-traffic environments, add a DestinationRule with connection pool limits and outlier detection to protect the mesh from cascading failures caused by a single tenant’s misbehaving service [8].
These steps not only improve overall performance but also help reduce operational expenses, as detailed below.
Cost Trade-Offs Between Different Patterns
The choice of isolation strategy directly affects your infrastructure costs. Here’s a breakdown of costs for three common approaches, based on a scenario with 50 tenants:
| Pattern | Control Plane Cost | Per-Tenant Overhead | Total Monthly (50 Tenants) |
|---|---|---|---|
| Namespace Isolation | ~£58/mo (1 shared EKS) | Negligible | ~£2,450 |
| Virtual Clusters (vCluster) | ~£58/mo (1 shared EKS) | ~£4–£12/mo | ~£3,130 |
| Separate Clusters | £58/mo per tenant | High (redundant nodes) | ~£10,100+ |
(Data adapted from Stripe Systems Engineering, January 2026 [5])
Namespace isolation is the least expensive option but offers weaker separation at the control plane level. At the other end, separate clusters provide the strongest isolation but come with high costs, making them viable only in cases where extreme security concerns - like privilege escalation or data breaches - are a priority.
The operational overhead of dedicated clusters is only justified when your threat model includes privilege escalation or data exfiltration - not just noisy neighbors.- Tim Derzhavets [13]
Virtual clusters (vCluster) offer a middle ground. Each tenant gets a dedicated API server and etcd instance, using about 256MB of RAM and 100m CPU per tenant. This adds a modest overhead of £4–£12 per tenant per month [5]. For most SaaS platforms, this strikes the best balance between cost and isolation.
Reducing Complexity with Automation
Managing resource isolation and costs effectively also requires automation.
Manual onboarding of tenants can lead to errors in multi-tenancy setups. For instance, missing an AuthorizationPolicy or Sidecar resource could leave a tenant exposed. The solution? Automate the baseline setup using a Kubernetes operator or controller that triggers on namespace creation [12].
A well-designed onboarding controller should automatically apply key configurations like a deny-all AuthorizationPolicy, a scoped Sidecar resource, ResourceQuota and LimitRange objects, and a strict PeerAuthentication policy - all before any workloads are deployed [13]. Tools such as ArgoCD ApplicationSets can further streamline this process, ensuring consistent policies across numerous namespaces as if managing a single unit [13].
For large-scale onboarding, fine-tune istiod variables to avoid CPU spikes. Adjusting PILOT_DEBOUNCE_AFTER to 300ms and PILOT_DEBOUNCE_MAX to 15 seconds allows the control plane to batch configuration updates rather than handling each namespace change individually [12]. This small tweak can make a big difference when onboarding dozens of tenants quickly.
Implementation Strategies and Best Practices
Assessing Your Current Environment
Start by documenting your current tenant boundaries. Identify which services are shared - like logging, authentication, or databases - and which are tenant-specific. This step is crucial because shared services often become a weak point for cross-tenant data leaks. To mitigate this, apply explicit AuthorizationPolicies for every tenant accessing shared services [8].
Next, evaluate your current isolation measures. Does your namespace separation rely on enforced rules or just conventions? If it's the latter, you likely have gaps. Check whether mTLS is enabled, if NetworkPolicies are in place, and whether any ResourceQuotas have been applied. Tools like istioctl analyze can quickly identify misconfigurations, helping you address potential issues before making changes.
With these insights, you can plan an incremental migration towards stricter controls, ensuring a safer and more robust system.
A Step-by-Step Migration Path
Taking an incremental approach reduces risks and allows you to build confidence as you implement stricter controls.
Set Up Namespace Boundaries and RBAC
Create dedicated namespaces for each tenant and label them consistently (e.g.,tenant: acme). Apply namespace-level RBAC to establish foundational isolation. Before deploying workloads, enforce a default-deny-all NetworkPolicy to strengthen security from the outset [1].Enable mTLS in Permissive Mode First
Start by setting Istio toPERMISSIVEmode, which supports both plaintext and encrypted traffic. This lets you verify service communication before enforcing strict encryption. Once validated, switch toSTRICTmode for mesh-wide encryption [1][2].Deploy AuthorizationPolicies and Scope Sidecars
Begin with a deny-all AuthorizationPolicy, then add tenant-specific allow rules based on SPIFFE identities. Combine this with Sidecar configurations to limit each proxy's service discovery to its respective namespace [2].Consider Virtual Clusters When Needed
For SaaS platforms with untrusted or regulated tenants, virtual clusters (vCluster) can be an effective solution. For example, Stripe's Systems Engineering team demonstrated in January 2026 how moving 50 enterprise clients from separate EKS clusters to vCluster on a shared cluster reduced monthly costs by 69% - from £12,650 to £3,923 - while maintaining compliance with a SOC 2 Type II audit and avoiding isolation-related issues [5].
Monitoring and Continuous Improvement
After completing the migration, continuous monitoring is key to maintaining isolation and performance. Observability tools can transform static configurations into adaptive systems. For instance, configure Prometheus relabelling so that every metric includes a namespace label. Group metrics like istio_requests_total by source_workload_namespace to detect unexpected cross-tenant traffic patterns [5][8].
Set up alerts for 403 Forbidden responses to catch misconfigurations or unauthorised access attempts early [1]. Tools like Kubecost or OpenCost can help track resource usage per namespace, ensuring accurate cost allocation for each tenant [5][14].
Finally, integrate policy violation tests into your CI/CD pipeline. For example, deploy a test pod in one tenant’s namespace and attempt to curl a service in another. A proper setup should return a 403 Forbidden response. If it doesn’t, your policies may have drifted. Automating checks with tools like istioctl analyze in your GitOps workflow can catch these issues before they impact production [1][2].
Conclusion and Key Takeaways
Service mesh multi-tenancy presents a range of patterns, each offering a different balance of cost, security, and operational complexity. The best approach hinges on two key factors: your tenant trust profile and compliance requirements. As Mehul Budasna, Head of Engineering at Bacancy, aptly states:
The isolation model you choose should follow directly from two inputs: your tenant trust profile and your compliance obligations.[14]
For many organisations in the UK, a practical starting point is the namespace-per-tenant model with a shared control plane, combined with strict mTLS, deny-all AuthorizationPolicies, and carefully scoped Sidecar resources. This setup delivers effective isolation at a relatively low cost. If stronger guarantees are necessary - for example, to meet SOC 2, PCI DSS, or healthcare compliance standards - virtual clusters (vCluster) provide a compelling middle ground. They offer dedicated API servers without the financial burden of fully separate clusters. To put this into perspective, for 50 tenants, a shared vCluster model costs approximately £3,100 per month, compared to over £9,700 per month for separate clusters [5].
Here’s a quick comparison of the three main patterns:
| Pattern | Security Boundary | Compliance Fit | Relative Cost |
|---|---|---|---|
| Namespace-per-Tenant | Logical | Internal/Trusted | Lowest |
| Virtual Clusters (vCluster) | Partial isolation | SaaS/External | Moderate |
| Separate Clusters | Physical (hard) | Regulated (HIPAA/PCI) | Highest |
From these insights, two operational principles stand out as essential for success:
- Automate everything. Whether it’s setting up namespaces or deploying policies, automation is crucial. Manual processes can lead to configuration drift, which increases risk.
- Monitor continuously. Use namespace tagging for metrics, alert on unexpected 403 responses, and incorporate policy checks into your CI/CD pipeline. These practices ensure your architecture remains robust over time.
The ultimate aim is to create a system where strong isolation, fair resource allocation, and operational efficiency work together seamlessly. For organisations looking to reduce cloud infrastructure costs while maintaining high standards of security and compliance, Hokstad Consulting provides expert guidance on cloud cost optimisation and DevOps transformation.
FAQs
When should I move from namespaces to vCluster or separate clusters?
If namespaces aren't meeting your multi-tenancy needs, consider switching to vCluster. While namespaces share resources like the API server, etcd, and network paths, they can lead to problems such as RBAC vulnerabilities or interference from noisy neighbours. vCluster solves this by giving each tenant their own API server, CRD registry, and backing store. For situations requiring strict compliance, complete separation of concerns, or independent failure domains, separate clusters are the better choice.
How do I stop tenants seeing or hijacking each other’s services in Istio?
To keep tenants from interfering with or accessing each other's services, you should implement a defence-in-depth strategy that leverages both network and mesh controls:
- Kubernetes NetworkPolicies: Set these to block all cross-namespace traffic by default, ensuring isolation.
- Istio AuthorizationPolicies: Configure these to permit traffic exclusively within each tenant's namespace.
- Service Discovery Restrictions: Deploy a Sidecar resource for each namespace to limit service discovery to only what's necessary.
- Strict Mutual TLS (mTLS): Enforce authenticated and encrypted communication between services to enhance security.
What’s the quickest way to onboard new tenants safely without manual mistakes?
When it comes to onboarding tenants quickly and securely, automating the setup process is key. At the same time, applying defence in depth ensures robust security. Here's how you can achieve this:
- Create the tenant namespace: This isolates each tenant's resources, providing a dedicated space for their workloads.
- Apply a default-deny NetworkPolicy: Block all ingress and egress traffic by default, allowing only what’s absolutely necessary. This includes access to essential services like DNS and the Kubernetes API.
- Configure Istio policies: Set up service mesh policies to control traffic flow and strengthen security.
- Set RBAC and resource quotas: Define role-based access control (RBAC) rules and enforce resource limits to prevent any tenant from over-consuming resources.
To make this process seamless and error-free, use a script or a Helm chart. This ensures every deployment is consistent, reducing the risk of manual mistakes.