
Microservices create more entry points for attackers, making API security critical. Here's a quick guide to protecting your API endpoints effectively:
- Authentication & Authorisation: Use JWT tokens, OAuth 2.0, and mTLS to verify requests and control access.
- Encryption & Input Validation: Encrypt data with TLS 1.2/1.3 and validate inputs to prevent injection attacks.
- API Gateway Controls: Implement rate limiting, request validation, and circuit breakers to manage traffic and block threats.
- Service Mesh & Zero Trust: Encrypt service-to-service traffic with mTLS, and enforce strict access policies.
- Automated Security & Monitoring: Add security checks in CI/CD pipelines and monitor API traffic for anomalies.
::: @figure 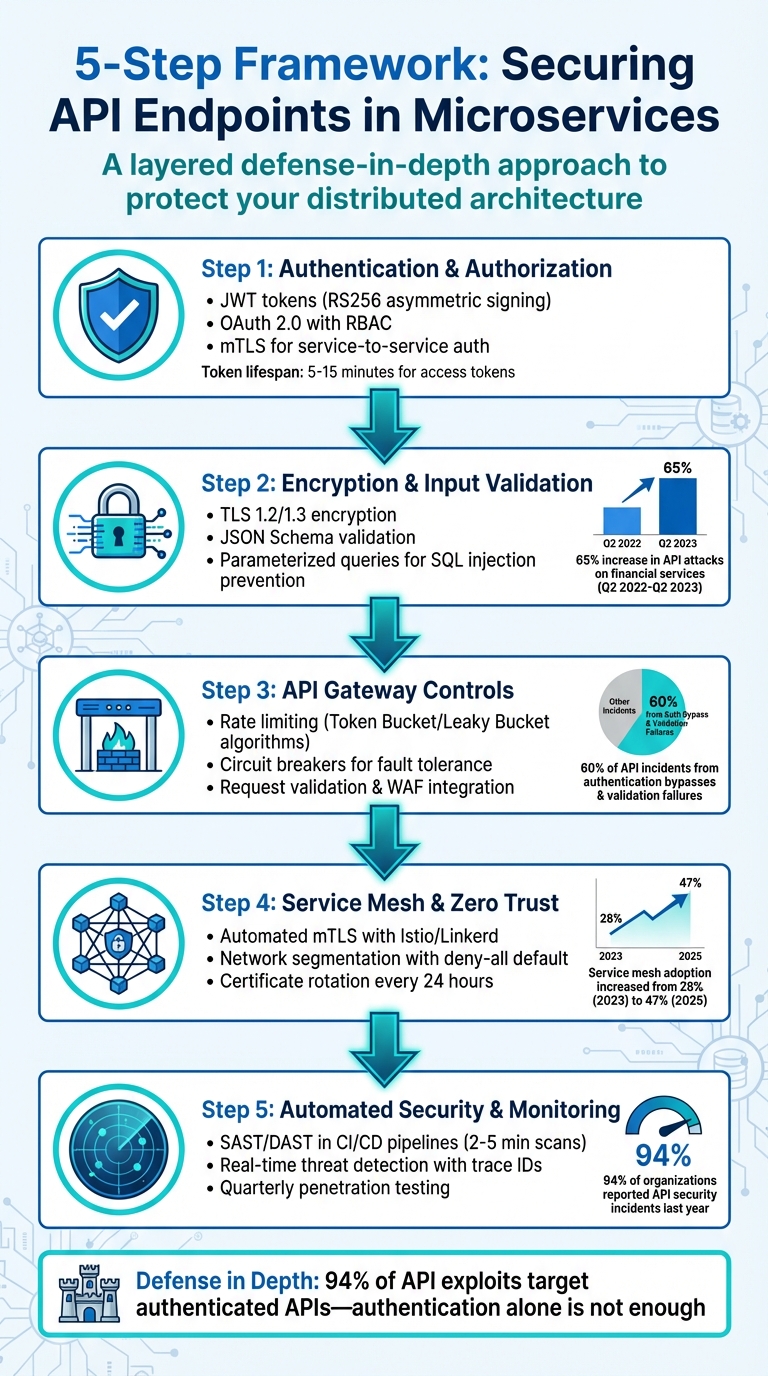 {5-Step Framework for Securing API Endpoints in Microservices Architecture}
:::
{5-Step Framework for Securing API Endpoints in Microservices Architecture}
:::
Apidays Paris 2023 - The Ultimate Guide to Securing Microservice-Based APIs
Step 1: Set Up Authentication and Authorisation
Authentication verifies who is making a request, while authorisation determines what they are allowed to do. In a microservices setup, every API endpoint must check both before proceeding with a request. Without these safeguards, a compromised service could expose your entire infrastructure. Together, these measures create the first line of defence for your interconnected services.
Use JWT Tokens for Stateless Authentication
JSON Web Tokens (JWT) simplify authentication by embedding user data directly within the token, removing the need for centralised session storage. As Daniel Swift, Java Microservices Architect at Springfuse, puts it: Think of JWT as a tamper-evident envelope that contains verified user information. The receiving service can trust the contents without contacting the original authentication service
[5].
Here’s how it works: a user authenticates with an Authorisation Server (e.g., Keycloak or Auth0), which generates a signed JWT. The client then includes this token in the Authorization: Bearer <token> header for requests. The API Gateway or Resource Server verifies the token’s signature and checks claims like expiration (exp) and issuer (iss) [5][6].
Use asymmetric signing (RS256) instead of symmetric (HS256) for distributed systems. With RS256, the private key stays securely on the Authorisation Server, while Resource Servers only use the public key for validation. As Bharath Dayal, Backend Architect, advises: In distributed systems, you must never share the signing secret with resource servers
[6]. Implement JSON Web Key Sets (JWKS) by exposing public keys through a /jwks endpoint. This allows services to fetch and cache the keys instead of querying the Auth Server for every request [6].
Short-lived access tokens (5–15 minutes) are ideal for microservices [6]. Always validate claims such as exp, iat, iss, and aud to guard against replay attacks. For web applications, store tokens in httpOnly cookies to mitigate XSS risks [7].
Use OAuth 2.0 and Role-Based Access Controls (RBAC)
OAuth 2.0 is the go-to protocol for delegated authorisation, enabling services to exchange tokens instead of passwords. With OAuth, applications can securely perform actions on behalf of users without sharing credentials [8].
Scopes define what an application can do (e.g., read:orders), while roles determine user permissions (e.g., Order_Manager). Configure your Identity Provider to include both scopes and roles as claims within JWTs. The API Gateway validates these tokens, extracting claims like user ID or roles, and forwards them to downstream services via headers [10][12].
For user-facing apps, always use the Authorisation Code Grant with Proof Key for Code Exchange (PKCE) to prevent authorisation code theft [9][11]. For service-to-service communication, use the Client Credentials Grant [7][9]. Always validate the aud (audience) claim to ensure tokens are intended for the receiving service [9][13]. Access tokens in production typically expire within 15–60 minutes [11].
Add Mutual TLS (mTLS) for Service-to-Service Authentication
While standard TLS verifies only the server, Mutual TLS (mTLS) ensures both the client and server authenticate one another using digital certificates. This prevents man-in-the-middle attacks and spoofing. As APIPark notes: Mutual TLS (mTLS) stands as a critical component in the stack of security technologies that businesses must implement as they expose APIs and services on the internet
[14].
The mTLS handshake involves both parties exchanging certificates, verifying them against a trusted Root CA, and generating a session key for encrypted communication. This process provides stronger security than IP whitelisting or API keys.
To streamline certificate management, use service mesh tools like Istio or Linkerd. These tools handle certificate issuance, distribution, and rotation across large-scale microservices. Also, configure your API Gateway to enforce mTLS for all upstream communication, ensuring only trusted services can interact. Keep in mind that the bi-directional handshake might introduce slight latency, so assess its impact in high-traffic scenarios.
Step 2: Enable Encryption and Input Validation
After setting up authentication, the next step is to secure data exchanges and ensure only valid requests interact with your APIs. Without encryption, sensitive data can be intercepted, and poor input validation leaves your system vulnerable to malicious payloads. Together, these measures form a protective layer for your microservices.
Enable TLS/SSL Encryption for Data Transmission
Once authentication is in place, securing data in transit is essential to prevent interception and tampering. Transport Layer Security (TLS) encrypts communication between clients and services, safeguarding data from eavesdropping. Use TLS 1.2 or TLS 1.3, as older versions like SSL 2.0/3.0 and TLS 1.0/1.1 are outdated and prone to attacks like POODLE [15][16]. For example, the infamous 2017 Equifax breach, which exposed data from 147 million users, was partly due to an unpatched TLS vulnerability [16].
To secure your services, obtain certificates from trusted providers like DigiCert, GlobalSign, or Let's Encrypt. For service-to-service encryption, refer to the mTLS guidelines outlined in Step 1. API gateways such as Tyk, Kong, or Zuplo can handle TLS termination and manage certificate renewals. For automated certificate rotation in Kubernetes, tools like Cert-Manager or AWS Certificate Manager can prevent outages caused by expired certificates.
Configure servers to use strong cipher suites, such as AES-GCM or ChaCha20-Poly1305, and disable weaker algorithms like RC4 or 3DES. Add the Strict-Transport-Security header to enforce HTTPS connections and implement Perfect Forward Secrecy using Diffie-Hellman or Elliptic Curve Diffie-Hellman key exchanges. This ensures past traffic remains secure even if a private key is compromised.
Validate Input and Enforce Schema Rules
Input validation is critical for stopping injection attacks by ensuring requests strictly adhere to expected data types and formats. As Impart Security advises, Never trust user input
[18]. Validation should occur at every layer - API gateway, controller, service, and repository - using an allowlist approach to define acceptable data instead of filtering out known malicious inputs.
Leverage JSON Schema or OpenAPI specifications to enforce strict data structures. Define required fields, set string length limits, and establish numerical ranges. By using additionalProperties: false in schemas, you can automatically reject requests with unexpected fields. Data Transfer Objects (DTOs) are another useful tool for mapping incoming requests to internal models, protecting sensitive properties like isAdmin or role from mass assignment attacks.
To prevent SQL injection, always use parameterised queries or prepared statements instead of directly embedding user input into database queries. For NoSQL databases, ensure inputs match expected types to block payloads containing operators like {"$gt": ""}. When handling file uploads, validate file types using signature checks, enforce size limits, and generate filenames server-side. For XML parsers, disable or limit entity expansion to defend against Billion Laughs
denial-of-service attacks.
Strictly enforce Content-Type headers (e.g., ensuring application/json is used). Remember, while client-side validation improves user experience, server-side validation is your true security barrier.
Remove Sensitive Headers from API Requests
To prevent exposing details about your infrastructure, configure API gateways to strip unnecessary headers. Headers like Server, X-Powered-By, and X-AspNet-Version can unintentionally disclose software versions, while internal routing IDs or IP addresses may reveal your network architecture.
Use gateway plugins, such as Kong's hide_client_headers, to remove these headers before they reach backend services. Additionally, set the Referrer-Policy header to strict-origin-when-cross-origin to prevent sensitive URLs from leaking in the Referrer header. For Kubernetes environments, use Ingress annotations to standardise header management across services.
Between Q2 2022 and Q2 2023, web application and API attacks targeting the financial services industry surged by 65% [17]. Attackers have also exploited header manipulation to bypass rate-limiting measures, making robust header security a must. Verify your implementation with a command like curl -I https://api.example.com.
Step 3: Configure Rate Limiting and API Gateway Controls
Once you've established robust authentication and encryption, the next layer of defence lies in managing traffic at the gateway. An API gateway serves as a central checkpoint, shielding backend services from excessive requests, cascading failures, and malicious payloads. Without proper controls, even a single misbehaving client - or a coordinated attack - could disrupt your entire microservices setup.
Set Rate Limits and Throttling Policies
After securing data transmission, controlling the flow of requests adds another layer of protection. Rate limiting is crucial for preventing abuse by capping the number of requests a client can send within a specific timeframe. Implementing this at the gateway level centralises enforcement, sparing microservices from duplicating this logic. You can apply rate limits at various levels:
- API-level: Protect the overall system from being overwhelmed.
- Key/user-level: Ensure fair usage among clients.
- Endpoint-level: Restrict high-demand operations while allowing more requests for lightweight endpoints.
Algorithms like the Token Bucket allow short bursts of traffic while maintaining a steady average rate. Meanwhile, the Leaky Bucket ensures a predictable flow, which is ideal for backend services sensitive to sudden spikes. For example, AWS API Gateway Usage Plans can create tiered access levels - offering Free
tiers with 10 requests per second and 20 burst capacity, while Enterprise
tiers allow 1,000 requests per second with 5,000 burst capacity.
Throttling is a real-time, short-term protective measure against traffic spikes. Quotas are long-term, business-driven limits tied to commercial agreements or subscription plans.
– dotMock [20]
In distributed setups with multiple gateway nodes, a centralised store like Redis can maintain shared counters, ensuring rate limits are enforced globally. Communicate these limits to developers using standard HTTP headers like X-RateLimit-Limit, X-RateLimit-Remaining, and Retry-After. Also, return HTTP 429 status codes when thresholds are exceeded [19][20]. By 2023, over 80% of enterprise customers fine-tuned rate limits to meet their application needs, with some configurations supporting up to 5,000 requests per second [20].
Use Circuit Breakers for Fault Tolerance
Circuit breakers act as a safeguard against cascading failures by monitoring the health of backend services. When error rates exceed a set threshold, the circuit breaker trips
, halting requests to the failing service and giving it time to recover. This mechanism works hand-in-hand with rate limiting to ensure system stability. Tools like Kong, AWS API Gateway, and NGINX offer built-in circuit breaker functionality to isolate failing services quickly. While these measures stabilise backend performance, the gateway also needs to validate and filter incoming payloads.
Enable Request Validation and Blocking at the Gateway
Request validation at the gateway adds an extra layer of protection by blocking malformed requests before they reach backend services. For example, you can enforce hard limits on request body sizes - typically no larger than 10MB - to mitigate denial-of-service attacks.
Integrating Web Application Firewall (WAF) modules at the gateway helps block advanced attack patterns like SQL injection, cross-site scripting (XSS), and path traversal. According to data from 2025, authentication bypasses and validation failures accounted for nearly 60% of API incidents [21]. A real-world example comes from MedTech Innovations, which tackled a 340% surge in unauthorised access attempts. By combining JWT authentication with Redis-based rate limiting and schema validation for HL7 FHIR medical data, they achieved an 87% reduction in unauthorised access attempts and a 92% drop in input validation failures [21].
To further strengthen security, configure the gateway to fail closed
, rejecting requests if security checks fail. Use IP filtering to allow traffic only from trusted CIDR blocks. Apply tiered rate limiting based on endpoint sensitivity - for example, stricter limits for /payments compared to /homepage. Finally, ensure consistent protection across microservices by injecting security headers, such as Strict-Transport-Security and Content-Security-Policy, directly at the gateway level.
Step 4: Deploy Service Mesh and Zero Trust Policies
After securing your gateway, the next step is to protect communication between services in a microservices setup. This is where deploying a service mesh and adopting Zero Trust policies becomes crucial. A service mesh simplifies encryption and access controls without requiring code changes, while Zero Trust principles operate on the idea that no service is trusted by default. Together, they significantly cut down the risk of breaches. For instance, a 2025 audit revealed that 43% of inter-service traffic in Kubernetes clusters lacking a service mesh was unencrypted. Meanwhile, service mesh adoption in production environments rose from 28% in 2023 to 47% in 2025 [27].
Automate mTLS with Service Mesh Tools
Service meshes like Istio and Linkerd use sidecar proxies deployed alongside each microservice to handle tasks like encryption, decryption, and certificate management automatically. A central control plane (e.g., Istiod for Istio or Linkerd Identity) issues X.509 certificates tied to Kubernetes Service Accounts instead of IP addresses. These certificates are rotated automatically - Linkerd, for example, does this every 24 hours by default [23]. Istio also enforces TLS v1.2 as the minimum standard for all communications between clients and servers [22].
Start with PERMISSIVE mode to identify services not yet integrated into the mesh, then transition to STRICT mode to block unencrypted traffic entirely [22][24]. Use the telemetry features provided by service meshes - such as Istio metrics or Linkerd Viz - to monitor for TLS handshake errors or unauthorised plaintext connections. Root certificate rotation can also be automated using tools like cert-manager [23].
Apply Network Segmentation and Zero Trust Principles
Once secure communication channels are set up, the next layer of defence is segmenting your internal network and applying Zero Trust principles. In a service mesh, cryptographic identities replace IP addresses to define communication rules. Start by enforcing a deny-all
policy across namespaces, allowing communication only when explicitly authorised [28][24]. Layer 7 policies can then be applied to permit or block traffic based on factors like HTTP methods (e.g., GET, POST), URL paths, or SNI matching for TCP services [28][29].
Zero Trust is based on a simple principle: Never trust, always verify.– Tajinder Minhas [26]
To enhance security further, combine service mesh policies with Kubernetes NetworkPolicy at Layers 3/4. This blocks unauthorised traffic before it even reaches the sidecar proxy [28][26]. Assign unique Kubernetes Service Accounts to each workload for precise, identity-based access control [22][25]. For example, Service A might only have permission to POST data to /orders, while Service B is restricted to making GET requests on /inventory. Finally, use a dedicated egress gateway to regulate and monitor all outbound traffic from the cluster, ensuring secure communication with external APIs or databases [26].
Step 5: Automate Security in CI/CD Pipelines and Monitor API Traffic
Once you've secured communication between services, it's time to integrate security into your development pipeline and keep an eye on API activity. With 94% of organisations reporting at least one API security incident last year [33], relying on manual reviews is outdated - particularly when microservices are updated several times a day. Embedding security into your CI/CD workflows and monitoring API traffic are essential next steps.
Add Security Scanning to CI/CD Workflows
Security testing shouldn't be an afterthought. Instead, it needs to happen at multiple stages of your pipeline. For example, pre-commit checks using IDE plugins or Git hooks can flag hardcoded credentials or weak authentication mechanisms before the code even gets submitted [30]. During pull requests, automated scans like Static Application Security Testing (SAST) can catch code vulnerabilities, while Dynamic Application Security Testing (DAST) evaluates running APIs. Keep these scans efficient - aim for completion within five minutes [30][33].
In the build pipeline, you can perform more thorough scans. Look for OWASP Top 10 risks, injection vulnerabilities, and use Software Composition Analysis (SCA) to inspect third-party libraries for known issues [30][31]. Set up your pipeline to fail builds with Critical or High vulnerabilities and flag Medium or Low ones for review [30][33]. Tools like OWASP ZAP can run active scans on API endpoints in Docker (headless mode) within CI tools like GitHub Actions or GitLab CI [32]. These automated tests typically add just 2–5 minutes to the pipeline - far less time than manual reviews, which can take days or weeks [33].
| CI/CD Stage | Security Action | Tools/Examples |
|---|---|---|
| Continuous Integration (CI) | Run automated API scans after each commit | SAST, Secret Scanning (Trivy) |
| Continuous Delivery (CD) | Apply security gates before staging/production | DAST (OWASP ZAP), SCA (Snyk) |
| Continuous Deployment | Ongoing production scans and monitoring | WAF, API Gateway logging, Trace IDs |
Once the pipeline is secure, the focus shifts to maintaining security in your production environment.
Enable Logging and Real-Time Threat Detection
Automated scans are just one piece of the puzzle. In production, you need continuous monitoring to spot threats in real time. Start by configuring your API gateway to generate unique trace IDs for every request. These IDs should be included in logs across all microservices [1][34]. Aggregating these logs into platforms like the ELK Stack or Splunk can help uncover attack patterns spanning multiple services [1][18].
For a deeper view, distributed tracing tools like OpenTelemetry, Jaeger, or Zipkin can visualise the entire request path through your microservices [34][3]. This makes it easier to spot potential lateral movement by attackers. At the container level, tools like Falco can detect unusual behaviour, such as unexpected network connections or unauthorised file access, in real time [34]. AI-based behavioural analysis can also help by identifying normal
API traffic patterns and flagging anomalies [18][34].
Speed Determines Impact... Real-time monitoring reduces \[detection time\] to minutes.– Kong [34]
Make sure your logs capture critical events like authentication failures, access denials, rate limit violations, and attempts to access sensitive resources [1]. While the average cloud-based data breach takes 277 days to detect [34], real-time monitoring can cut this down to just minutes. For organisations struggling with the complexities of microservices security, Hokstad Consulting offers tailored solutions that integrate automated scanning and real-time monitoring into your CI/CD pipelines, helping to mitigate risks and manage cloud costs effectively.
Conduct Regular Security Audits and Penetration Testing
Even with automation, manual testing remains a key part of a strong security strategy. Automated tools often miss logic-based flaws, so schedule quarterly penetration tests to simulate real-world attacks on your APIs. Focus on business logic vulnerabilities like privilege escalation or payment manipulation [30].
Another useful technique is API fuzzing, where mutated or malformed data is sent to endpoints to test their input validation. This can reveal weaknesses like crashes or injection vulnerabilities [31]. Keep immutable audit logs for compliance and incident analysis [4], and rotate secrets frequently - ideally every 24 hours - using tools like HashiCorp Vault to minimise the risk of stolen credentials being exploited [34].
Use Defence in Depth: Multiple Security Layers
To strengthen your microservices architecture, applying a defence-in-depth strategy is essential. No single security control is flawless, so layering multiple independent measures ensures that if one fails, others are there to catch the breach [4][37].
For microservices, this approach means securing three critical levels: the API gateway (your front door
), the service layer (where business logic operates), and the network infrastructure (the connections between services). The API gateway manages broad tasks like rate limiting and SSL termination [35][36], while each microservice handles more detailed tasks like fine-grained authorisation and input validation [18]. These overlapping layers complement earlier security efforts, making lateral movement within your system far more challenging. As Eric Pulsifer from Kong explains:
Defense in depth is a cybersecurity model... that focuses on layering multiple levels of protection. Theoretically, defense in depth security reduces the chance of a successful attack by deploying several independent controls[38].
This layered approach is especially critical since 94% of API exploits target authenticated APIs - proving that authentication alone is not enough [39]. To mitigate these risks, you need authorisation checks at the service level, encrypted communication between services, and real-time observability tools to flag anomalies. For organisations navigating complex microservices setups, companies like Hokstad Consulting offer expertise in designing layered security strategies that balance robust protection with performance while managing cloud infrastructure costs effectively.
Security Layers Breakdown
| Security Layer | Primary Responsibility | Implementation Tools | Key Benefit |
|---|---|---|---|
| API Gateway | Edge protection, rate limiting, authentication | Kong, AWS API Gateway, Traefik | Centralised policy enforcement; offloads service logic |
| Service Layer | Fine-grained authorisation, input validation | Spring Security, OPA, Casbin | Protects against business-logic attacks and gateway bypass |
| Network Layer | Service-to-service security, mTLS | Istio, Linkerd, Calico | Ensures confidentiality and limits lateral movement |
| Infrastructure | Container and cloud optimisation | Trivy, HashiCorp Vault, KMS | Secures runtime environments and sensitive secrets |
Each layer addresses a unique threat. For example, the API gateway blocks general attacks and bots, service-level controls stop unauthorised access to resources, and network segmentation reduces the damage if a service is compromised [39]. By combining these measures, you create a robust security framework that doesn’t rely on a single point of failure. This layered approach ensures your API endpoints and microservices remain secure, reinforcing the overall architecture.
Conclusion
Securing API endpoints in microservices demands a multi-layered approach to address the growing attack surface. Dan Barahona from APIsec highlights the stakes perfectly:
A breach in one microservice can expose your entire system.[1]
With APIs now driving over 80% of all internet traffic [2], relying solely on perimeter security simply isn't enough.
The five steps discussed - covering authentication and authorisation, encryption and input validation, rate limiting and gateway controls, service mesh implementation, and automated monitoring - are designed to work together. This layered approach ensures that if one defence falters, others can step in, significantly complicating the job for potential attackers. By reinforcing each layer, you create a robust security framework that protects your microservices architecture at every level.
Misconfigurations account for 80% of cloud security breaches, making automation a critical component [34]. Incorporating automated security scans into CI/CD pipelines, using service mesh tools for certificate rotation, and centralising secrets management with tools like HashiCorp Vault can help identify and resolve vulnerabilities early - before they ever reach production.
For organisations already managing complex microservices systems, balancing security, performance, and cost efficiency can feel overwhelming. Hokstad Consulting offers tailored solutions, crafting layered security strategies that integrate seamlessly with DevOps practices while keeping cloud infrastructure costs under control. This ensures your API endpoints stay secure without sacrificing deployment speed.
The guiding principle remains clear: never trust - always verify [34]. By adopting a defence-in-depth strategy, you're not just safeguarding individual APIs - you’re building resilience across your entire system.
FAQs
How do I choose between JWT, OAuth 2.0 and mTLS?
Opting for OAuth 2.0 with JWT provides a scalable way to manage delegated authorisation and user identity. This approach ensures secure access by leveraging JWT (JSON Web Tokens), which maintain token integrity and allow efficient authentication.
For encrypted, authenticated communication between services, mTLS (mutual TLS) is a reliable choice. It guarantees that both parties in a connection are verified, adding an extra layer of security.
By combining these methods, you can achieve a robust security framework. OAuth 2.0 handles delegated access, JWT ensures the authenticity of tokens, and mTLS safeguards inter-service communication. The right choice will depend on the specific needs and architecture of your system.
Where should authorisation checks live: gateway or services?
Authorisation checks work best when placed at the gateway, as this centralises enforcement and makes things simpler for downstream services. However, in more complex systems, it’s a good idea to combine gateway checks (for broad access control) with checks inside individual services (to handle more specific rules). This two-layered setup strengthens security by following the principle of defence in depth while also managing detailed access needs effectively.
How can I add security scans to CI/CD without slowing releases?
Integrating automated security testing tools into your CI/CD pipeline is a smart way to keep security checks running continuously without slowing things down. By incorporating methods like static analysis, dependency scanning, and API fuzzing into separate, isolated stages, you can avoid creating bottlenecks in your workflow.
Automating these processes helps catch vulnerabilities early, reducing the need for manual involvement. To make things even smoother, consider tools that support incremental or selective testing. These can enhance efficiency by focusing only on changes, allowing you to maintain rapid release cycles while keeping your security strong.