
Cloud storage costs can spiral out of control if not managed effectively. Kubernetes, while powerful, often leads to unnecessary expenses due to unattached volumes, overprovisioning, and mismatched storage tiers. This guide outlines simple ways to cut these costs without compromising performance:
- Identify unused storage: Regularly audit for unattached volumes and orphaned disks. Use commands like
kubectl get pvto spot resources no longer in use. - Optimise storage allocation: Avoid overprovisioning by matching storage sizes to actual needs. Tools like Prometheus and PVC Autoscaler can help automate this.
- Choose cost-effective storage tiers: Assign workloads to the right storage classes (e.g., standard for backups, premium for databases) to avoid overpaying.
- Automate retention policies: Set rules to delete or archive unused data, preventing long-term storage waste.
Annie Talvasto - Kubernetes cost optimisation - How to actually do it - #BuildStuffconf
Need help optimizing your cloud costs?
Get expert advice on how to reduce your cloud expenses without sacrificing performance.
What Drives Kubernetes Storage Costs
Knowing what inflates your Kubernetes storage bill is the first step to managing it effectively. Three main culprits typically contribute to rising costs: unattached volumes that continue to rack up charges, overprovisioned storage that sits idle, and mismatches between storage tiers and workload needs. Let’s break down how each of these factors can quietly drain your budget.
Unattached Volumes and Orphaned Storage
Persistent volumes that stick around after their purpose is served can be a major source of waste. These so-called orphaned
volumes refer to Persistent Volumes (PVs) that remain in your cluster even after their associated Persistent Volume Claims (PVCs) or namespaces have been deleted [1][2]. This often happens because of the Retain
reclaim policy, which leaves PVs in a Released
state instead of deleting them entirely [1][2].
Persistent volumes often survive the deletion due to their reclaim policy configuration. These orphaned volumes consume storage and incur costs without serving any active workload.– OneUptime [2]
It’s not just Kubernetes clusters where this happens. At the cloud provider level, disks can remain in an available
state even when they’re no longer attached to a node or PV [2]. The financial impact can add up quickly: with block storage costing around £0.08 per GB per month, a single forgotten 100GB volume could cost £8 monthly. Multiply that by 50 orphaned volumes in a large environment, and you’re looking at £400 per month in unnecessary spending [4].
To avoid these costs, you can identify released volumes with the command:
kubectl get pv --field-selector status.phase=Released.
It’s also a good idea to regularly audit your cloud provider dashboards for unattached disks [2].
Overprovisioned Storage Resources
Cloud providers typically bill for the storage you provision, not the amount you actually use. This leads to overprovisioning, where teams allocate more storage than necessary, often as a precaution. This is especially common with stateful applications, where over-allocation of 25%–35% is not unusual [3].
Another issue is developers requesting round-number allocations, like 1GB or 10GB, instead of basing their requests on the actual needs of the application. Static scaling strategies can exacerbate the problem, leaving large chunks of storage unused during off-peak periods. Despite this idle capacity, you’re still charged for the full provisioned amount [3].
Premium Storage Tiers vs. Workload Needs
Storage costs can make up 15%–25% of your Kubernetes cloud expenses [5]. Using high-performance storage tiers for workloads that don’t require them is another common mistake. For instance, many organisations still use outdated defaults like AWS EBS gp2, which costs about 20% more than the newer gp3 option while offering similar performance [5][4].
Here’s a real-world example: in 2025, one SaaS platform cut its monthly storage costs by 43%, reducing expenses from £19,600 to £11,200, partly by switching from AWS EBS gp2 to gp3 [5]. The difference between standard gp3 storage at roughly £0.06 per GB per month and high-performance io2 storage at £0.10 per GB per month (plus £0.05 per provisioned IOPS) can add up quickly when scaled across dozens or even hundreds of volumes [5].
Next, we’ll dive into actionable strategies to tackle these cost drivers head-on.
How to Reduce Kubernetes Storage Costs
::: @figure 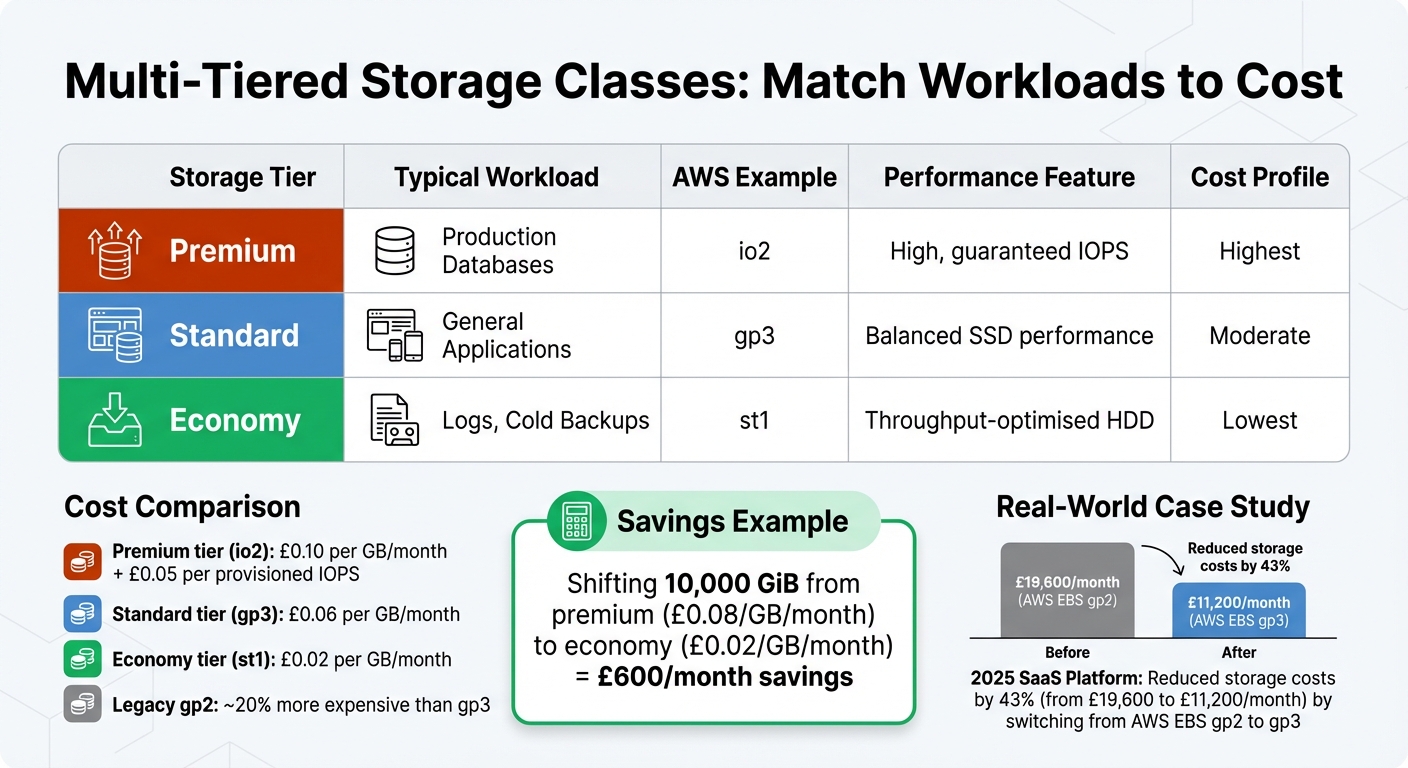 {AWS Storage Tier Cost Comparison for Kubernetes Workloads}
:::
{AWS Storage Tier Cost Comparison for Kubernetes Workloads}
:::
Cutting down Kubernetes storage costs boils down to three main strategies: right-sizing storage, using multi-tiered storage classes, and implementing automated data lifecycle policies. Let's break each one down, starting with optimising storage allocation to meet actual workload demands.
Right-Sizing Storage for Workloads
The first step to saving on storage is analysing your workload's actual needs. Start by reviewing 30 days of usage data to establish baselines. Tools like Prometheus, using metrics such as kubelet_volume_stats_used_bytes, can help track real-time consumption and pinpoint how much storage each volume truly requires.
Storage buffers should be tailored to workload types:
- Stateless and batch workloads: ~15%
- Stateful applications: 25–35%
- AI/ML workloads: 20–30%
Overprovisioning in Kubernetes... occurs when your deployments' requested resources (CPU or Memory) are significantly higher than what you actually use.– Jesse Houldsworth, nOps
Aim to keep storage utilisation between 60% and 80%. If usage regularly falls below 40%, that's a sign to downsize. On the flip side, set alerts for when capacity hits 80% so you can expand proactively. Tools like the PVC Autoscaler can automate this process, increasing storage by a fixed percentage (e.g., 20%) when thresholds are exceeded [6][7].
Kubernetes provides features to prevent over-provisioning at the policy level:
-
ResourceQuota: Limits the total storage a namespace can consume. -
LimitRange: Sets minimum and maximum sizes for Persistent Volume Claims.
Additionally, enabling allowVolumeExpansion in your StorageClasses lets you start with smaller volumes and scale as needed. Thin provisioning, where supported, ensures you only pay for the physical storage you actually use.
Now that your storage is right-sized, it's time to optimise performance and cost with tiered storage.
Using Multi-Tiered Storage Classes
Not all workloads need premium storage. Yet, many organisations default to high-performance options for everything, driving up costs unnecessarily. By defining storage tiers - such as fast-ssd
, standard
, and economy
- you can match workloads to the right performance and cost levels [9][10].
| Tier | Typical Workload | AWS Example | Performance Feature | Cost Profile |
|---|---|---|---|---|
| Premium | Production Databases | io2 |
High, guaranteed IOPS | Highest |
| Standard | General Applications | gp3 |
Balanced SSD performance | Moderate |
| Economy | Logs, Cold Backups | st1 |
Throughput-optimised HDD | Lowest |
Set a cost-efficient tier like AWS gp3 as your default StorageClass to avoid accidentally provisioning expensive options [8][10]. Use volumeBindingMode: WaitForFirstConsumer to ensure storage is only created in the same availability zone as your compute resources, preventing cross-zone data transfer fees [8][9][11].
For non-critical workloads, configure the Delete reclaim policy to automatically remove unused resources [8][9][10]. Treat StorageClass names as stable interfaces - if backend behaviour changes are needed, create a new class rather than altering an existing one, ensuring running workloads remain unaffected [9].
Here's an example of potential savings: shifting 10,000 GiB of data from a premium tier (£0.08 per GiB/month) to an economy tier (£0.02 per GiB/month) can save around £600 per month [10][6]. To encourage mindful tier selection, you can enforce a ResourceQuota at the namespace level, capping the amount of premium storage any team can request [10][6].
Automating Data Retention and Lifecycle Policies
Automating data retention policies ensures that data is either archived to cheaper storage or deleted when no longer needed, reducing manual intervention. For instance, you can set policies to automatically move infrequently accessed data to lower-cost tiers based on its age or access patterns.
Choose reclaim policies based on data type:
- Test environments and non-critical data: Use the
Deletepolicy to clean up volumes automatically when claims are removed. - Production data: Archive to object or cold storage tiers after a specified period.
Regular audits are still essential to catch issues automation might miss. Use commands like kubectl get pv --field-selector status.phase=Released to identify and delete volumes stuck in Released
or Failed
states, which can otherwise rack up unnecessary charges. Combine automated policies with periodic checks of your cloud provider's dashboard to spot unattached disks.
Monitoring and Auditing Kubernetes Storage Costs
Without proper oversight, even the best optimisation strategies can lose their effectiveness over time. As new workloads are deployed and default volume requests are made, unused or orphaned resources can pile up. By implementing continuous monitoring, you can catch these inefficiencies early, while regular audits ensure your storage strategy remains aligned with your business goals. Together, these practices help maintain the cost-management strategies you've worked hard to establish.
Tracking Persistent Volume Usage
To get a snapshot of volume usage at the pod level, you can use commands like kubectl exec <pod-name> -- df -h to check disk usage or kubectl describe pvc to review capacity and status details [12][13]. While these commands are handy for quick checks, they aren’t practical for monitoring larger clusters.
For a broader view, dedicated tools are the way to go. Prometheus provides real-time metrics, though you might need to pair it with custom Grafana dashboards to visualise storage trends effectively. If you need deeper insights, tools like Kubecost offer detailed, workload-level analysis, breaking down costs by namespace and pod. Kubecost offers both free and paid tiers, while OpenCost serves as an open-source alternative for basic allocation tracking. Additionally, cloud-native tools from providers like AWS, Azure, and GCP integrate with billing data, offering insights tailored to their respective ecosystems.
To stay ahead, establish a baseline for your storage usage. Keep an eye on volumes nearing capacity to avoid application performance issues. Beyond monitoring, setting up proactive alerts can help you stay in control of your storage spending.
Setting Alerts for Cost Anomalies
Alerts are key to catching unexpected cost issues before they spiral. Aim to set two types of alerts: one for monthly budgets and another for sudden cost spikes.
- Monthly budget alerts: Trigger when predicted monthly spending (calculated as hourly cost × 730 hours) exceeds a set limit, such as £200.
- Cost anomaly alerts: Trigger when short-term hourly costs (e.g., a three-hour average) exceed 120% of the weekly average.
These alerts can help you spot issues like misconfigured storage classes, accidental use of premium storage tiers, or unexpected surges in data growth.
| Alert Type | Trigger Condition | Objective |
|---|---|---|
| Monthly Budget | Predicted cost > Threshold (e.g., £200) | Catch monthly overruns early [14] |
| Cost Anomaly | 3-hour avg > 120% of 7-day avg | Detect sudden spending spikes [14] |
Regular Storage Cost Audits
Regular audits are essential to maintaining the savings achieved through right-sizing and tier adjustments. Schedule monthly reviews of storage usage across your cluster. Compare your Kubernetes inventory against your billing dashboard to identify unattached disks or unused resources.
During these audits, confirm that workloads are using the appropriate storage tiers. For example, running a database on standard storage when premium storage is required could either degrade performance or inflate costs unnecessarily. These regular check-ins are crucial for preventing gradual cost increases, even in environments that were once well-optimised.
Conclusion
Summary of Cost Reduction Methods
Effectively managing Kubernetes storage can lead to significant savings in cloud costs. This guide highlighted three key strategies:
- Right-sizing storage: Avoid overprovisioning by aligning storage with actual workload needs.
- Using multi-tiered storage classes: Save money by assigning storage types based on use cases. For instance, logs or backups can use standard storage, which is typically 3–5 times cheaper than premium SSDs[15].
- Automating lifecycle policies: Prevent unnecessary charges by eliminating orphaned volumes and outdated snapshots.
In addition to these core strategies, continuous monitoring and auditing play a vital role in maintaining cost efficiency. Setting up alerts for budget thresholds and anomalies allows you to catch potential issues early. Regular monthly audits ensure your storage strategy evolves alongside your business needs, creating a solid framework for long-term cost control.
Long-Term Cost Management
As your infrastructure grows and data requirements change, storage costs can shift. Regular reviews - ideally on a monthly basis - help you adjust your approach to match new workload demands and avoid gradual cost increases.
For organisations aiming to scale these strategies or seeking expert advice on cloud infrastructure optimisation, Hokstad Consulting offers specialised services in cloud cost engineering and DevOps transformation. Their expertise spans public, private, and hybrid cloud setups, helping you achieve consistent cost savings without compromising application performance.
FAQs
How can I safely find and delete orphaned Kubernetes volumes?
To safely locate and remove orphaned Kubernetes volumes, start by identifying Persistent Volumes (PVs) in either a 'Released' or 'Available' state using the command kubectl get pv. Carefully confirm that these volumes are unclaimed and not in use. For PVs marked with a Retain
policy, manually delete them only after ensuring no active workloads rely on them. Always double-check that the volumes are not connected to any active resources to avoid data loss or disrupting services.
How can I right-size PVCs without risking outages?
To adjust Persistent Volume Claims (PVCs) in Kubernetes safely, ensure your StorageClass supports online volume expansion. Start by confirming that resizing is enabled in your storage class configuration. Once verified, update the PVC's size in its specification and apply the changes. Kubernetes handles the resizing process dynamically, allowing the volume to grow without causing downtime.
It's a good idea to test this process in a staging environment first. Additionally, refer to your storage provider's documentation to avoid any unexpected issues during implementation.
Which Kubernetes StorageClass should be the default to minimise costs?
To keep expenses under control, ensure your default Kubernetes StorageClass supports dynamic provisioning with cost-efficient settings. Opt for storage classes that use lower-cost storage tiers or standard storage options, depending on your specific environment and workload needs. It's important to assess your workload requirements carefully to strike the right balance between performance and affordability.