Managing build storage costs in DevOps can save you a significant amount of money. Here’s how you can do it:
- Audit your storage usage: Identify large or unused artifacts and monitor access patterns.
- Use the right storage tiers: Match your data with cost-effective storage classes like AWS S3 Standard-IA or Glacier Deep Archive.
- Set retention policies: Automate data lifecycle rules to delete or archive artifacts based on usage.
- Enable build caching: Reduce redundant builds by reusing existing components.
- Automate clean-up: Use lifecycle policies to remove outdated or untagged artifacts.
- Monitor costs regularly: Use tools like AWS S3 Storage Lens or Azure Cost Management to track and optimise expenses.
Step 1: Review Your Current Storage Usage
Take a close look at your artifact storage to understand what's driving up costs. Identify which artifacts use the most space and how often they're accessed. It's common to find that a large chunk of storage expenses comes from files that haven’t been touched in months. By assessing access patterns and spotting redundant data, you can better target areas for cost reduction.
Storage platforms generally categorise data into three types: hot (frequently accessed), warm (accessed occasionally), and cold (rarely or never accessed). For instance, AWS S3 Storage Lens offers a centralised view where you can rank your largest buckets by total storage and identify cold
buckets using the Retrieval rate
metric - this is calculated by dividing download bytes by total storage [5]. On Azure DevOps, you can check the Billing page for organisation-wide usage or use the CLI command az artifacts feed list to view package counts per feed [2].
Check Access Patterns and Retention Requirements
Once you've reviewed your overall storage, start monitoring access patterns over time. AWS S3 Storage Class Analysis, for example, tracks data access over a 30-day period, helping you identify specific prefixes or tags that are rarely accessed [4][6]. Similarly, Azure Blob Storage allows you to enable last access time tracking, which records when blobs are read. This can help you set lifecycle policies based on actual usage rather than just creation dates [7]. Data that remains untouched for 30 days can typically be classified as cold
[5].
For GitHub Actions, the situation is slightly different. Head to the Billing → Plans and usage
page to check your total storage. From there, look for workflows that unnecessarily upload artifacts - like test reports or coverage data - on every successful run instead of only on failures. This small oversight can lead to avoidable storage costs [1].
Find Unused or Oversized Artifacts
Once you've analysed access patterns, focus on identifying artifacts that inflate storage costs unnecessarily. In AWS S3, for example, if noncurrent versions make up more than 10% of your total storage, you're likely holding onto too many outdated object versions [5]. Using advanced metrics in S3 Storage Lens can help you pinpoint specific issues, such as Incomplete multipart upload bytes greater than 7 days old.
These leftover uploads can quietly add to your storage bill [5].
On Azure Artifacts, deleted packages aren’t fully removed until they're purged from the recycle bin, yet they still count towards your storage costs [2]. Conduct regular audits to locate and permanently delete these hidden cost drivers.
Step 2: Choose the Right Storage Classes
::: @figure 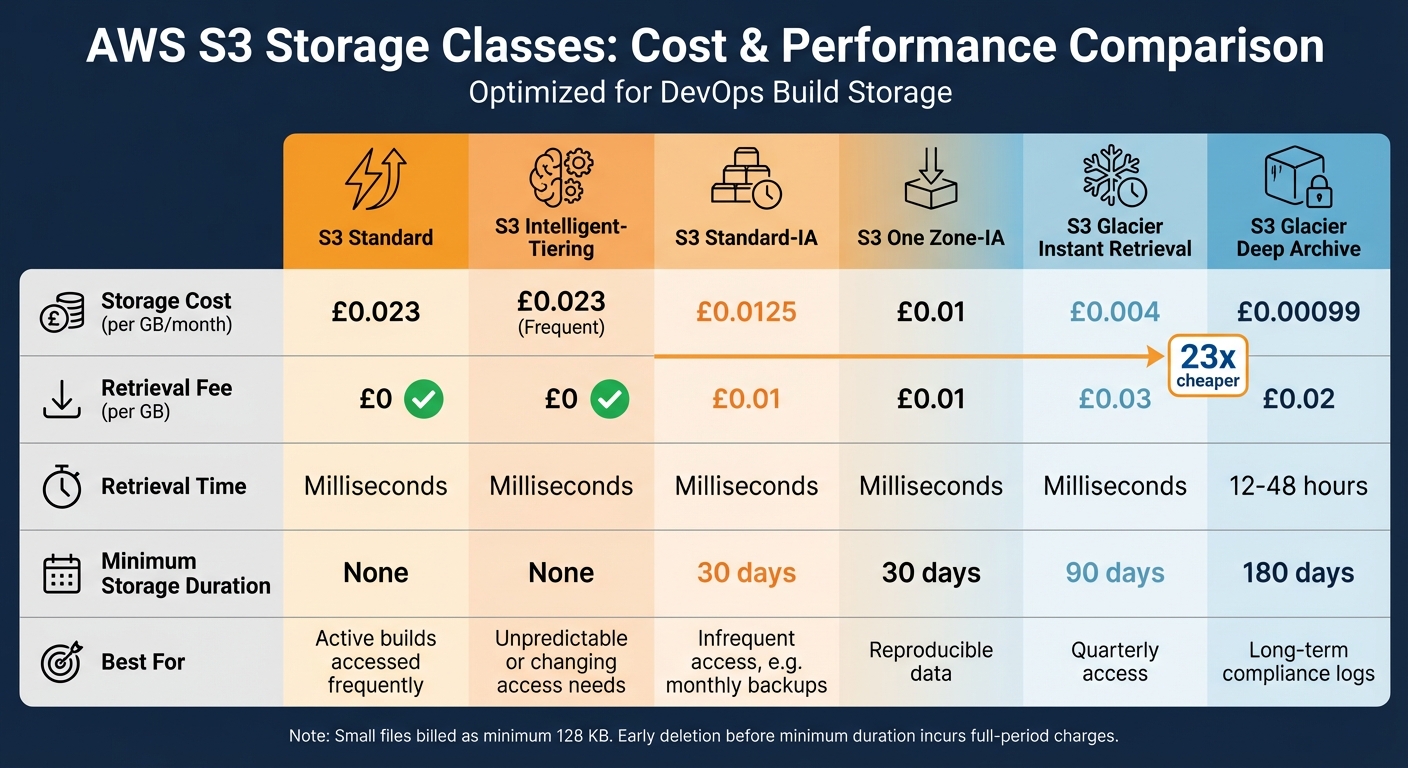 {AWS S3 Storage Class Comparison: Costs, Retrieval Times, and Best Use Cases}
:::
{AWS S3 Storage Class Comparison: Costs, Retrieval Times, and Best Use Cases}
:::
After identifying which artifacts are eating up your budget, the next step is to match them with the most suitable storage tier. Keeping all data in a high-performance tier is like leaving the heater on all summer - it's just wasting money.
Compare Storage Class Options
Storage classes vary in cost, retrieval speed, and retention requirements. For example, AWS S3 Standard costs £0.023 per GB per month, provides millisecond access, and has no retrieval fees. This makes it perfect for build assets that are accessed multiple times a week [11]. On the other hand, S3 Standard-IA is cheaper at £0.0125 per GB but charges £0.01 per GB for retrieval. This tier works well for backups, but retrieving more than 45% of data monthly can cancel out the savings [9][10].
Corey Quinn, Chief Cloud Economist at The Duckbill Group, shares this insight:
The biggest mistake I see organisations make is treating all data equally. A 5-year-old compliance document doesn't need the same retrieval speed as today's user-generated content, yet 80% of companies store both in S3 Standard.[10]
For long-term storage, S3 Glacier Deep Archive costs just £0.00099 per GB - 23 times cheaper than S3 Standard - but retrieval takes 12–48 hours and costs £0.02 per GB [11][14]. However, if frequently accessed files are moved to Glacier, retrieval charges can quickly add up. One Engineering Director at a Fortune 500 retailer reported a 40% increase in monthly costs after such a switch [10].
Keep in mind that small files are billed as if they are at least 128 KB, so bundling tiny logs together can save money [10]. Deleting data before the minimum storage period - 30 days for Standard-IA, 90 days for Glacier, and 180 days for Deep Archive - will still result in charges for the full duration [10].
If you’re unsure about access patterns, S3 Intelligent-Tiering automatically moves data between tiers without retrieval fees, though it adds a monitoring charge of £0.0025 per 1,000 objects [10]. For reproducible artifacts, like thumbnails or test reports that can be regenerated, S3 One Zone-IA provides a 20% discount over Standard-IA by using a single availability zone [10].
| Storage Class | Storage Cost (per GB/mo) | Retrieval Fee (per GB) | Min. Duration | Best For |
|---|---|---|---|---|
| S3 Standard | £0.023 | Free | None | Active builds accessed frequently |
| S3 Intelligent-Tiering | £0.023 (Frequent) | Free | None | Unpredictable or changing access needs |
| S3 Standard-IA | £0.0125 | £0.01 | 30 days | Infrequent access, e.g. monthly backups |
| S3 One Zone-IA | £0.01 | £0.01 | 30 days | Reproducible data |
| S3 Glacier Instant Retrieval | £0.004 | £0.03 | 90 days | Quarterly access |
| S3 Glacier Deep Archive | £0.00099 | £0.02 | 180 days | Long-term compliance logs |
These choices lay the groundwork for effective lifecycle management, which we’ll explore next.
Set Retention Policies
After selecting the right storage classes, it’s crucial to align them with clear retention rules. This ensures that data doesn’t sit in expensive tiers longer than necessary. A common approach is to move data from S3 Standard to Standard-IA after 30 days, then to Glacier after 90 days, and finally to Deep Archive for long-term storage [9]. This tiered strategy helps manage costs in DevOps pipelines by matching storage tiers to data usage patterns.
Be mindful of minimum storage durations to avoid penalties. For instance, if you move files to Standard-IA at 30 days but delete them at 45 days, you’ll still pay for the full 30-day minimum [9]. Adding a buffer - like transitioning at 45 days instead of 30 - can help avoid unexpected charges [9].
Tagging data provides even more control. Tags like RetentionPeriod:30d or Environment:Dev can trigger lifecycle policies tailored to specific needs. For example, development builds might be deleted after seven days, while production artifacts could move through multiple tiers before being deleted after two years [9].
Don’t overlook hidden costs. Incomplete multipart uploads can rack up charges indefinitely, so set lifecycle rules to abort these after seven days [9]. In versioned buckets, moving noncurrent versions to IA after 7–30 days and expiring them after 90–365 days can prevent unnecessary storage costs [9].
Bundling small files into larger objects (e.g., 50MB–500MB) using tools like s3tar can help reduce monitoring fees and avoid the 128 KB billing minimum [13]. One audit by a fintech company revealed that 71% of objects hadn’t been accessed in over 90 days but were still stored in the pricier S3 Standard tier - highlighting the importance of automated retention policies [12]. Effective retention policies ensure cost efficiency across your DevOps pipeline.
Step 3: Use Build Caching and Lifecycle Policies
Once you've chosen the right storage tiers, the next step is to focus on build caching and lifecycle policies. These strategies can significantly reduce compute time and storage costs. Build caching avoids redundant rebuilds, while lifecycle policies manage how data transitions through storage tiers over time.
Configure Build Caching
Build caching works by reusing previously built components instead of starting each build from scratch. Since dependency installation can account for 40–70% of total build time, caching directly translates to cost savings [16]. For example, Docker layer caching can cut build times by up to 70%. A build that typically takes eight minutes could drop to just two minutes with proper caching. If you're running 20 builds daily, this could reduce monthly costs from £21 to just £5 [16].
AWS CodeBuild offers two caching options: local caching for Docker layers and S3-based caching for sharing across build hosts [21][22]. Using Amazon ECR as a remote cache allows you to persist layers across projects and build schedules. In one AWS test case, reusing a previously built image as a cache reduced build time from 39 minutes to just six [20].
For Google Cloud Build, Docker layer caching with Artifact Registry is the go-to method, especially with the upcoming deprecation of Kaniko in June 2025 [3]. If you're using BuildKit for multi-stage builds, set mode=max to cache all intermediate layers, not just the final image [3]. To maximise cache efficiency, structure your Dockerfile with stable dependencies - like base images and system packages - at the top, and place frequently changing application code at the bottom [15][3].
GitHub Actions provides a 10 GB cache limit per repository, automatically evicting the least-used entries when the limit is exceeded [16]. After setting up caching, lifecycle policies can further optimise your storage by automating the movement of data across different tiers.
Create Lifecycle Policies
Lifecycle policies are an automated way to manage storage costs by moving artifacts from expensive storage tiers to more economical archive options after a set period. As Nawaz Dhandala explains:
ECR lifecycle policies automate image cleanup. You define rules about which images to keep, and ECR deletes the rest. No cron jobs, no Lambda functions, just a policy on the repository.[17]
By implementing ECR lifecycle policies, you can achieve a 94% to 96% reduction in storage costs [17][19]. Similarly, for S3 buckets, transitioning data from Standard to Glacier Deep Archive can cut storage expenses by roughly 95% [9].
Policies are evaluated in priority order, starting with the lowest number. Matched artifacts are excluded from subsequent rules [17]. Use count-based rules (e.g., imageCountMoreThan) to retain a fixed number of recent versions, or age-based rules (sinceImagePushed) to remove items older than a specific threshold [17][8]. For development tags (e.g., dev-, feature-), apply aggressive cleanup policies, while retaining production tags (e.g., v-, release-) for longer periods [17][18][8].
It's also crucial to set a rule for deleting untagged images, which are often orphaned layers from multi-tag pushes. These should typically be removed within one to three days to avoid unnecessary storage bloat [17][8][3]. Before committing to any new policy, use the aws ecr get-lifecycle-policy-preview command to review which images will be deleted [17]. Ideally, retention rules should be established when creating a repository or feed, rather than waiting until storage limits become an issue [2]. These automated policies lay the groundwork for the clean-up and retention strategies discussed in the next step.
Step 4: Automate Clean-Up and Retention
Once lifecycle policies are in place, the next step is to automate clean-up processes and enforce retention rules on a larger scale. This helps keep storage under control and avoids unnecessary accumulation.
Automate Artifact Deletion
Many cloud-native registries, such as AWS ECR, Google Artifact Registry, and Azure Artifacts, can automatically evaluate lifecycle policies and delete matching artifacts without requiring additional scripts or cron jobs. For example, reducing the retention of images from 500 to 30 per repository using lifecycle policies can cut storage costs by up to 94% [17]. At around £0.08 per GB per month, these savings can quickly add up across multiple repositories.
For self-hosted Docker registries, automation usually involves two steps. First, use scripts (e.g., with tools like curl and jq) to remove tag manifests via the registry API [23]. Then, schedule garbage collection to reclaim physical disk space. Keep in mind that deleting a tag only removes the reference; the actual layers remain until garbage collection is run. It’s best to perform garbage collection during low-traffic periods since it may require switching to a temporary read-only mode to avoid data corruption.
GitLab users can manage artifact lifespans by setting the expire_in keyword in their .gitlab-ci.yml file. Alternatively, the REST API can be used for bulk deletions of jobs, pipelines, and artifacts [26]. For Azure Container Registry’s Standard tier, which lacks built-in retention policies, Ansible playbooks can help automate clean-up tasks [27]. Be aware of limitations, such as Google Artifact Registry’s cap of 300,000 automated deletions per repository per day, and plan large-scale clean-up operations accordingly [24].
Once automated clean-up is set up, the next step is to apply consistent retention policies across all repositories using Policy-as-Code.
Implement Policy-as-Code for Retention
To maintain efficient storage practices and prevent configuration drift, define retention rules using Policy-as-Code. Tools like Terraform or YAML can help ensure that uniform standards are applied across all repositories [18]. For example, Terraform’s aws_ecr_lifecycle_policy resource can enforce organisation-wide rules.
Pay attention to rule order when setting up policies. In AWS ECR, policies are evaluated based on priority numbers, with lower numbers taking precedence [17][18]. This means that specific Keep
policies, such as those protecting production tags (v*, release-*, or prod-*), should have higher priority than broader Delete
rules [8][25]. Google Artifact Registry, on the other hand, automatically prioritises Keep
policies; artifacts matching both Keep
and Delete
rules are retained [24].
Before deploying these policies, use dry-run modes to preview the impact of artifact deletions. AWS provides the aws ecr get-lifecycle-policy-preview command, while Google Artifact Registry includes a built-in dry-run mode for each repository [17][25]. Always review audit logs to confirm that the policies are working as expected. For Azure Artifacts, you can use Views
to safeguard production versions, as promoted versions are typically exempt from automated deletions [2].
Finally, set more aggressive clean-up policies for untagged images (e.g., 1–3 days) and development branches, while retaining higher counts for production-ready tags. This balance ensures that storage remains lean without risking the loss of critical assets [8][17][18].
Step 5: Monitor and Optimise Storage Costs
Once you've automated clean-up processes, the next step is to keep a close eye on storage costs and find ways to make them more efficient. Regular monitoring can help you avoid unexpected expenses and spot inefficiencies before they become bigger problems. In fact, research shows that 45–55% of cloud storage spending can often be improved, making this step a critical part of cost management [31].
Set Up Monitoring Tools
Leverage cloud-native tools to track your storage costs in real time. For example:
- AWS S3 Storage Lens provides organisation-wide insights and flags wasteful usage, such as
Incomplete multipart upload bytes greater than 7 days old
[5][31]. - Azure Cost Management offers detailed resource-level analysis.
- Google Cloud Cost Explorer links usage data directly to costs [28][29][30].
- For GitHub Actions, the
Plans and usage
page alerts you to storage quota issues. Exceeding these limits can block new uploads for all repositories on an account [1].
Focus your monitoring efforts on four key areas of cost: storage capacity (GB/month), operations (API requests like PUT/GET), data retrieval fees, and data egress (outbound data transfers) [31]. Setting up spending alerts in your billing console can keep stakeholders informed when costs approach or exceed thresholds [28][30].
Interestingly, 60–80% of stored data is rarely accessed after the first 30 days [31]. A Bubble Analysis
(plotting storage size against retrieval rate) can help you identify which storage buckets are candidates for moving to cheaper tiers [5]. These insights provide a solid foundation for conducting regular audits.
Schedule Regular Storage Audits
Regular audits are your best defence against inefficiencies. They often uncover patterns like workflows that upload unnecessary test reports or retain ephemeral PR artifacts for the default 90-day period, even though these files lose relevance almost immediately after a merge [1].
Tailor retention policies to the type of build:
- PR build artifacts: Retain for 1 day.
- Main branch outputs: Retain for 7 days.
- Release artifacts: Retain for 30 days [1].
Keep an eye on the % noncurrent version bytes
metric. If this exceeds 10% of your total storage, it’s time to enforce stricter versioning lifecycle rules [5]. Deleted packages can also linger in recycle bins and continue to count toward storage totals, so make sure permanent purging is part of your audit routine [2].
By integrating these practices into your workflow, you can significantly lower your storage expenses.
Work with Cost Engineering Specialists
If managing these processes feels overwhelming, bringing in experts can make all the difference. Hokstad Consulting, for instance, specialises in cloud cost engineering and can help businesses cut storage costs by 30–50%. Their services include storage audits, lifecycle policy design, and automated monitoring systems tailored to DevOps environments. For organisations navigating multi-cloud setups or struggling with rising storage bills, expert guidance can simplify the process and help avoid common mistakes.
Partnering with specialists ensures that your cost-saving measures are not only effective but also sustainable over the long term.
Conclusion
Cutting down build storage costs calls for a structured plan: start by auditing your current usage to spot inefficiencies, assign the right storage classes for different artefact types, automate lifecycle management to avoid unnecessary build-up, and keep a close eye on costs. Following this framework can trim storage expenses by 30–50% while ensuring performance and compliance remain intact.
Set SMART goals - like aiming to cut storage costs by 25% within six months - to stay on track[32]. Keep an eye on key metrics such as total storage costs (in GBP), cost per build artefact, and retention compliance rates. Regular reviews, ideally every quarter, can help evaluate your progress and make adjustments as needed[33].
Documentation and governance are equally important. Using a RACI framework (Responsible, Accountable, Consulted, Informed) can clarify responsibilities, remove bottlenecks, and ensure smooth execution across teams[33]. Centralising policies, retention guidelines, and automation standards on platforms like Confluence or Notion can also help maintain consistency and knowledge sharing over time[32].
If managing these processes becomes overwhelming, expert help is an option. Hokstad Consulting, for instance, offers support for teams lacking DevOps expertise. Their services include detailed storage audits, custom lifecycle policy design, and automated monitoring systems. By focusing on tailored development and automation, they can help reduce cloud costs by 30–50%.
FAQs
How do I decide what counts as hot, warm and cold build artefacts?
When managing build artefacts in your CI/CD workflows, it’s helpful to categorise them based on how often they’re accessed and their purpose. This ensures you can allocate the right type of storage to balance performance and cost effectively.
Hot artefacts: These are the artefacts you access frequently, like recent builds or deployment packages. Because they’re in constant use, they need to be stored on high-performance storage systems to ensure quick access.
Warm artefacts: These are accessed less often, such as rollback versions. They don’t need the same high-speed storage as hot artefacts, so they can be moved to a more affordable storage option.
Cold artefacts: These are rarely accessed, like outdated builds. For these, cost-effective storage with slower access speeds is ideal.
By analysing access patterns, you can automate the transition of artefacts between these tiers. This helps to optimise storage costs while maintaining the right level of performance where it’s needed most.
When does moving artefacts to cheaper storage tiers stop saving money?
When moving artefacts to cheaper storage tiers, the financial benefits can disappear if associated costs - like retrieval or monitoring fees - start to outweigh the savings. This is especially true when data access patterns shift or when data sits in lower-cost tiers without being accessed frequently, making the move less cost-efficient. Additionally, if the expenses tied to managing tiering, such as automation tools or monitoring systems, become higher than the savings from reduced storage costs, the overall benefit diminishes.
What retention rules should I use for PR, main and release artefacts?
To keep storage costs under control, implement automated retention rules for artefacts:
- Pull Request (PR) artefacts: Set them to delete after 30 days or when replaced by newer builds.
- Main and release artefacts: Keep only the latest stable versions or a specific number of recent builds.
By automating cleanups based on age or version count, you can avoid storage bloat and maintain smooth, efficient CI/CD processes.