
Multi-cluster scheduling cuts cloud spend by using the capacity you already pay for more efficiently, placing work on lower-cost clusters, and stopping waste from poor sizing. In the article, I show how teams can trim costs through tighter bin-packing, better workload placement, rightsizing, autoscaling, and firm policy controls. The main numbers are hard to ignore: 15–20% lower spend from cross-cluster placement, 20–40% lower compute costs from smarter node choices, and 61% fewer idle node-hours when utilisation improves.
If I had to boil it down, the article says you should focus on five things:
- Treat clusters as one pool, not separate islands
- Place each workload by cost, latency, and uptime needs
- Fix inflated CPU and memory requests
- Use autoscaling and cheaper node types for lower-priority work
- Track £ savings and enforce rules with policy
You’ll also see where savings can disappear. For example, cross-region egress fees can wipe out compute gains, and too many separate non-production clusters can add fixed costs fast. The article also covers a simple rollout path: audit first, change low-risk workloads first, then track results over at least two billing cycles.
In short: if you run Kubernetes across several clusters, cost control starts with placement, sizing, and rules.
::: @figure 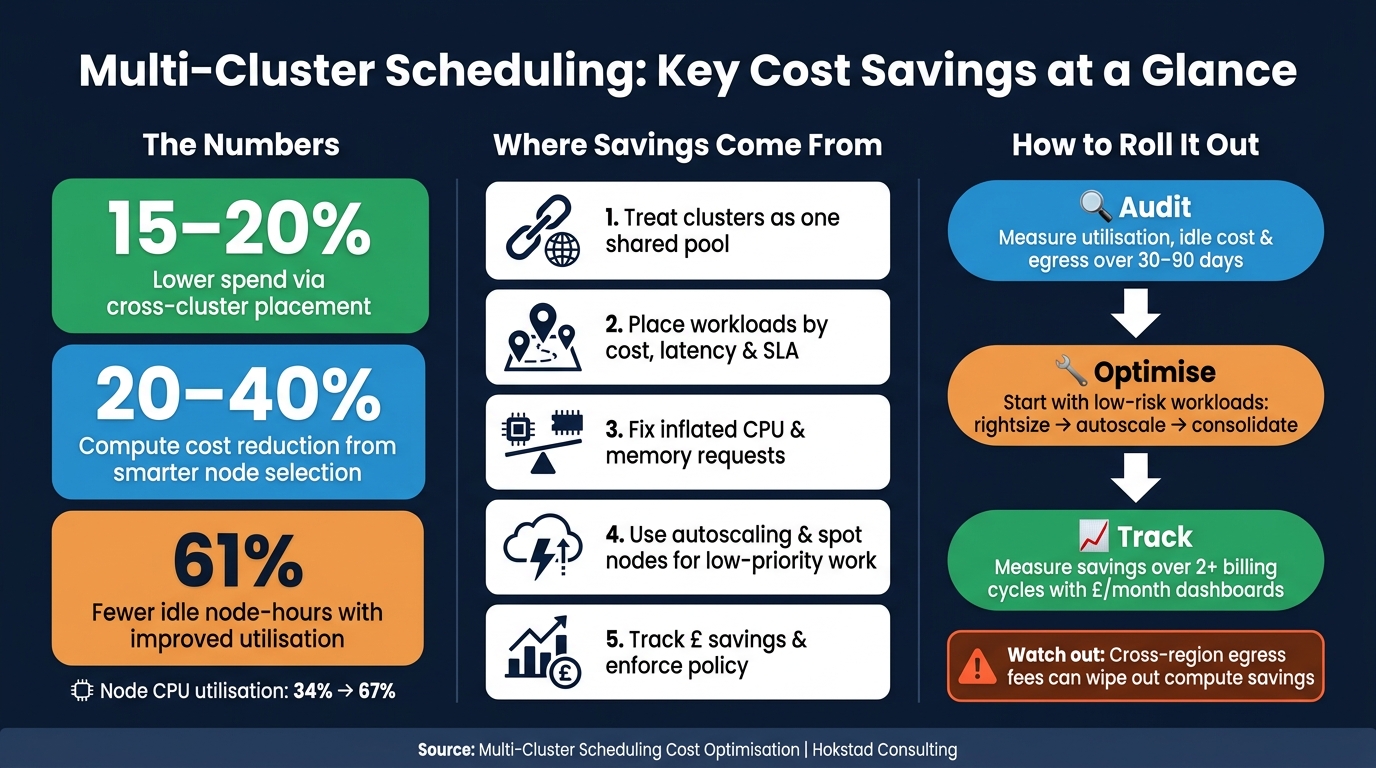 {Multi-Cluster Scheduling: Key Cost Savings at a Glance}
:::
{Multi-Cluster Scheduling: Key Cost Savings at a Glance}
:::
Where the savings come from
Better placement and bin-packing to raise utilisation
The first area of saving comes from getting more use out of the estate you already pay for. Multi-cluster scheduling treats your clusters as one shared pool, so spare capacity gets used across the estate before any cluster spins up new nodes.
Bin-packing helps by placing pods tightly on nodes while still respecting requests, anti-affinity, and topology spread constraints. On large Kubernetes estates, this method, used alongside autoscaling and spot/pre-emptible optimisation, has been shown to lift average node CPU utilisation from 34% to 67% and cut idle node-hours by 61% [5]. Put simply, less capacity sits there doing nothing.
For bin-packing to work properly, resource requests have to be right first. If requests are too high, nodes look full long before they are. That leaves awkward gaps in CPU and memory and makes packing far less effective. A common fix is to set requests near the 90th–95th percentile of observed usage, with limits at about 150% of requests [4]. Using a small range of node sizes helps too. Pods fit more predictably, and stranded CPU or memory becomes much less common.
Once utilisation improves, the next saving comes from sending the right work to the cheapest suitable capacity.
Cost-aware workload placement to lower running costs
Not every workload belongs in your most expensive cluster. Multi-cluster scheduling lets you place jobs based on what they need, not just where they happen to land.
Latency-sensitive services such as customer-facing APIs, web applications, and anything with a tight SLA stay in clusters close to users, on stable on-demand or reserved capacity. Batch jobs, internal pipelines, and async processing can move to lower-cost regions or clusters backed by spot or interruptible instances, where the £/vCPU-hour rate can be 60–80% lower than on-demand capacity [5]. Schedulers handle this with labels, taints, and cost-aware placement policies.
That mix cuts your overall unit cost without changing your SLA position. Critical services stay where they need to be. Lower-priority work goes to the cheapest option that still fits the job.
That only works if requests and autoscaling are tight enough to stop clusters looking full when they are not.
Rightsizing and autoscaling to cut wasted resources
Over-provisioned requests waste capacity in every cluster. When pods ask for far more CPU or memory than they use, the scheduler sees nodes as full even when actual usage is low. Extra nodes get added, and you end up paying for capacity that never gets touched.
Rightsizing fixes that by bringing requests closer to observed usage. HPA scales replicas, VPA tunes pod requests, and cluster autoscaling adds nodes only when the shared pool actually needs them. That coordination matters. Without it, several clusters can scale out at once even though another cluster already has room.
Provisioners and autoscalers that pick the cheapest suitable node types for pending pods have been shown to cut compute costs by 20–40% compared with fixed node groups [3]. Namespace-level LimitRanges and ResourceQuotas help as well. They stop teams from asking for more than they need, which keeps bin-packing and autoscaling from being blocked across the estate [6].
Kubernetes Multi-Cluster Consolidation Guide | Merge Clusters, Optimize Management & Reduce Costs
How to design cost-aware scheduling policies
Savings only stick when your placement rules are clear and enforced.
Set placement rules for cost, latency, and availability
Start by classifying workloads as Tier 1, Tier 2, or Tier 3. Then give each tier clear targets for cost, latency, and availability. The idea is simple: treat the estate as one placement pool, then send each tier to the cheapest cluster that still meets the rules.
This matters because “cheap” on its own can backfire. A batch job and a customer-facing service should not compete for the same kind of capacity if their needs are totally different.
Use Kubernetes placement controls to make those rules stick:
- Labels, affinity, taints, tolerations, and spread constraints help place each tier on the right clusters.
- Taints such as
spot=true:NoSchedulewith matching tolerations make spot nodes opt-in only. Batch jobs get the toleration; production pods do not. -
podAntiAffinityand topology spread constraints spread replicas across zones or clusters, which helps keep services up without spinning up extra clusters.
The right tools for multi-cluster scheduling
You need three layers: placement control, cost visibility, and policy enforcement. Once the rules are set, telemetry and admission control do the hard work of keeping teams inside them.
| Layer | Tools | Role in the policy loop |
|---|---|---|
| Placement control | Karmada, KubeFed | Distribute workloads across clusters with weighted placement; consolidate into fewer clusters during off-peak hours; apply data-residency constraints for UK workloads |
| Cost visibility | Prometheus, OpenCost | Track CPU, memory, and latency per cluster; map resource usage to actual cloud spend per namespace, team, or label; validate that cost-saving moves do not degrade SLOs [1] |
| Policy enforcement | OPA / Gatekeeper, Kyverno | Block non-compliant deployments at admission time; auto-add cost labels; enforce spot tolerations for non-critical workloads |
Each layer plays a different role. Placement tools decide where workloads go. Cost tools show whether those choices are saving money or just moving spend around. Policy tools stop people from sidestepping the rules when they are in a rush.
Put guardrails in place before chasing savings
Low-cost placement only works if it stays inside availability and compliance limits.
Go after the cheapest option without guardrails and you can create a mess without noticing. PodDisruptionBudgets (PDBs) limit how many replicas can go down at the same time during spot interruptions, with a hard rule that no more than 50% of a Tier 1 service's replicas may run on spot nodes [2]. Namespace-level ResourceQuotas limit how much premium capacity any one team can claim.
Admission policies through OPA or Kyverno can also block deployments that pick high-cost node types unless they include an explicit justification label. For example, approved-high-cost=true alongside a cost-centre code.
It is also worth putting a guardrail around cross-region traffic. A synchronous call between a UK service and a backing store in another region can trigger egress charges that wipe out compute savings. Keeping dependent services in the same region, and limiting cross-region replication to a small set of Tier 1 services, makes egress spend easier to control.
Your observability stack should show per-region egress cost metrics too. That way, teams can see the £ impact of architecture choices and change placement rules before a cheap-looking setup turns expensive.
How to put multi-cluster cost optimisation into practice
Audit utilisation, workload patterns, and cluster costs first
Start with an audit. That way, you’re changing placement based on facts, not guesswork, and you can focus on the clusters and workloads burning the most money.
Install a cost-visibility tool such as OpenCost across all clusters. Then turn on centralised reporting so you can view total spend, utilisation rates, and idle costs across the whole estate in one place. Measure utilisation, idle cost, and egress over 30–90 days before you decide what to fix first. In most cases, low utilisation points to the biggest savings.
Don’t stop at compute. Pull egress volumes and unit costs for each cluster and region too. Cross-region traffic charges are easy to miss on cloud bills, but they can quietly wipe out compute savings. It happens more often than teams expect.
Map each workload to:
- its environment: production, staging, dev, or test
- its SLO
- its data-residency limits
The end result should be a ranked list of opportunities, each with:
- an estimated monthly saving in £
- a risk level
- a rough engineering effort
Use that baseline to go after the simplest savings first: rightsizing, then autoscaling, then consolidation.
Roll out rightsizing, autoscaling, and consolidation step by step
Once you know where the waste sits, make changes in the lowest-risk environments first. Begin with non-critical workloads in a single cluster. Dev or staging is usually the best place to start.
Apply request changes in small batches. Then watch latency, errors, restarts, and throttling for 24 hours before you move to the next batch. If the process works well, bake it into your Helm charts or GitOps manifests so the setup stays consistent.
After that, extend autoscaling and consolidation in phases. Enable HPAs on stateless services. Set cluster autoscalers to favour cheaper or spot node groups for non-critical workloads. Use scheduled jobs - Kubernetes CronJobs or tools like kube-downscaler - to pause development and test clusters outside UK business hours (09:00–17:30, Monday–Friday).
Multi-tenant clustering in non-production can cut fixed costs as well. If five teams share one cluster instead of each running a separate one, you save roughly £360/month on control-plane fees alone [7].
Leave production clusters until last. That’s not the place for early experiments.
Track savings with cost allocation and policy enforcement
Track each workload with steady labels: team, service, environment, and cost-centre.
To stop costs drifting back up, tie every change to a control that keeps the rule in place:
| Control | Example | Cost problem addressed |
|---|---|---|
| Mandatory labels |
team, cost-centre, environment on all workloads |
Unallocated spend that cannot be attributed to an owner |
| TTL policies | Auto-delete idle test clusters after 7 days | Orphaned zombieenvironments accumulating charges |
| Scale-to-zero | kube-downscaler or KEDA for dev/test overnight | Paying for idle capacity outside working hours |
Set a baseline spend figure for each initiative before making any change. Then track costs after the change over at least two billing cycles so normal demand swings don’t distort the picture.
Your dashboards should show both sides of the story: the technical view, such as utilisation gains and lower node counts, and the financial view, shown as £ per month by environment. Monthly reviews with platform, finance, and product leadership help keep things moving and make the next set of savings easier to spot.
Conclusion: Build a cheaper and more efficient multi-cluster platform
In practice, the savings usually come from three moves. Multi-cluster scheduling cuts spend by improving use of capacity, placing workloads on lower-cost suitable infrastructure, and extending rightsizing and autoscaling across the whole estate instead of handling each cluster on its own.
But those savings don't stick by themselves. They last only when visibility, policy, and phased rollout remain in place.
Cost optimisation should be treated as an ongoing practice, not a one-off project. That means making cost checks part of deployment and governance, enforcing labels and resource limits automatically, and reviewing spend on a regular basis with platform and finance teams. As the estate grows, teams should refine policies and build on the savings they already have.
Hokstad Consulting helps organisations reduce cloud cost through DevOps optimisation, cloud cost engineering, and multi-cluster strategy.
When those controls stay in place, the savings hold up over time. With clear placement rules, visibility, and governance, a multi-cluster platform can cost less without sacrificing performance.
FAQs
When should I use multi-cluster scheduling?
Use multi-cluster scheduling when one cluster can’t give you enough capacity or resilience.
It makes sense when you need:
- cross-region or cross-cloud failover
- strict compliance boundaries such as UK GDPR or PCI-DSS
- physical trust boundaries between environments
- independent lifecycles for legacy workloads
- blast-radius isolation for critical systems
In plain terms, multi-cluster scheduling is the point where “just add more to one cluster” stops being the right answer. You split workloads across separate clusters so a problem in one place doesn’t take everything down, and so each environment can follow its own rules and release pace.
How do I avoid egress costs wiping out savings?
Prioritise locality-aware routing so traffic stays in the same availability zone where possible. That cuts avoidable cross-zone hops and helps keep latency in check. Use node labels such as topology.kubernetes.io/region, and pair them with outlier detection so the system can steer clear of unhealthy endpoints without sending traffic to remote clusters more than needed.
Data gravity matters here too. Put compute workloads in the same zone as the data stores they rely on, because cross-zone transfers are a common source of surprise egress charges. In more complex multi-cluster setups, gateways can help handle internal service-to-service communication in a cleaner, more efficient way.
What should I optimise first to cut cloud spend?
Start with full visibility across all clusters, workloads, and costs. In a multi-cluster setup, the first job is simple: know exactly where every £ is going across providers, regions, and teams.
That only works if your labels are consistent. Use the same labels for team, environment, and cost centre so your data stays clean and dependable. Once that’s in place, you can spot waste, rightsize resources, combine clusters you don’t need, and put automated governance in place.