
Want to cut AWS costs by up to 90%? Using Amazon EKS with EC2 Spot Instances can help UK businesses achieve massive savings while maintaining performance. Here's how:
- EKS: A managed Kubernetes service that simplifies app deployment and scaling.
- Spot Instances: Unused AWS compute capacity offered at steep discounts but subject to interruptions.
- Key Benefits: Save on compute costs, with historical Spot interruptions occurring less than 5% of the time.
By pairing Kubernetes' dynamic scheduling with Spot Instances, you can run fault-tolerant workloads like CI/CD pipelines, batch jobs, and microservices at a fraction of the cost. For critical applications, a hybrid model (e.g., 70% Spot, 30% On-Demand) ensures stability while cutting expenses.
Example: Monzo saved 15% on compute costs, and ITV saved £150,000 annually by adopting Spot-aware EKS strategies.
Learn how to design a Spot-aware cluster, manage interruptions, and configure autoscaling for optimal savings. With the right setup, you can achieve significant cost reductions without sacrificing reliability.
Building a Spot-Aware EKS Cluster
Baseline EKS Architecture Design
When designing a Spot-aware EKS cluster, it's essential to separate workloads based on their requirements. Critical and stateful applications - like databases, message queues, and control plane tools - should run on On-Demand nodes to ensure reliability. Meanwhile, stateless and fault-tolerant services such as web APIs, batch jobs, and CI/CD pipelines can take advantage of Spot instances, which are more cost-effective but subject to interruptions.
To achieve this, create two node groups: 'Essential' for On-Demand workloads and 'Preemptible' for Spot workloads. Kubernetes tools like nodeSelector and affinity rules, combined with labels such as eks.amazonaws.com/capacityType, help ensure that each workload is scheduled on the appropriate node type. Additionally, diversifying instance types within these groups can improve both resilience and cost efficiency.
The safest Spot adoption pattern uses separate node groups for different workload classes: Essential nodes for databases and critical APIs, and Preemptible nodes for batch jobs and stateless microservices.- packetadmin, PacketSensei [6]
Diversifying Spot Capacity Pools
A Spot capacity pool is defined by a specific combination of instance type and Availability Zone (AZ). To minimise risks of disruption, it's crucial to diversify across multiple pools, utilising various instance types and AZs.
AWS suggests maintaining flexibility by targeting at least 10 different instance types per workload. Instead of specifying instance names, use attribute-based instance selection. For example, targeting any instance with 2–4 vCPUs and 8–16 GB of RAM ensures compatibility with newer generations as they are introduced.
For allocation strategies, price-capacity-optimized (when using Karpenter) or capacity-optimized (for Auto Scaling Groups) are recommended. These methods prioritise pools with the highest available capacity, reducing the likelihood of interruptions while maximising savings.
Instance and Availability Zone flexibility are the cornerstones of pulling from multiple capacity pools and obtaining the scale your application requires.- Chris Foote, Sr. EC2 Spot Specialist Solutions Architect, AWS [1]
Using Mixed Node Groups
Scaling your cluster requires effective tools, and both Cluster Autoscaler (CA) and Karpenter offer distinct advantages depending on your needs.
| Feature | Cluster Autoscaler | Karpenter |
|---|---|---|
| Scaling speed | 1–2 minutes (reactive) | Under 30 seconds (proactive) |
| Instance selection | Fixed list per node group | Dynamic selection via EC2 Fleet API |
| Interruption handling | Requires AWS Termination Handler | Built-in, native support |
| Consolidation | Limited | Automatic node repacking |
Karpenter is gaining popularity due to its ability to provision nodes directly via the EC2 Fleet API. It dynamically selects the most cost-efficient instance type for pending pods and includes features like the WhenEmptyOrUnderutilized consolidation policy. This automatically replaces underutilised nodes with smaller, cheaper ones, effectively eliminating idle capacity without manual adjustments.
For most scenarios, a 70% Spot to 30% On-Demand balance works well. The On-Demand portion provides stability in case of mass Spot interruptions, while Spot instances significantly reduce costs. For instance, a startup that implemented this split reduced their monthly compute costs from approximately £2,500 to £700 - a 72% savings. This translated to annual savings of around £21,600, all without requiring changes to their application code [4]. By carefully optimising node selection and scaling tools, teams can achieve substantial cost reductions while maintaining performance.
Need help optimizing your cloud costs?
Get expert advice on how to reduce your cloud expenses without sacrificing performance.
How to Deploy Spot Instances in EKS: Step by Step
Creating Spot Node Groups
Once you've planned your architecture and node groups, you can provision Spot nodes using eksctl. To create a managed Spot node group via the command line, use the following:
eksctl create nodegroup --cluster=<name> --spot --instance-types=m5.xlarge,m5a.xlarge,m6i.xlarge
Alternatively, you can define this in a configuration file under managedNodeGroups with spot: true. AWS will automatically apply the capacity-optimised strategy and label these nodes as eks.amazonaws.com/capacityType=SPOT [7]. To choose appropriate instance types across various families, you can use the amazon-ec2-instance-selector CLI tool. For more details on diversifying instance types, refer to earlier sections.
There are no additional charges for using EKS Managed Node Groups - you only pay for the underlying EC2 and EBS resources [5][7].
These steps help cut compute costs by leveraging the most economical Spot capacity pools. With your Spot node groups in place, the next task is to optimise workload scheduling to make the most of these cost-saving resources.
Scheduling Workloads for Cost Efficiency
After setting up your Spot node group, you’ll need to configure Kubernetes to schedule workloads on these nodes. Add a node selector in your pod specification like this:
nodeSelector:
  eks.amazonaws.com/capacityType: SPOT
For workloads that are fault-tolerant, consider adding a preferred node affinity rule. This allows fallback to On-Demand instances if Spot nodes become unavailable. To prevent critical workloads from running on Spot nodes, you can apply a taint (e.g., spot=true:NoSchedule) to the Spot node group. Then, add a matching toleration only for pods designed to handle interruptions.
Spot nodes are ideal for stateless applications, batch jobs, and CI/CD runners. However, workloads like databases or singleton controllers should remain on On-Demand instances. Additionally, to ensure service continuity during interruptions, use topology spread constraints to distribute replicas across multiple Availability Zones. Once your scheduling is configured, you can move on to setting up autoscaling for optimal cost and performance.
Configuring Autoscaling for Spot Nodes
For clusters that rely heavily on Spot instances, Karpenter is the recommended autoscaler. It interacts directly with the EC2 Fleet API, provisioning nodes in under 30 seconds and handling Spot interruptions seamlessly [2]. To target Spot capacity in a Karpenter NodePool, include this configuration:
requirements:
  - key: karpenter.sh/capacity-type
    operator: In
    values: ["spot"]
Karpenter uses a price-capacity-optimised strategy to balance cost with capacity. By enabling its WhenEmptyOrUnderutilized consolidation policy, you allow Karpenter to repack underutilised nodes onto more cost-efficient instances, further enhancing savings.
If you’re using the Cluster Autoscaler instead, pair it with the AWS Node Termination Handler. This ensures nodes are cordoned and drained within the two-minute interruption window. Additionally, configure a fallback to On-Demand instances to mitigate regional Spot capacity limits. By aligning autoscaling with your scheduling setup, you can maximise both efficiency and resilience.
Combining a high performant cluster autoscaler like Karpenter with EC2 Spot instances, Amazon Elastic Kubernetes Service (Amazon EKS) clusters can acquire compute capacity within minutes while keeping costs low.- Muru Bhaskaran, Senior Solutions Architect, AWS [2]
Finally, ensure deployments include Pod Disruption Budgets (PDBs). For example, setting minAvailable: 1 ensures at least one replica remains active during node drains, maintaining service availability even during interruptions.
AWS re:Invent 2022 - Optimizing Amazon EKS for performance and cost on AWS (CON324)
Handling Spot Interruptions and Keeping Workloads Running
::: @figure 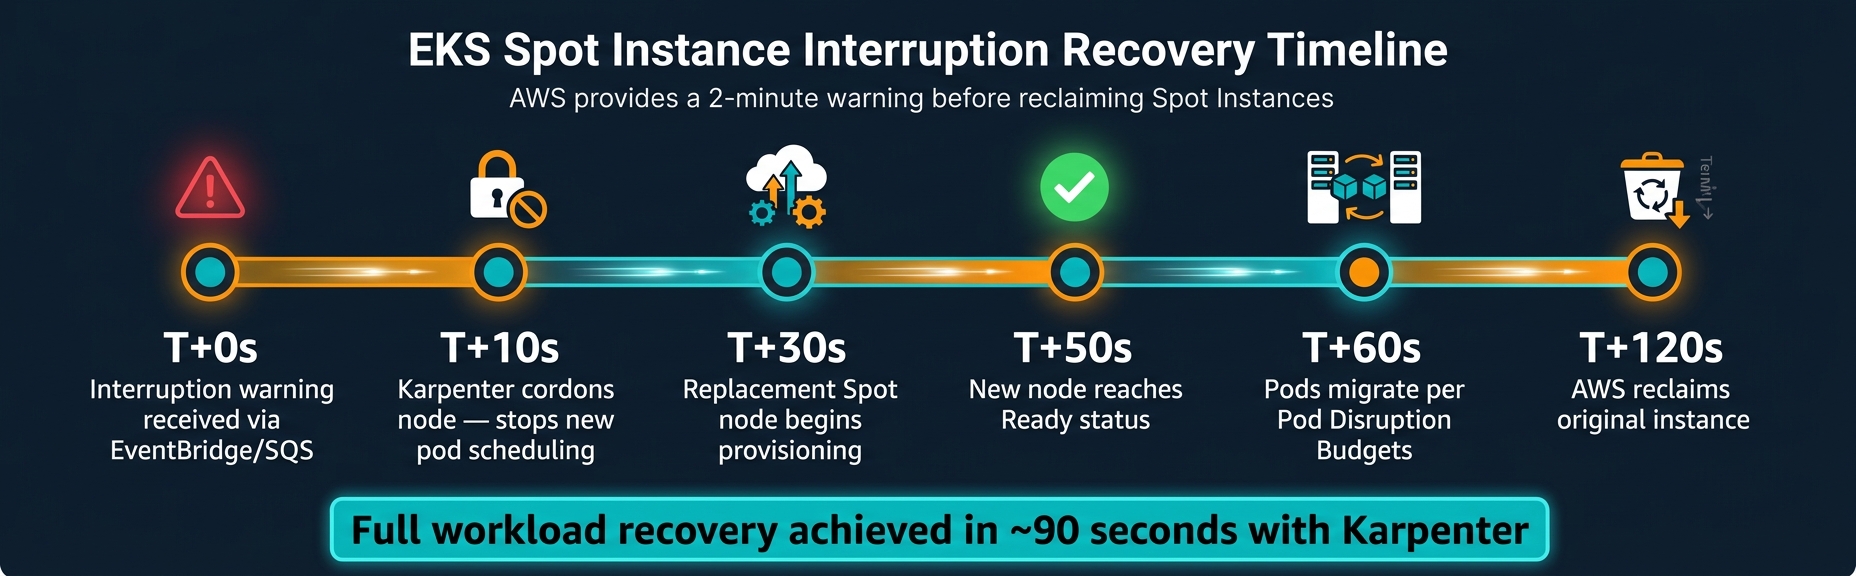 {EKS Spot Instance Interruption Recovery Timeline}
:::
{EKS Spot Instance Interruption Recovery Timeline}
:::
How the Spot Interruption Lifecycle Works
When AWS needs to reclaim a Spot Instance, it provides a two-minute warning through the EC2 Instance Metadata Service (IMDS) and Amazon EventBridge [9]. Additionally, AWS may send a Rebalance Recommendation signal, which often arrives 10–20 minutes before the actual interruption notice. This early signal indicates that a node is at higher risk and offers an opportunity to act before the two-minute warning [11][3]. Leveraging this early signal can be a game-changer for maintaining stability in your Spot setup.
Here’s a typical interruption timeline:
| Time | Event |
|---|---|
| T+0s | Interruption warning received via EventBridge/SQS |
| T+10s | Karpenter cordons the node to stop new pod scheduling |
| T+30s | Replacement Spot node begins provisioning |
| T+50s | New node reaches Readystatus |
| T+60s | Pods migrate in line with Pod Disruption Budgets |
| T+120s | AWS reclaims the original instance |
With a well-configured cluster using Karpenter, full workload recovery can be achieved in approximately 90 seconds from the initial warning [10]. This timeline highlights the importance of using the right tools to manage interruptions effectively.
Tools for Handling Interruptions
To handle interruption signals, you can use AWS Node Termination Handler (NTH) or Karpenter's built-in capabilities.
-
AWS Node Termination Handler (NTH) operates in two modes:
- IMDS mode: A DaemonSet polls the instance metadata every five seconds.
- Queue mode: A centralised Deployment listens to an SQS queue fed by EventBridge events. Queue mode is better for production clusters because it supports Auto Scaling Group (ASG) lifecycle hooks and can extend termination grace periods for long-running batch jobs by up to 48 hours [13].
Karpenter (from version 0.19.0 onwards) natively handles interruptions using SQS and EventBridge. It provisions replacement nodes before the original ones are terminated, offering one of the fastest recovery options available [12].
Spot instances are the single highest-impact cost lever in EKS, but only when implemented with proper safety guardrails.- PacketSensei [6]
Enhancing Workload Resilience
Beyond managing interruptions, you can strengthen workload resilience by adopting a few strategies:
- Set a Pod Disruption Budget (e.g.,
minAvailable: 1) to ensure a minimum number of pods remain available during disruptions. - Configure
terminationGracePeriodSecondsto 90 seconds, giving pods enough time to shut down gracefully. - Add a
preStophook (e.g.,sleep 15) to allow smooth transitions during node draining [6][10].
Additionally, distribute Spot nodes across multiple Availability Zones and diversify across five to ten instance types. This reduces the risk of capacity pool exhaustion in a single zone or instance type [6][8].
With the right architecture, you can run production workloads on Spot instances with 70% cost savings and zero downtime.- Kalyan Reddy Daida, Instructor, StackSimplify [10]
Case Study: Cutting EKS Costs with Spot Instances
This case study highlights how a UK-based travel and hospitality company significantly reduced its EKS costs by incorporating Spot instances into its infrastructure.
Initial Challenges and Cost Baseline
The company relied entirely on On-Demand instances for its EKS workloads, resulting in a hefty monthly EC2 bill of £50,000. The infrastructure had grown quickly to keep up with business demands, but this rapid expansion introduced technical debt. Manual scaling, lack of Pod Disruption Budgets, and unclear workload separation led to over-provisioning and made it difficult to track costs across build processes, EKS workloads, and other tasks sharing the same AWS account [15].
Spot Instance Strategy and Implementation
To address these inefficiencies, the engineering team revamped their approach and implemented a hybrid model: 70% Spot instances and 30% On-Demand instances. They kept stateful workloads - like databases and message queues - on On-Demand nodes, while migrating stateless microservices and batch jobs to Spot instances. By spreading workloads across multiple instance families (e.g., m5, m5a, m5n, m6i) and all three Availability Zones, they reduced the risk of capacity shortages.
To ensure smooth operation despite the transient nature of Spot instances, the team introduced several measures:
- AWS Node Termination Handler: Allowed for graceful pod eviction within the two-minute termination notice period.
- Pod Disruption Budgets: Ensured critical deployments always had at least three pod replicas running on separate nodes.
- Cluster Over-Provisioner: Used low-priority dummy pods to maintain a buffer of CPU and memory, enabling instant rescheduling when Spot nodes were reclaimed.
- Node Affinity and Taints: Ensured critical workloads stayed on On-Demand nodes.
| Strategy Component | Method | Outcome |
|---|---|---|
| Interruption handling | AWS Node Termination Handler | Graceful pod eviction within a 2-minute window [6] |
| Instant rescheduling | Cluster over-provisioner | No pod queuing during terminations [14] |
| Workload placement | Node affinity & taints | Critical apps maintained on On-Demand nodes [6] |
| Availability guarantee | Pod Disruption Budgets | Minimum three replicas on distinct nodes [14] |
These adjustments not only improved resilience but also set the stage for significant cost reductions.
Results and Key Takeaways
The revamped strategy led to a £15,000 monthly saving, cutting the EC2 bill from £50,000 to £35,000 - a 30% reduction - while maintaining 100% service reliability [14].
The key takeaway? Success with Spot instances hinges on careful preparation. This includes classifying workloads, diversifying instance types, and implementing robust interruption handling. Starting with non-critical environments, like development or batch jobs, can help teams gain the confidence needed to expand Spot usage to production workloads.
Conclusion and Next Steps
Key Takeaways from EKS Spot Optimisation
Reducing EKS costs with Spot instances requires thoughtful planning and execution. The main principles - spreading workloads across instance families and Availability Zones, managing interruptions effectively, and choosing the right workloads for Spot instances - remain central to success.
One often overlooked factor is ensuring accurate pod resource requests. By rightsizing these requests, you can significantly improve node efficiency. In fact, this adjustment alone can triple the number of pods per node, potentially reducing your EC2 instance count by up to two-thirds [16]. When combined with Spot instance discounts of up to 90% compared to On-Demand pricing [1], the cost savings can be substantial.
The safest way to adopt Spot instances is through a gradual rollout. Start with development and testing environments, then move to batch jobs and CI/CD runners. Once confident, you can migrate stateless production APIs, all while ensuring Pod Disruption Budgets and topology spread constraints are in place at every step [6]. This phased approach lays the groundwork for successfully implementing these strategies in production.
Spot is an architectural commitment, not a configuration setting.- Hokstad Consulting [3]
How Hokstad Consulting Can Help

These insights pave the way for professional guidance tailored to your needs. Hokstad Consulting specialises in cloud cost optimisation, helping businesses achieve 30–50% savings with structured, low-risk Spot instance strategies.
Their services address every aspect of the process, from assessing which workloads are ready for Spot instances to identifying those that may require re-architecting. They also focus on diversifying capacity across at least 10 instance types, deploying Karpenter for rapid node provisioning (under 30 seconds), and implementing FinOps frameworks to track actual savings rather than theoretical discounts [3]. For existing EKS workloads, they use a phased migration strategy, starting with non-critical environments before moving to production, ensuring risks are kept under control [3].
What’s more, Hokstad Consulting operates on a no savings, no fee model for cost optimisation projects, eliminating any upfront financial risk.
FAQs
Which EKS workloads should never run on Spot?
Critical workloads that require persistent storage, like databases or certain applications, should avoid running solely on Spot instances. Instead, ensure there is On-Demand fallback capacity available. This backup guarantees that essential services can continue running smoothly, even if Spot instances are interrupted.
How can I prevent Spot interruptions from causing downtime?
Preventing downtime due to Spot interruptions requires smart strategies and tools. Start by using the AWS Node Termination Handler, which helps detect interruptions, cordon affected nodes, and drain pods smoothly, minimising disruption.
To maintain critical workloads during these interruptions, configure PodDisruptionBudgets (PDBs). These ensure that essential services remain operational even as nodes are drained.
For better resilience, diversify your setup by using a mix of instance types and spreading workloads across multiple availability zones. This reduces the risk of widespread impact from interruptions. Additionally, automation tools like Karpenter or capacity-optimised autoscaling groups can be invaluable. They enable rapid replacement of interrupted instances, helping maintain uninterrupted service.
Should I use Karpenter or Cluster Autoscaler for Spot nodes?
When it comes to managing Spot nodes on Amazon EKS, Karpenter often stands out as the better choice compared to Cluster Autoscaler. Why? It delivers faster provisioning times - usually within 30 to 60 seconds - along with more dynamic node management. Plus, it handles Spot interruptions more effectively.
Another key advantage of Karpenter is its ability to support a wider range of instance types and capacity options, which helps minimise the risk of interruptions. On the other hand, Cluster Autoscaler tends to be slower, taking around 1 to 2 minutes to provision. This makes it less ideal for scenarios requiring rapid scaling, especially when using Spot instances.