
Container image registries are a critical part of your software supply chain. If left unprotected, they can become a gateway for attackers to inject malicious code, steal sensitive data, or disrupt operations. Here's a quick guide to securing your registry:
- Access Control: Use Role-Based Access Control (RBAC) to limit permissions, enforce Multi-Factor Authentication (MFA), and restrict access to approved applications and IP ranges.
- Vulnerability Management: Automate image scanning, prioritise remediation by severity, and maintain a Software Bill of Materials (SBOM) for quick vulnerability tracking.
- Encryption: Encrypt data in transit and at rest, sign images cryptographically, and validate image integrity using SHA256 digests.
- Trusted Sources: Use private registries, enforce immutable tags, and scan for secrets or sensitive data in images.
- Compliance and Monitoring: Follow security benchmarks, harden container configurations, and monitor runtime activity for threats.
::: @figure 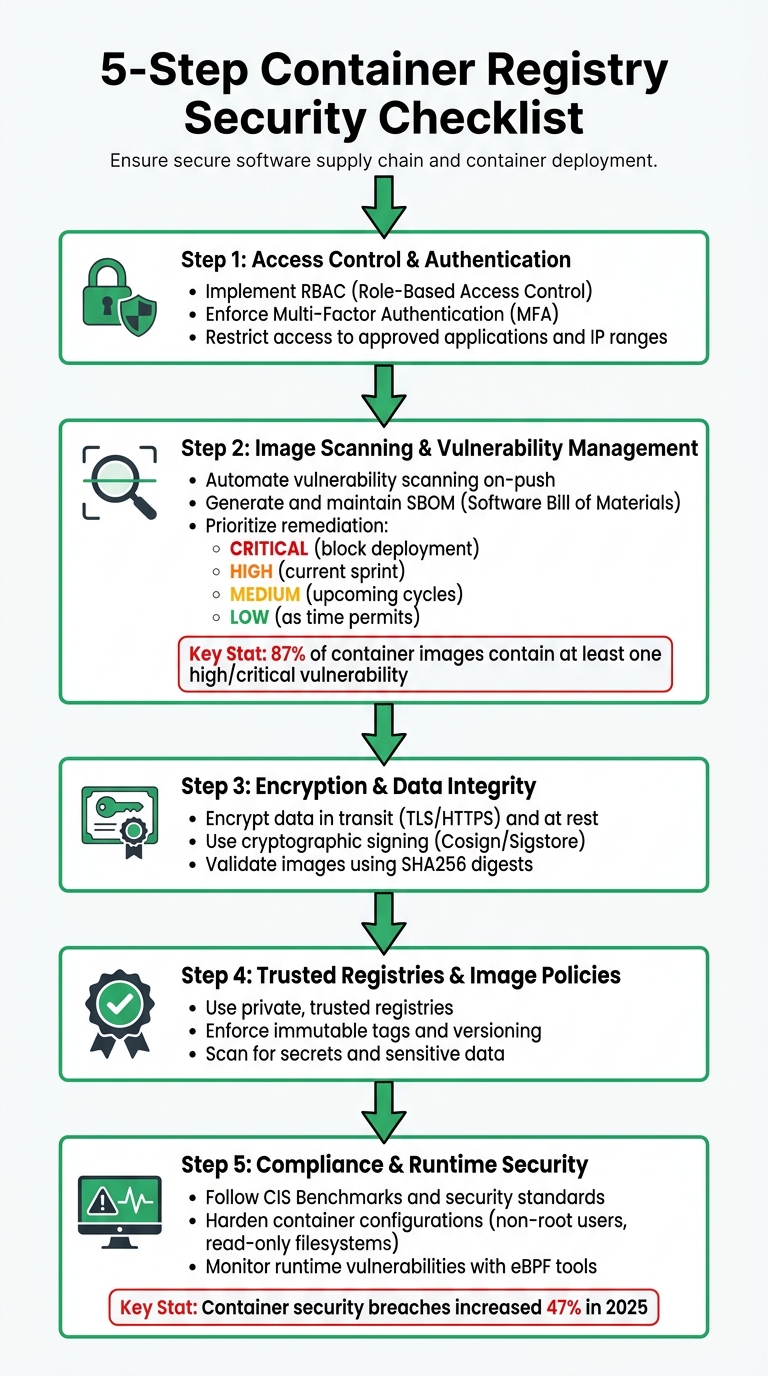 {5-Step Container Registry Security Checklist}
:::
{5-Step Container Registry Security Checklist}
:::
Docker Registry Security: Risks & Hardening Techniques | Container Security Course
Need help optimizing your cloud costs?
Get expert advice on how to reduce your cloud expenses without sacrificing performance.
1. Access Control and Authentication
Managing who can push, pull, or oversee container images is a critical step in preventing unauthorised access or tampering. Without proper measures, malicious actors could introduce harmful code or extract sensitive image data.
1.1 Implement Role-Based Access Control (RBAC)
Stick to the principle of least privilege by granting users and services only the permissions they absolutely need. For instance, production nodes should only have pull rights, while CI/CD pipelines should have push rights limited to specific repositories. Permissions should be scoped at the repository level to minimise risks. Additionally, separate roles for registry settings (control) and image management (data) to reduce the chance of accidental misconfigurations.
1.2 Enforce Multi-Factor Authentication (MFA)
Adding MFA is an essential layer of security for anyone accessing the registry. For interactive access, use identity providers like Microsoft Entra ID to take advantage of enterprise-level MFA and conditional access policies. In command-line or automated environments, replace static passwords with Personal Access Tokens (PATs) tied to a user’s authenticated identity. Developers should always use organisational credentials for container tools, and credentials should be rotated regularly - for example, Azure CLI tokens automatically expire after three hours.
| Authentication Method | Typical Scenario | MFA/RBAC Support |
|---|---|---|
| Individual Identity | Developer/Tester interactive push/pull | Yes (via Microsoft Entra ID) [4] |
| Service Principal | Unattended CI/CD pipeline or headlesspull |
Yes (via Azure RBAC) [4] |
| Managed Identity | Unattended pull to Azure services | Yes (via Azure RBAC) [4] |
| Admin Account | Testing/Single user access | No (Always full access; not recommended) [4] |
| Repository Tokens | IoT devices or external organisation access | No (Scoped to repository, not Entra ID) [5] |
To strengthen security further, ensure that only pre-approved applications can connect to your registry.
1.3 Restrict Access to Approved Applications
Limit registry access strictly to authorised users, services, and IP ranges. You can use DNS filtering tools like Docker Registry Access Management to ensure downloads only occur from approved domains. For even tighter control, implement Private Endpoints such as Azure Private Link to confine registry traffic within your private virtual network, effectively cutting off public internet access.
To enhance security within Kubernetes environments, use admission controllers like OPA Gatekeeper or Kyverno. These tools can intercept pod creation requests and block any container images that don’t come from approved registries. Additionally, manage permissions with time-limited, repository-specific tokens and wildcard scopes (e.g., samples/*) to keep access efficient and secure.
2. Image Scanning and Vulnerability Management
Container images often come with hidden risks. Research highlights that 87% of container images in production contain at least one high or critical vulnerability, with the average image carrying hundreds of known CVEs (Common Vulnerabilities and Exposures) [9]. Without a structured approach to scanning and fixing these issues, your registry can quickly turn into a repository of potential threats.
2.1 Automate Vulnerability Scanning
To keep vulnerabilities in check, enable automatic scanning on-push in your container registry. This ensures that every image - whether it's your own or sourced from third-party vendors - is scanned before deployment. Services like Google Artifact Registry and AWS ECR automatically trigger scans as soon as an image is pushed [7][6]. This shift-left
security approach helps catch problems early, well before they reach production.
For added security during development, complement on-push scans with on-demand scanning. Developers can use tools like gcloud artifacts docker images scan to inspect local images for vulnerabilities before uploading them to shared repositories [7]. Once an image passes the scan, create digital attestations to confirm it meets your security standards. For example, Google Cloud's Binary Authorization only allows images signed by a vulnerability-scan-attestor
to deploy to GKE, ensuring that only verified images make it to production [8].
Set clear priorities for remediation based on severity:
- CRITICAL vulnerabilities (easily exploitable or actively being exploited) should block deployment immediately.
- HIGH severity issues, such as risks of remote code execution, should be addressed within the current sprint.
- MEDIUM risks can be scheduled for upcoming cycles.
- LOW or MINIMAL issues can be resolved as time permits [7].
Consider using distroless images to minimise your attack surface. These images significantly reduce the number of installed packages, often cutting them down from over 400 to around 20 [9].
With automated scanning and prioritised remediation in place, maintaining an up-to-date inventory of your software through an SBOM becomes essential.
2.2 Generate and Maintain a Software Bill of Materials (SBOM)
An SBOM (Software Bill of Materials) is a machine-readable list of all components within a container, from operating system packages to application dependencies [10][11]. When a zero-day vulnerability like Log4Shell emerges, having an SBOM allows security teams to quickly identify affected images, saving time and effort compared to manually scanning the entire container fleet [10][11].
Without an SBOM, responding to a new vulnerability is a nightmare of manual inventory and guesswork.- Felix Wagner, Infrastructure Security Reporter [10]
To streamline this process, integrate tools like Syft into your CI/CD pipelines. These tools can automatically generate SBOMs in formats like SPDX or CycloneDX for every image you build [10][11]. Once the SBOM is ready, use tools like Grype to scan it against vulnerability databases such as the NVD (National Vulnerability Database) or GitHub Advisory Database [10][11]. Attach the SBOM to your image using Cosign to ensure its integrity [11]. Additionally, SBOMs can help track outdated or unmaintained libraries across your containers, enabling you to prioritise remediation efforts effectively [10].
2.3 Monitor and Remediate Vulnerabilities
A single scan isn't enough. Vulnerabilities are discovered regularly, so it's vital to rescan images in your registry to detect newly disclosed CVEs. Tools like Amazon Inspector can track image usage status
, identifying which images are actively running on clusters. This helps you focus on fixing vulnerabilities in exposed images first [12].
Establish remediation timelines based on severity:
- 48 hours for Critical vulnerabilities,
- 7 days for High,
- 30 days for Medium, and
- 90 days for Low [11].
If a vulnerability has no available fix, document the risk and provide a formal justification, along with a scheduled review date [11]. To further reduce risks and storage costs, use registry lifecycle policies to automatically delete stale or untagged images [12]. When dealing with sensitive credentials during builds, rely on Docker BuildKit secrets to keep them secure and prevent them from being written into image layers [11].
3. Encryption and Data Integrity
Protecting images involves more than just scanning for vulnerabilities; it also requires strong encryption and measures to ensure data integrity.
Even if vulnerabilities are addressed, images can still be at risk if intercepted during transmission or accessed in storage. To counter this, encrypt data both in transit (using TLS/HTTPS) and at rest, ensuring protection against tampering and unauthorised access.
3.1 Use Cryptographic Signing
Cryptographic signing plays a key role in verifying image integrity. Tools like Cosign, which follows the Sigstore standard for signing OCI artefacts [13], offer two approaches: key-based signing (using a key pair stored in a Key Management Service) and the preferred keyless signing (using short-lived certificates linked to OIDC identities). Keyless signing simplifies the process by eliminating long-term key management, while also logging every signing event in Rekor for an immutable audit trail.
Container image signing is the foundation of software supply chain security. Cosign makes signing straightforward, and keyless signing eliminates key management overhead.- Nawaz Dhandala [13]
To incorporate signing into your workflow, integrate cosign sign into your CI/CD pipeline after pushing the image to the registry. Always sign using the image's digest (the immutable SHA256 hash) rather than a mutable tag like :latest to avoid tag-switching attacks [15]. For environments requiring additional security, implement policies that demand signatures from multiple trusted sources - such as both the Security Team and the Release Team - before deployment [14]. You can further enforce this by using a Kubernetes admission controller, like Sigstore Policy Controller or Kyverno, to block images that are unsigned or incorrectly signed [13]. This signing process strengthens the multi-layered security approach alongside vulnerability scanning.
3.2 Enable Data Encryption in Transit and at Rest
Encrypting registry communications ensures that data remains secure during transmission. Use TLS/HTTPS with valid SSL/TLS certificates from a trusted Certificate Authority. Additionally, disable outdated protocols, enforce HSTS, and automate certificate renewal using tools like Let's Encrypt.
For cloud-based registries, such as Azure Container Registry, enhance security by disabling public network access and routing traffic through private networks (e.g., a virtual network with private endpoints). This limits access to trusted environments like VPNs or dedicated network zones, reducing exposure to potential threats. To protect stored images, encrypt storage backends and manage encryption keys through services like Key Management Services (KMS) or Hardware Security Modules (HSM). If encryption affects performance, hardware-accelerated encryption and TLS session reuse can help minimise any slowdown.
3.3 Implement Integrity Checks
Integrity checks ensure that artefacts remain unaltered throughout the CI/CD process. Always validate images using their SHA256 digest instead of tags, as tags can be overwritten or redirected to different images. Use cosign verify to confirm signatures against trusted sources before deployment, and enforce runtime verification through admission controllers [16].
Signing container images at the Build stage and then verifying them at the Deploy stage helps ensure that only trusted and unaltered images are deployed.- Microsoft Learn [16]
You can also attach attestations to your images using cosign attest, providing a verifiable record of the image's security details, such as SBOMs or vulnerability scan results [13]. For critical applications, adopt multi-signature policies requiring approvals from multiple authorities before an image is deemed valid [14]. These integrity checks close the loop on security, complementing access controls and vulnerability scanning to maintain a robust defence.
4. Trusted Registries and Image Policies
Strengthening your security setup goes beyond encryption and access control. Trusted registries play a crucial role by ensuring that all images come from verified and reliable sources. Even with the best safeguards, pulling a single image from an unverified source can compromise your entire system.
4.1 Use Private, Trusted Registries
Private registries offer better control over image access and distribution. Using private endpoints like Azure Private Link or dedicated VPNs helps restrict access to internal, trusted networks [18].
For example, Azure Container Registry Premium supports features like Private Link, geo-replication, and Content Trust [19]. To enhance security, avoid relying on the default admin
account. Instead, integrate authentication through Microsoft Entra ID (formerly Azure AD) for better identity management and audit trails [18]. Automate lifecycle policies to remove outdated or unused images, reducing the risk of deploying insecure or obsolete code [17][1].
Prevention begins at the source - make sure your registry isn't an open door to your entire stack.- Kapusto, Dev.to [1]
Once you secure trusted sources, the next step is to manage image versions effectively.
4.2 Enforce Image Tagging and Versioning Policies
Using the :latest tag might seem convenient, but its unpredictability makes it unsuitable for production. Instead, assign unique and immutable tags to your images, such as tags tied to build IDs or commit hashes (e.g., :abc123). These ensure that all nodes run the exact same image version. If you need stable tags (e.g., :1.0) for base images requiring updates, use them cautiously in production environments.
Enable features like tag immutability or image lock in your registry to prevent accidental or intentional overwrites. For added security, reference images by their manifest digest (SHA-256 hash) rather than tags, as digests are cryptographically tied to the image content. Admission controllers can enforce policies to allow only images with immutable tags or manifest digests. Additionally, during your release pipeline, set deployed tags to write-enabled: false to prevent unintended modifications or deletions.
4.3 Scan for Secrets and Sensitive Data
Controlling access and versioning is vital, but scanning for embedded secrets is equally important. Hardcoded credentials, API keys, and tokens present significant risks, especially if registries are misconfigured or IAM controls are weak [17]. Tools like Trivy, Anchore, Clair, or Aqua can be integrated into your CI/CD pipeline to detect and block sensitive data before images are pushed to the registry [20][6]. Configure these tools to return failure exit codes (e.g., exit-code 1) for any detected secrets or high-severity vulnerabilities, stopping insecure images from advancing further.
These tools should scan both the filesystem layers and metadata for sensitive information, as credentials often appear in KEY=VALUE formats [21]. Managed services like Microsoft Defender for Containers can also provide continuous, agentless vulnerability assessments of images already stored in your registry [6][18]. To enforce compliance, use policy-based admission controls to ensure only scanned and secure images are deployed. Before finalising an image, remove any unnecessary configuration files or temporary credentials to reduce potential risks [17].
5. Compliance, Runtime Security, and Monitoring
Once containers are deployed in production, they encounter new risks that require ongoing vigilance and security measures. In 2025, container-related security breaches surged by 47% compared to the previous year, with the most frequent attack methods being vulnerable base images (32%), misconfigured containers running as root (28%), and exposed Docker sockets (18%) [23].
5.1 Ensure Compliance with Security Standards
Conducting regular audits against recognised benchmarks is essential to maintaining a secure configuration. CIS Benchmarks provide a reliable framework for assessing both the host operating system and the container runtime. Tools like Docker Bench for Security can automate these audits, while admission controllers such as Kyverno and Qualys Admission Controller help block images that fail compliance checks or originate from untrusted registries [23][25][22][2].
For organisations managing sensitive payment data, monitoring control plane logs, like those from Amazon EKS, can help uncover unusual registry activity. This step is critical for meeting PCI DSS compliance requirements [20].
Once compliance is established, the next priority is to secure the runtime environment.
5.2 Harden Images for Runtime Security
Compliance lays the foundation, but runtime hardening is crucial to defend against evolving threats. As Sarah Chen, Senior Cybersecurity Engineer at ZeonEdge, explains, poorly configured Docker containers can grant attackers root-level access [23]. To minimise this risk, always use the USER directive in Dockerfiles to ensure applications run as non-privileged users with UIDs above 10,000 [3][23].
Further strengthen security by enabling read-only root filesystems with the --read-only flag, which stops attackers from modifying files or injecting malware. For temporary storage needs, like /tmp, use tmpfs mounts [23][1]. Drop all unnecessary Linux capabilities with --cap-drop=ALL, only re-enabling essentials such as NET_BIND_SERVICE. Additionally, enable the no-new-privileges option to block privilege escalation through setuid/setgid binaries [23][24][26].
Set strict CPU and memory limits to prevent resource exhaustion attacks. Use custom Seccomp profiles to control the specific Linux system calls a container is allowed to make, reducing the risk of kernel-level exploits [23][26]. Avoid mounting /var/run/docker.sock directly into containers unless absolutely necessary. If this is unavoidable, use a socket proxy to filter and limit API access [23][24].
5.3 Monitor Runtime Vulnerabilities
Static scans alone cannot catch every threat, making real-time monitoring indispensable. Tools based on eBPF, such as Falco, can track system calls and network activity, raising alerts for unusual behaviour [23][24][25][26]. Keep an eye out for unexpected processes, as they may indicate a compromise. Similarly, monitor network traffic for connections to unusual domains or ports, which could signal data theft or command-and-control activity.
Another key aspect of runtime security is detecting drift
, where unauthorised changes alter a running container from its original image. To mitigate this, always pin images by their SHA256 digest rather than tags, ensuring the exact, verified version is used in production [23][24].
6. Hokstad Consulting: Custom Security Solutions
Securing container image registries isn't a one-size-fits-all task. It requires a mix of automation, strategic planning, and constant vigilance. Hokstad Consulting excels in fine-tuning DevOps workflows, optimising cloud infrastructure costs, and delivering robust security solutions for container registries and broader cloud environments.
6.1 Consulting Services for Registry Security
Hokstad Consulting builds on established best practices to craft tailored strategies that strengthen your registry's security. They offer custom automation solutions for role-based access control (RBAC), vulnerability scanning, and compliance audits, all designed to suit your specific infrastructure. Whether you're working in public, private, or hybrid cloud setups, they integrate security measures directly into your CI/CD pipelines. This includes inline scanning, automated pruning, and cryptographic signing adapted to your environment.
Their DevOps transformation services aim to speed up deployment cycles without compromising security. By automating image policy enforcement, maintaining continuous monitoring, and aligning with industry security standards, Hokstad ensures your systems remain secure and efficient.
6.2 Retainer Model for Continuous Support
Initial setup is just the beginning - security requires ongoing attention. With threats constantly evolving, continuous oversight is critical. Hokstad Consulting offers a retainer model that provides ongoing monitoring, infrastructure adjustments, and bespoke security strategies through a flexible engagement framework. Their services include regular security audits, performance tuning, and on-demand DevOps support to address new threats and infrastructure changes.
This model ensures your security practices grow alongside your operations. Whether you're adding microservices, migrating workloads, or dealing with newly discovered vulnerabilities, Hokstad's expertise is always on hand. It’s an ideal solution for organisations that need consistent security support but don’t want the expense of a full-time in-house team.
6.3 No Savings, No Fee Plan
Hokstad Consulting’s No Savings, No Fee plan ties security improvements to measurable cost savings. You only pay when genuine savings are achieved, with fees capped as a percentage of those savings. This approach works because many security best practices also help reduce costs. For instance, using distroless images, inline scanning, and automated pruning not only enhances security but also cuts down on storage and transfer expenses.
| Optimisation Strategy | Security Benefit | Cost Benefit |
|---|---|---|
| Distroless Images | Minimises attack surface | Smaller image sizes; reduced storage and transfer fees |
| Inline Scanning | Detects vulnerabilities locally | Avoids storing vulnerable or rejected images |
| Automated Pruning | Cleans up outdated, unpatched images | Reclaims storage space |
| Layer Optimisation | Speeds up vulnerability scanning | Reduces compute time and improves build caching |
This model allows businesses to reinvest the savings from these optimisations into advanced security measures, such as automated RBAC and improved vulnerability scanning. Additionally, fail-fast mechanisms in CI/CD pipelines stop builds when critical vulnerabilities are detected, saving the costs of storing and fixing insecure images later on.
Conclusion
Securing container image registries is a crucial step in protecting against vulnerabilities, data breaches, and compliance issues. Key practices include role-based access control, multi-factor authentication, automated vulnerability scanning, cryptographic signing, and runtime monitoring. Together, these measures create a layered defence strategy, reducing risks throughout your container lifecycle.
Putting these safeguards in place requires careful planning, tailored automation, and continuous oversight. Hokstad Consulting specialises in DevOps transformation and cloud cost engineering, helping businesses strengthen registry security while keeping costs under control. Their expertise ensures that security becomes an integral part of your CI/CD pipelines, seamlessly blending protection into your workflow.
Hokstad Consulting provides flexible solutions, ranging from one-off audits to ongoing support and cost-efficient plans. Whether you operate in public, private, or hybrid cloud environments, their services are designed to meet the needs of organisations at any stage of their DevOps journey. With evolving threats and increasing complexity, their expert guidance ensures your security adapts to new challenges without disrupting operations.
FAQs
What’s the quickest way to lock down registry access?
The quickest way to ensure secure registry access is by using role-based access controls (RBAC) and enforcing authentication methods like basic authentication or token-based policies. These steps limit actions - such as pulling, pushing, or managing images - to authorised users, cutting down on potential security vulnerabilities.
How do I enforce image signing and verification in Kubernetes?
To ensure image signing and verification in Kubernetes, you can use tools like Cosign in combination with admission controllers such as Kyverno or the Sigstore Policy Controller. The process involves signing images during the build phase and setting up admission controllers to check these signatures before deployment. This approach ensures that only signed and verified images are allowed to run in your cluster, adding an extra layer of security by preventing the use of unsigned or potentially altered images.
How often should I rescan images for newly disclosed CVEs?
To stay ahead of potential threats, it's important to rescan container images daily for newly disclosed CVEs (Common Vulnerabilities and Exposures). This regular scanning helps ensure your security defences remain current and effective.