
Blue-green deployment ensures software updates with minimal downtime by using two identical production environments: one live (Blue) and one idle (Green). Updates are deployed to Green, tested, and then traffic is switched when stable. If issues arise, traffic can revert to Blue.
Key steps include:
- Design two identical environments with shared resources and robust traffic management.
- Integrate deployment into CI pipelines for automated testing and artefact management.
- Deploy updates to the idle environment, ensuring readiness with health checks and tests.
- Switch traffic using load balancers, DNS, or Kubernetes routing, with monitoring for stability.
- Automate rollback and manage costs by scaling down idle environments and optimising resources.
This method reduces risk, simplifies rollbacks, and supports frequent updates while controlling costs.
::: @figure 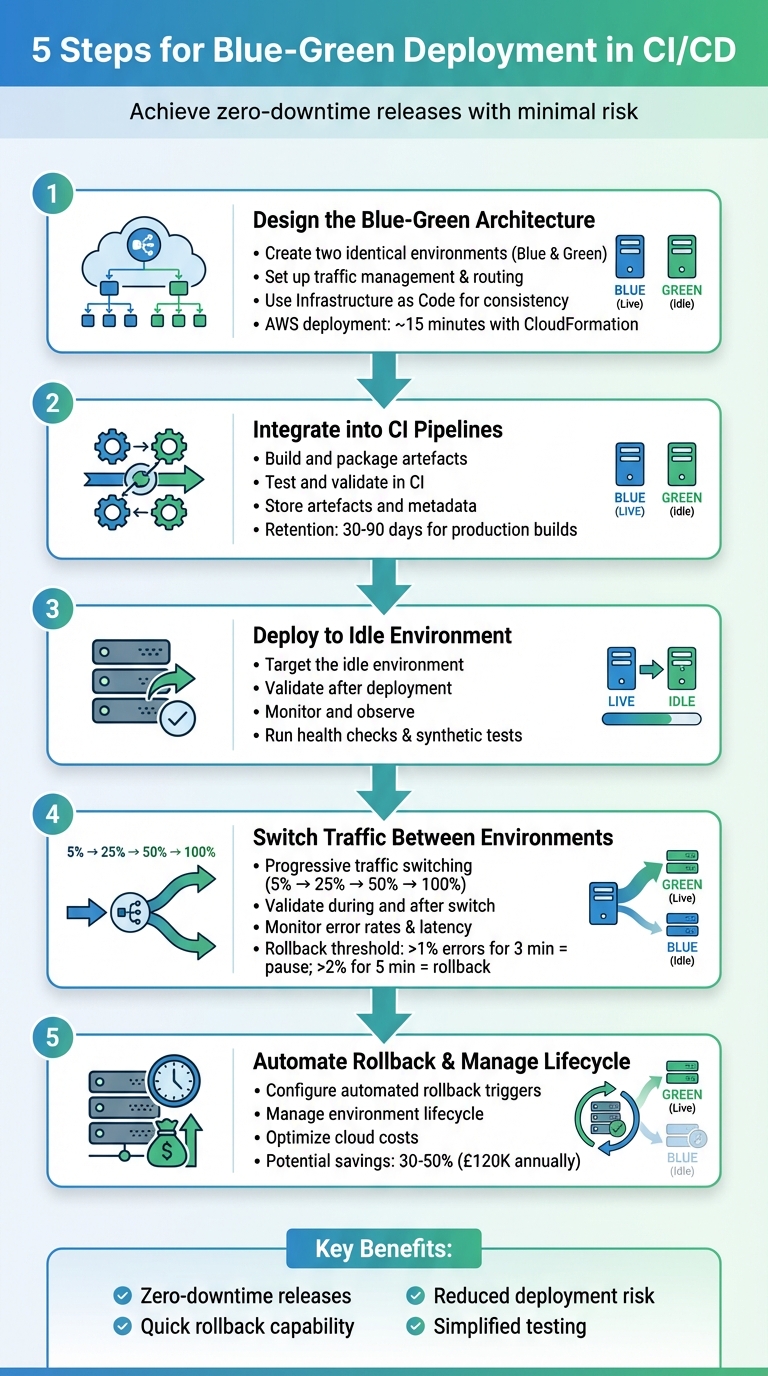 {5-Step Blue-Green Deployment Process for CI/CD Pipelines}
:::
{5-Step Blue-Green Deployment Process for CI/CD Pipelines}
:::
Production Level Blue-Green Deployment CICD Pipeline | Blue Green Deployment
Step 1: Design the Blue-Green Architecture
The first step in implementing a blue-green deployment is to design a solid architecture. This setup relies on having two identical production environments - referred to as Blue and Green. These environments must mirror each other in infrastructure, configuration, and dependencies to ensure smooth transitions when traffic is redirected. Even small differences, like variations in instance sizes or network settings, can result in unpredictable behaviour during the switch.
Create Two Identical Environments
Start by duplicating your infrastructure to create two identical environments. This includes components like autoscaling groups, Kubernetes clusters or node pools, load balancer target groups, and API gateways. For example, ensure both the Blue and Green environments have the same replica counts and container images.
However, not everything needs to be duplicated. Shared resources - such as databases, message brokers, and object storage - can be provisioned once and shared between environments. This approach avoids unnecessary costs and ensures data consistency. When dealing with shared resources, take extra care with schema changes to prevent disruptions in the live environment during deployment.
Set Up Traffic Management and Routing
Effective traffic management is key to a successful blue-green deployment. You need a mechanism to instantly redirect all incoming traffic from one environment to the other. Common solutions include load balancers (like AWS Application Load Balancer or NGINX), DNS services, or service meshes such as Istio. For Kubernetes setups, traffic can be managed using Services. For instance, you could redirect traffic by running the following command:
kubectl delete svc app-blue && kubectl expose deployment/app-green --name=app
Another option is using AWS CodePipeline with Elastic Beanstalk, which can perform atomic traffic shifts by swapping URLs between environments.
Keep in mind that different routing methods have varying behaviours. Load balancers can switch traffic instantly, while DNS changes may experience delays due to TTL and caching. To avoid disruptions, implement robust health checks at both the load balancer and application levels. This ensures that only healthy targets receive traffic, reducing the risk of failed deployments impacting users.
Use Infrastructure as Code for Consistency
Manual configurations can lead to inconsistencies over time. Using Infrastructure as Code (IaC) tools - such as Terraform, AWS CloudFormation, or Helm charts - ensures that your environments are reproducible, version-controlled, and consistent. By defining your infrastructure as a template, you can parameterise environment-specific variables (e.g., env = "blue" or env = "green"). For example, you could create a Terraform module for a shared VPC and database, while using separate modules for the Blue and Green environments that reference the same base setup.
AWS provides a reference pipeline for Elastic Beanstalk that can deploy a full blue-green environment in about 15 minutes using CloudFormation stacks [3]. For organisations aiming to balance high availability with cost management, Hokstad Consulting offers services to optimise these architectures. This can include strategies like right-sizing clusters or automating the scale-down of idle environments between releases.
Once your architecture is ready, the next step is to integrate blue-green deployment into your CI pipelines.
Step 2: Integrate Blue-Green Deployment into CI Pipelines
Once you've set up your blue-green architecture, the next step is to integrate it with your CI pipeline. This ensures that every code commit results in a deployment-ready artefact. The pipeline should handle everything - from pulling the latest code to creating a versioned, thoroughly tested package that’s ready to deploy to either environment. Key stages in this pipeline include source checkout, building, testing, packaging, and publishing to a registry. Tools like GitHub Actions, GitLab CI, Jenkins, or Azure DevOps are widely used to manage these processes, while Docker or OCI registries (such as AWS ECR, Azure Container Registry, or GitHub Container Registry) store the final artefacts. With this setup, you’re ready to validate and store builds for smooth transitions between environments.
Build and Package Artefacts
Every build should generate an unchangeable artefact that can be reliably deployed to both the blue and green environments without discrepancies. For containerised applications, this means creating a Docker image that includes all necessary dependencies and configuration defaults. Once built, push the image to a container registry, tagging it with a unique identifier for easy tracking and consistency. Avoid using generic tags like latest in production environments, as they can complicate rollbacks. To make debugging and audits easier, embed metadata such as the Git commit SHA, build number, and build timestamp into the artefact’s labels or manifest.
Test and Validate in CI
After packaging, every artefact must pass automated testing to ensure it's ready for deployment. Unit tests should run on every commit, followed by integration tests in isolated environments and smoke tests for critical user flows. Implement quality gates that require all unit tests to pass, meet a minimum code coverage threshold, and resolve any critical static analysis issues. To maintain fast feedback loops, run lightweight checks on every push, while reserving heavier end-to-end tests for changes targeting the main branch or scheduled pipeline runs. Speed up build times by running tests in parallel and caching dependencies wherever possible.
Store Artefacts and Metadata
Store all artefacts in a central, unchangeable registry so they can be accessed for deployment or rollback when needed. Each artefact should include metadata - such as the Git commit SHA, build number, build timestamp, test results, and details about who triggered the build. This information can be stored in manifest files, image labels, or repository properties, making it easy to identify which build is currently deployed to the blue or green environment. To manage storage costs while maintaining rollback safety, implement automated retention policies, such as keeping production builds for 30 to 90 days. If your organisation is looking for ways to balance deployment speed with cost efficiency, Hokstad Consulting offers guidance on designing artefact workflows and governance policies tailored to cloud cost management and compliance.
With artefacts built, tested, and safely stored, the pipeline is ready to transition to the deployment stage, where the idle environment will host the new version.
Step 3: Deploy to the Idle Environment
Once your artefacts have been thoroughly tested, the next step is to deploy them to the environment that's currently not serving users. This idle environment provides a safe space to check the new version without disrupting production traffic. Think of it as a staging area where you can catch any last-minute issues before they impact real users.
Target the Idle Environment
Your deployment pipeline needs a dependable way to identify which environment is idle. Many teams rely on deployment metadata stored in Git, configuration tools like AWS Systems Manager Parameter Store, or CI/CD variables that track which environment is live. For example, if the LIVE_COLOUR variable indicates blue, then the IDLE_COLOUR would be green [2][9].
In a Kubernetes-based CI/CD setup using GitLab CI, a new Docker image
my-app:${BUILD_NUMBER}is deployed to the idle green environment usingkubectl set image deployment/app-green. This is followed by health checks and monitoring via Prometheus. If any issues arise, the deployment can be rolled back withkubectl rollout undo, ensuring zero-downtime releases across EC2 and Kubernetes clusters [2].
Once you’ve identified the idle environment, confirm its readiness by running comprehensive health checks.
Validate After Deployment
After deploying to the idle environment, it’s crucial to ensure the new version meets baseline health requirements before diving into more extensive testing. Kubernetes readiness and liveness probes (like HTTP 200 checks on /healthz endpoints) confirm that pods are operational and will restart automatically if they fail [2][9]. For AWS Elastic Beanstalk or ECS, health checks through ELB or ALB continuously monitor instances or tasks. A successful deployment means all instances in the idle environment’s target group must show as healthy [3][6].
Your pipeline should include a stage that polls health endpoints (using commands like kubectl rollout status or ELB health checks) and fails if the targets don’t stabilise within a set timeout. Synthetic tests are also key here - they should simulate critical user journeys and integrations against the idle environment’s URL while keeping production data isolated [2][5]. These tests might include:
- Smoke tests to verify core pages or APIs.
- End-to-end tests that mimic user workflows, such as sign-ins or purchases.
- Contract tests to ensure compatibility with upstream and downstream services [2][4].
To prevent data contamination, use test tenants or anonymised datasets that can be reset between runs. However, live dependencies like payment gateways or third-party APIs should be called in sandbox mode [4]. Passing these synthetic tests is a non-negotiable step before moving on to the next phase.
Monitor and Observe
Set up metrics exporters tagged by environment (e.g., env='green') to compare key metrics like CPU usage, memory, error rates, and latency between environments. Centralised logging and distributed tracing are invaluable for pinpointing any anomalies introduced by the new release [2][4].
On AWS, you can leverage CloudWatch to track instance or container health, ALB target group statuses, and application logs for each environment. Dashboards can be organised by environment name or target group, making it easier to assess the idle environment’s performance [3][6]. Logs tagged with the environment and release version streamline anomaly detection [2][7]. Distributed tracing tools can further enrich this by annotating traces with environment and release version details, allowing for a clear comparison of latency and error paths between the blue and green environments [4][5].
According to Hokstad Consulting, which specialises in optimising DevOps and cloud infrastructure, designing dashboards and alerts early in the process is critical. This ensures that blue-green deployments can be evaluated using objective and comparable data across both environments [2].
Need help optimizing your cloud costs?
Get expert advice on how to reduce your cloud expenses without sacrificing performance.
Step 4: Switch Traffic Between Environments
This step marks the moment of truth - directing live traffic to the new release. Since this is when your new release officially goes live, precision is key, and having a quick rollback option is non-negotiable. The goal is to make the transition smooth and reversible in case any issues arise.
Traffic Switchover Methods
There are three primary ways to shift traffic: load balancer target switching, DNS updates, and Kubernetes ingress or service routing [2][9].
- Load balancer switching: This involves updating target groups, such as with AWS Application or Network Load Balancers, to reroute traffic instantly if you control the infrastructure [3].
- DNS-based switching: By updating a CNAME or A record, traffic is directed to the new environment. However, be mindful of DNS TTLs and client-side caching, which can slow down the transition [9].
- Kubernetes-based switching: For containerised workloads, this method uses Services, Ingress controllers, or service meshes (e.g. Istio) to redirect traffic by updating labels or routing rules [2][6]. In the UK, cloud-native setups often favour ingress or service mesh routing, while more traditional enterprise systems stick to load balancer approaches [3][5].
In an AWS CodePipeline configured for Elastic Beanstalk deployments via CloudFormation, after deploying Green (a clone of Blue), a subsequent stage uses CodeBuild to swap the URLs between the Blue and Green environments. This change enables the Green environment to serve live traffic, with health checks confirming stability and supporting automatic rollback on failure[3].
To keep things organised, define the traffic switchover as a separate stage in your CI/CD pipeline (e.g., Switch Traffic
). Include clear success criteria and, for high-risk production changes, approval gates. Before making the switch, ensure the Green environment has passed all pre-production checks and is marked as ready
in the pipeline metadata [2][3]. This stage naturally feeds into continuous monitoring and a gradual increase in traffic.
Validate During and After Traffic Switching
Once traffic begins to shift, continuous monitoring becomes crucial to confirm stability before fully committing to the new release. Focus on key metrics such as HTTP error rates, request latency, CPU and memory usage, and business-specific KPIs like successful logins or transaction approvals (e.g., GBP payment authorisations via UK gateways) [3][5]. Monitor dashboards closely for several minutes post-switch, while automated health checks in the CI/CD pipeline help catch any issues early [2][3].
Establish clear rollback thresholds based on error budgets and service level objectives (SLOs). For instance, if HTTP 5xx errors exceed 1% for over three minutes, pause any further traffic increases. If errors rise above 2% for five minutes, trigger an automatic rollback to the Blue environment [5][7]. These thresholds ensure quick responses from both on-call engineers and automated systems.
Use Progressive Traffic Switching
Instead of moving all traffic at once, adopt a phased approach. Start small - for example, route 5% of traffic to the new release, then increase to 25%, 50%, and finally 100% as metrics remain stable [6][8][9].
- With load balancers, adjust traffic weights using API calls or infrastructure-as-code tools [3][9].
- In Kubernetes, service meshes or advanced Ingress controllers can route a portion of traffic to Green while keeping the rest on Blue. Gradually increase Green’s share over time [2][6].
- Use internal QA traffic or requests with test headers to exclusively target the Green environment.
These methods can be automated through CI/CD pipelines using APIs or GitOps practices. This ensures repeatable, auditable transitions - critical for regulated industries like finance or healthcare in the UK [4][5].
For stateful systems, ensure both Blue and Green environments can access shared session stores (e.g., Redis or database-backed session tables). This avoids issues like user logouts during the switchover [5]. Plan schema changes carefully - start with additive updates that work with both versions, confirm compatibility, and only remove old fields after all traffic has shifted to the updated version [5].
For more insights into optimising CI/CD pipelines and blue–green deployment strategies, UK organisations can consult Hokstad Consulting for expert advice and tailored cloud solutions.
Step 5: Automate Rollback and Manage Lifecycle
Once you've switched traffic, it's crucial to have a plan in place for quick rollbacks and controlling idle costs. This step is all about creating automated safeguards and managing your environments effectively to ensure reliability without overspending.
Configure Automated Rollback Triggers
Having automated rollback mechanisms is what separates a reliable blue-green deployment from a risky manual one. Set up layered triggers that can automatically detect problems and reroute traffic back to Blue if needed. For instance, you could define a policy like:
If HTTP 5xx errors exceed 1% for five minutes, or if the p95 latency doubles within ten minutes of the switch, redirect 100% of traffic back to Blue and notify the on-call engineer.
These thresholds should be configured directly in your CI/CD pipeline. Tools like Jenkins, GitLab CI, or AWS CodePipeline can halt a deployment stage when monitoring flags issues like high error rates or latency spikes. AWS CodeDeploy, for example, can handle rollbacks automatically when health checks fail or alarms are triggered. On Kubernetes, you can use commands like kubectl rollout undo or adopt GitOps-style rollbacks for quick, reversible changes.
To keep things consistent and auditable, manage all rollback criteria through version-controlled configurations. While automation handles most scenarios, it's wise to include a manual override - such as a pause stage or a runbook script - so operators can step in if more subtle problems arise.
With robust rollback triggers in place, the next focus is managing your environments to keep costs under control.
Manage Environment Lifecycle
Once you've confirmed that no rollback is needed, it's time to manage the lifecycle of your old environment to avoid unnecessary expenses. Running both environments simultaneously can double your infrastructure costs, so it's common to keep the previous live environment for a limited safety window
- perhaps a few hours or days - before scaling it down and eventually decommissioning it.
After a successful deployment and a stable observation period, scale down the old environment to minimal capacity. Eventually, decommission it entirely. The length of this safety window depends on factors like risk, compliance requirements, and budget. For instance, business-critical services in regulated sectors may need a longer standby period, whereas less critical services can be retired more quickly.
An increasingly popular approach is using ephemeral blue-green deployments. In this model, a fresh environment is created for each release and destroyed once confidence is established. This works particularly well for lower environments like QA, staging, or UAT, where resources are spun up only when needed.
Optimise Cloud Costs
Blue-green deployments can be expensive, but there are ways to minimise costs. During rollouts, keep the idle environment at minimal capacity - use fewer pods or smaller instances - while still ensuring confidence in your testing. Scale it up to full capacity only for the switchover and the initial monitoring phase. After that, scale it back down to save resources.
You can also use cost-saving measures like autoscaling and Spot or pre-emptible instances for non-critical or idle environments, while keeping the primary production environment on more reliable capacity. Another way to cut costs is by consolidating shared components, such as observability tools or certain backing services. Just be cautious when dealing with stateful services or databases.
These strategies can significantly reduce cloud spending - some organisations have reported savings of 30–50%, with annual reductions of around £120,000. For businesses in the UK aiming to design efficient and cost-effective blue-green deployment strategies, consulting firms like Hokstad Consulting can provide expert guidance in areas like DevOps transformation, cloud cost optimisation, and AI-driven automation.
Best Practices for Production-Grade Blue-Green CI/CD
Technical Best Practices
The success of blue-green deployments hinges on three key principles: repeatable deployments, immutable artefacts, and uniform configuration. Start by building a versioned Docker image, pushing it to a registry, and promoting that exact artefact across all environments. This ensures consistency and eliminates surprises during deployment.
To maintain identical blue and green environments, use Infrastructure as Code tools like Terraform, Helm, or CloudFormation. These tools define infrastructure configurations in code, making it easier to replicate environments and avoid configuration drift. Before switching traffic, run automated tests on the idle environment to ensure it’s ready for production. For instance, one tech startup cut deployment time from six hours to just 20 minutes and reduced infrastructure downtime by 95% by implementing automated CI/CD pipelines, Infrastructure as Code, and robust monitoring solutions [1].
Finally, observability plays a vital role in ensuring these practices lead to well-informed decisions during deployments.
Observability and Monitoring
Effective observability is the backbone of managing blue-green deployments. Tag all logs, metrics, and traces with version numbers and labels for the environment (blue or green). This makes it easier to compare behaviours and troubleshoot issues. Use structured logging with consistent timestamps, and consider distributed tracing tools like Jaeger or OpenTelemetry to follow request flows across different services.
Set up real-time dashboards with tools such as Grafana or Prometheus to track critical metrics like error rates, latency (especially P95), CPU usage, and other business-specific indicators. Monitoring both environments during and after the switchover is crucial. Configure alerts to trigger automated rollbacks if metrics like the 5xx error rate exceed thresholds - for example, a 1% error rate.
Organisational Considerations
While technical precision and monitoring are critical, they must be supported by well-defined organisational processes to achieve a production-grade CI/CD pipeline.
Create detailed runbooks that outline every step of the deployment process, including pre-deployment checks, switchover procedures, validation steps, and rollback instructions. These documents should also include escalation contacts and protocols for communicating with stakeholders. For added safety, many teams integrate manual approval gates into their CI/CD pipelines.
Roles and responsibilities should be clearly assigned. Define who initiates deployments, who approves them, and who handles incident responses. To minimise customer impact, schedule deployments during off-peak UK hours, such as early mornings or after 17:00 GMT/BST. Ensure that on-call engineers and decision-makers are available during these windows. Automating repetitive tasks further streamlines the process, allowing developers to focus on delivering meaningful business outcomes.
Conclusion
Blue-green deployment offers a practical way to achieve zero-downtime releases while minimising deployment risks. By following a structured five-step process - creating identical blue and green environments with traffic routing, integrating the setup into your CI pipeline, deploying and validating in the idle environment, safely switching traffic, and automating rollback with lifecycle management - you can streamline deployments and eliminate much of the unpredictability tied to traditional methods.
The key advantage lies in maintaining two production environments, allowing new versions to be thoroughly tested before being exposed to users. This setup also provides the ability to quickly revert to the previous version if any issues arise. By automating processes like builds, tests, deployments, traffic switching, and health checks, you establish a consistent workflow that minimises recovery time and reduces the risk of human error during critical incidents. Each step contributes to a dependable, automated deployment system that strikes a balance between risk management and operational efficiency.
While running dual environments may increase cloud costs, strategies like on-demand scaling, right-sizing resources, scheduled shutdowns, and automated environment teardowns can help manage expenses effectively. Intelligent resource management ensures that reliability doesn't come at an unsustainable cost.
To implement blue-green deployment successfully, collaboration between development, operations, and QA teams is essential. Clear criteria for promoting and rolling back releases should be integrated into existing change management processes. Starting with lower-risk services can help teams build confidence before extending the approach to more critical systems.
For expert guidance, Hokstad Consulting provides tailored solutions for production-grade blue-green CI/CD pipelines. They can optimise deployments and reduce cloud costs by 30–50%, whether you're working with public, private, hybrid, or managed hosting environments.
FAQs
How do blue-green deployments help reduce downtime during updates?
Blue-green deployments are a smart way to minimise downtime during updates. Here's how it works: two identical environments are maintained - one active (blue) and the other idle (green).
When updates are ready, they’re applied to the idle environment first. This setup allows for thorough testing without disrupting the experience for users on the live environment.
Once everything checks out, traffic is redirected to the updated environment, ensuring a smooth shift with no interruptions. If any problems crop up, rolling back to the previous version is quick and easy, keeping risks low during deployment.
How can I reduce costs while managing dual environments in a CI/CD pipeline?
Managing dual environments can be expensive, but there are smart ways to cut costs. Start by right-sizing your resources - make sure you're not over-provisioning or paying for capacity you don't actually need. Pair this with automating deployment processes and fine-tuning your cloud infrastructure. These adjustments can deliver substantial savings, often ranging from 30% to 50%.
Cost management doesn't stop there. Automating the provisioning and decommissioning of environments helps avoid waste and ensures you're only using what you need, when you need it. Keep a close eye on resource usage to spot inefficiencies. Additionally, exploring hybrid or private cloud options can strike the right balance between performance and expenses. These steps not only help reduce costs but also simplify operations.
What are the benefits of automated rollbacks for deployment reliability?
Automated rollbacks play a crucial role in keeping deployments reliable. When something goes wrong during a deployment, they quickly revert to a stable version, cutting down on downtime and keeping disruptions for users to a minimum.
With automation in place, teams can ensure continuous service availability without relying on manual fixes that might slow things down. This not only allows for faster responses to issues but also boosts confidence in the deployment process, enabling smoother and more dependable delivery cycles.