
I use progressive perturbation to flag samples for review - not automatic removal. I change each sample in small steps, compare its predictions with clean data, and check unusual responses. Stability or sensitivity alone does not prove poisoning.
My approach is to:
- Set limits: keep transformations within a range that preserves the sample’s label.
- Calibrate first: fix the score, then set thresholds using separate clean validation data.
- Check results: test different datasets, attacks and strength ranges; measure precision, recall, false positives and costs in £.
- Review before acting: check labels and sources, use a separate gradient-based check, and quarantine uncertain cases.
- Keep a record: save settings, decisions and rollback steps; assign reviewers and approvers; rerun checks after updates.
For scale, a 1% false-positive rate means 100 clean samples flagged per 10,000 screened - an illustration, not a reported result. I start with a read-only pilot and keep removal decisions under human control.
::: @figure 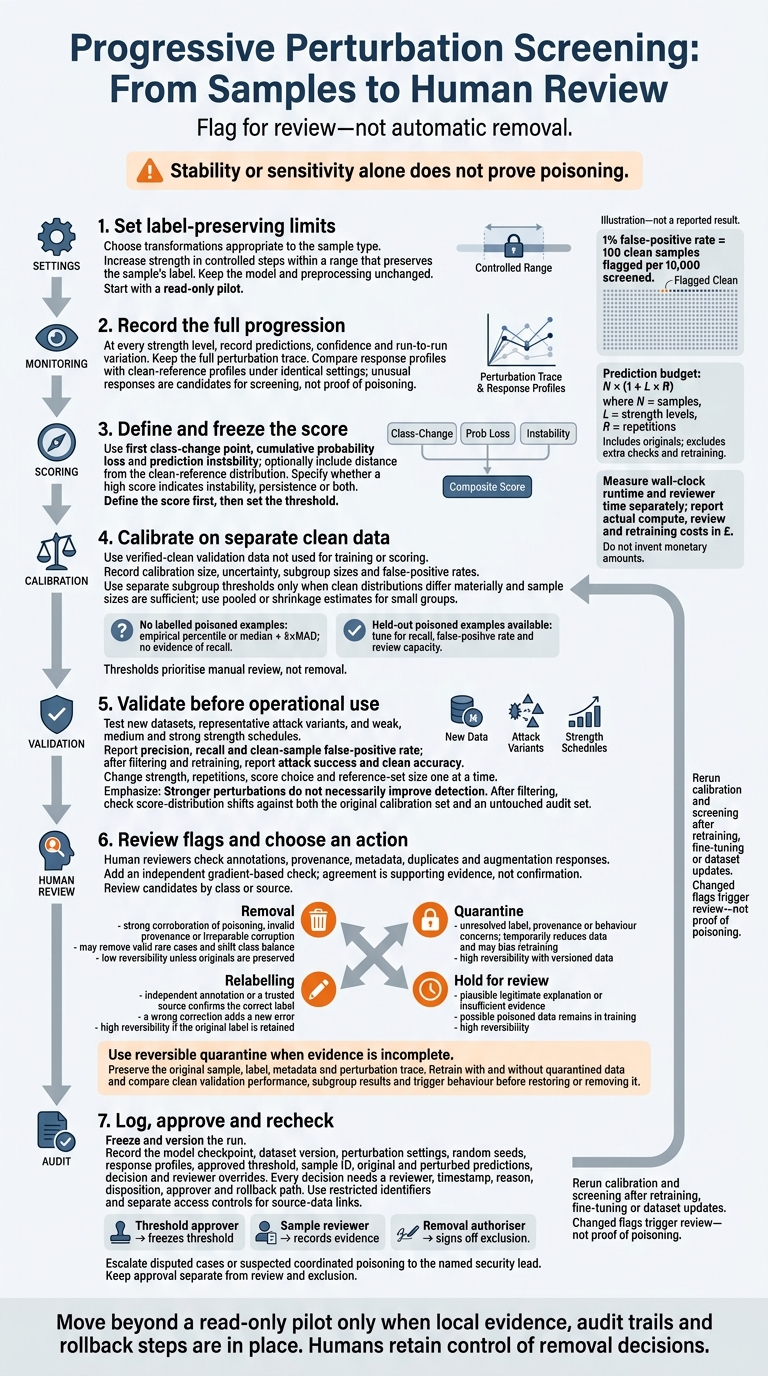 {Progressive Perturbation Screening: From Samples to Human Review}
:::
{Progressive Perturbation Screening: From Samples to Human Review}
:::
Set Up and Run Progressive Perturbations
Choose Transformations and Strength Limits
Choose a label-preserving transformation suited to the sample type. Increase its strength in controlled steps, stopping before clean samples lose the information needed to support their label. The aim is to locate the point where the label no longer holds.
Track Predictions at Each Strength
Use the clean reference set as your benchmark, and keep the model and preprocessing unchanged. For each sample, record confidence and run-to-run variation at every strength level. Keep the full progression so you can track how the model’s response changes as the perturbation increases.
Compare Response Profiles with Clean Baselines
Compare each sample’s prediction profile with clean baseline profiles under the same transformation settings. Flag samples only when their responses differ materially from clean response patterns. Sensitivity alone is not proof of poisoning. These profiles feed into score calibration in the next step.
Calibrate Scores and Flag Samples
Set Thresholds with Held-Out Data
Turn the response profiles from the previous step into a fixed screening score. Define the score first, then set the threshold. Score each sample using its first class-change point, cumulative probability loss and prediction instability. Where useful, include its distance from the clean-reference distribution. Specify whether a high score indicates instability, persistence or both, and freeze the scoring rule before final evaluation.[2][5][7]
Calibrate the threshold on verified-clean validation data that was not used for training or scoring. Set separate thresholds only when clean distributions differ materially and there are enough samples. Record subgroup sizes and false-positive rates. For small groups, use pooled or shrinkage estimates.[6]
If you have no labelled poisoned examples, use an empirical percentile or median + k×MAD. Report the assumptions, calibration size and uncertainty - this does not provide evidence of recall. If held-out poisoned examples are available, tune the threshold for recall, false-positive rate and review capacity. Keep final evaluation separate.
After filtering, check for score-distribution shifts against both the original calibration set and an untouched audit set.[4] Use thresholds to prioritise manual review, not to decide which samples to remove.
Review Flags Before Removing Samples
Review flagged candidates before changing the training set. Check their annotations, provenance, metadata, duplicates and augmentation responses. Add an independent gradient-based check, but treat agreement as supporting evidence, not confirmation. Review candidates by class or source so large groups do not dominate the queue.[2][5][6]
Use the score alongside corroborating evidence to choose the least risky action.
| Action | Required evidence | Risk to training | Reversibility |
|---|---|---|---|
| Removal | Strong corroboration of poisoning, invalid provenance or irreparable corruption | May remove valid rare cases and shift class balance | Low unless originals are preserved |
| Quarantine | Unresolved label, provenance or behaviour concerns | Temporarily reduces data and may bias retraining | High with versioned data |
| Relabelling | Independent annotation or a trusted source confirms the correct label | A wrong correction adds a new error | High if the original label is retained |
| Hold for review | A plausible legitimate explanation or insufficient evidence | Possible poisoned data remains in training | High; the decision can be revisited |
Use reversible quarantine when evidence is incomplete. Preserve the original sample, label, metadata and perturbation trace. Retrain with and without quarantined data, then compare clean validation performance, subgroup results and trigger behaviour before restoring or removing it.[6] Record each review outcome for later audits. Screening supports verification; it does not replace it.
Validate Screening Across Datasets and Attacks
Report Detection Metrics and Test Conditions
After calibration, test the screen on new datasets and attack variants - not just a published benchmark. For each threshold, report precision, recall and the clean-sample false-positive rate. Then report attack success and clean accuracy after filtering and retraining. Use the results to compare strength schedules and identify failure cases.
When reviewing published studies, check the threat model, baselines, calibration split, code, seeds and limits. Keep progressive perturbation screening separate from unrelated detection methods.
For N samples, L strength levels and R repetitions, budget N × (1 + L × R) sample-level predictions, including originals. This excludes extra checks and retraining. Measure wall-clock runtime and reviewer time separately. Begin with a representative pilot, agree on a clean-sample false-positive budget, and report actual compute, review and retraining costs in pounds sterling (£).
Test Strength Ranges and Failure Cases
Define weak, medium and strong schedules, stating the transformation parameters for each. Test clean and poisoned samples separately. Stronger perturbations do not necessarily improve detection.
| Strength range | Clean-sample response | Poisoned-sample response |
|---|---|---|
| Weak: lower third of the permitted range | High stability; few changes | Many remain stable |
| Medium: middle third | Moderate stability; some noise | Fewer remain stable |
| Strong: upper third | Low stability; many false positives | Few remain stable |
Change strength, repetitions, score choice and reference-set size one at a time. Inspect naturally stable clean samples, distributed triggers and triggers erased by mild transformations. Report class-change and stability failure cases separately, rather than hiding them within overall accuracy.
Log Decisions and Assign Review Roles
Log Decisions and Recheck After Updates
Once thresholds are set, freeze and version the run so later decisions can be traced. Keep the perturbation trace that supports each flag. Record the model checkpoint, dataset version, perturbation settings, random seeds, response profiles, approved threshold, sample ID, original and perturbed predictions, decision and any reviewer override. Use restricted identifiers, leave sensitive source data out of logs and protect the link to source data with separate access controls.
For each flagged sample, log the disposition, approver and rollback path. Document who can authorise removal and how records flagged as false positives can be restored. Every decision needs a reviewer, timestamp, reason and final disposition.
Rerun calibration and screening after retraining, fine-tuning or dataset updates. Changed flags should trigger review - they are not proof of poisoning.
Keep approval separate from review and exclusion.
Assign Approval and Escalation Roles
Assign a threshold approver, sample reviewer and removal authoriser. The approver freezes the threshold, the reviewer records evidence, and the authoriser signs off any exclusion.
Send disputed cases or suspected coordinated poisoning to the named security lead. For high-risk cases, define when to pause training or data ingestion until the review is complete. Do not delete flagged records automatically; use the records to support later review.
Conclusion: Use Screening to Guide Review
After calibration, use progressive perturbation to prioritise review - not to decide removal. Rank samples using clean baselines, calibrated scores and calibrated thresholds.
Before deployment, test the screen on your datasets and representative attack variants. Check false positives alongside compute, review and retraining costs. Treat published results as hypotheses to test, not proof that the screen will work reliably on your data.
Start with a read-only pilot. Move to approval-only use only when local evidence, audit trails and rollback steps are in place. Screening should support review, while humans keep control of removal decisions.
FAQs
How can I verify that perturbations preserve labels?
Use a human-in-the-loop approach: analysts should check AI decisions through manual testing and contextual analysis. This helps confirm that perturbations preserve labels rather than trigger false alarms [1][2].
Pair this with model-graded evaluations, where a second AI model checks the primary model’s outputs against a fixed reference (‘golden’) dataset. This gives teams a benchmark for consistency and quality during screening [1].
What if my clean reference data contains poisoned samples?
Poisoned samples in your reference data can make screening less reliable because AI effectiveness depends on data quality [1]. Treat data poisoning as a critical governance risk, and use threat modelling frameworks such as STRIDE or MITRE ATLAS to assess it [2].
Use adversarial testing and red teaming to simulate poisoning attacks. Update incident response plans so they cover poisoned data pipelines [2][3]. Keep data clean and well organised: noise or malicious patterns can distort how a model understands the data [4][5].
How can I tell whether published results apply to my dataset?
Test published results in your own setup rather than assuming the model will perform consistently across datasets. Run it in observe mode for a representative period, such as one week, and compare its predictions with actual outcomes. Check precision and recall: performance can drop sharply outside curated datasets.
Hokstad Consulting specialises in AI strategy and implementation, helping refine models through human-in-the-loop validation and targeted performance monitoring.