High clean accuracy does not mean an AI model is free of backdoors. BackdoorBench helps teams test poisoned image-training data using 20 attack methods and 32 defence methods. The key is to measure attack success rate, clean accuracy and compute cost together - not judge protection by one score.
A useful test plan covers:
- Repeatable tests: Fix datasets, models and settings, keep test data separate from tuning data, and compare clean, poisoned and defended models.
- Attacks and defences: Test different trigger types and label policies. Match each defence to the data and model access available.
- Results and release rules: Set limits before testing, report variation across runs, and retest after repair. Detection alone does not mean a backdoor has been removed.
- Pipeline controls: Review flagged data, retain test records, assign risk owners and repeat tests after changes.
Benchmark results support release decisions. They do not prove protection against untested attacks or replace checks in the team’s own pipeline.
::: @figure 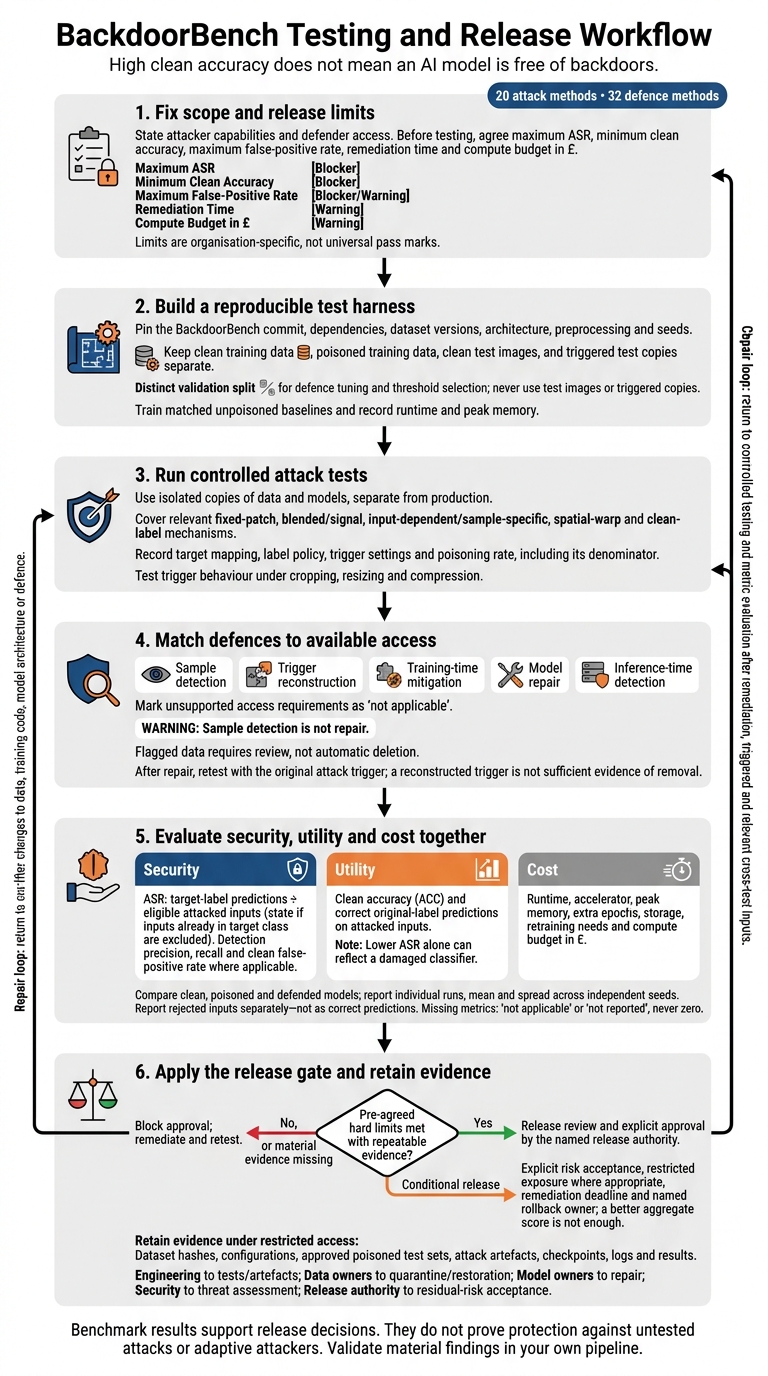 {BackdoorBench Testing and Release Workflow}
:::
OSAI AI Red Teaming - Lesson 25: Data & Model Backdoors
Set Up Datasets, Models and Tests
With the scope fixed, build one reproducible test harness before comparing attacks and defences.
Use one hypothetical e-commerce case throughout: supplier-provided product photos are treated as untrusted. Do not infer wrongdoing.
Check out the chosen BackdoorBench commit and pin dependencies. Store configs, logs, checkpoints and metrics outside the source tree. Follow the BackdoorBench repository documentation for that commit: commands vary by release, and dataset–model pairings must be supported.[2][3] The aim isn't to mirror production perfectly. It's to keep attack and defence comparisons stable enough to guide deployment decisions.
Choose Datasets and Model Architectures
Start with CIFAR-10 for a smoke test, then add a larger dataset. More classes make clean accuracy and ASR less directly comparable. Image scale also changes how visible a trigger is. Match preprocessing, input resolution and initialisation between clean and poisoned runs. BackdoorBench results don't replace tests on real product photos with class imbalance, varied lighting and background clutter.[1][3]
| Dataset | Classes and native dimensions | Architecture to check | Poisoning rate | Evaluation splits |
|---|---|---|---|---|
| CIFAR-10 | 10; 32 × 32 pixels | PreAct-ResNet18 | 0% and 1% | Untouched clean test; triggered copies |
| CIFAR-100 | 100; 32 × 32 pixels | VGG19-BN | 0% and 1% | Untouched clean test; triggered copies |
| GTSRB | 43; variable dimensions | ConvNeXt-Tiny | 0% and 1% | Untouched clean test; triggered copies |
| Tiny ImageNet | 200; 64 × 64 pixels | ViT-B/16 | 0% and 1% | Held-out labelled images; triggered copies |
Lock the split plan before any defence tuning or threshold selection.
Keep Evaluation Splits Separate
Store clean training data, poisoned training data, clean test images and triggered test copies as separate artefacts. BackdoorBench uses names including bd_train_dataset and bd_test_dataset. Keep test originals read-only and record the transformation seed used to create triggered copies. For WaNet and Input-Aware, retain auxiliary inputs and report cross-test results separately.[2][4]
Give the defender a separate, independently inspected clean subset only if that access is realistic. Record where it came from, and use a distinct validation split for defence tuning and threshold selection. Never use test images or triggered copies for either task.
For the retailer, keep related photographs of the same product together when splitting data, so near-duplicates cannot leak between training and evaluation.
Once these splits are in place, record baselines and run the attack/defence grid.
Record Settings and Clean Baselines
Save the commit, dependency lockfile, dataset version and checksums, architecture, preprocessing, target label and trigger parameters. Record the poisoning-rate denominator too: is it the full training set or the eligible supplier subset?
Also log augmentations, optimiser, learning-rate schedule, batch size, epochs, checkpoint-selection rule and seeds. Train a matched unpoisoned baseline for each pairing to isolate poisoning effects. Compare supplier-mixed and trusted internal baselines to identify data-shift effects.
Repeat conditions across independent seeds. Keep each result, plus the mean and spread. Log CPU/GPU models, runtime and peak memory alongside the agreed limits for memory, storage and wall-clock time.[1][2][3]
Test Attack Families and Defences
With datasets, splits and baselines fixed, run the attack–defence matrix on isolated copies of data and models, separate from production systems. State what the attacker can do: edit samples, change labels, inspect training data, access gradients and query the model. Separately, state whether the defender can access weights, data, calibration samples and retraining controls.
Compare each mitigation with its matched poisoned baseline. For training-time methods, keep the poisoned training setup the same.[5][3][2] Use the fixed splits and baselines above to keep comparisons like for like.
Compare Triggers and Poisoning Methods
Group attacks by mechanism rather than method name. Record the source-to-target mapping, label policy, trigger settings and poisoning rate. Preprocessing and deployment conditions can change trigger behaviour, so test each mechanism under the same conditions.
Clean-label poisoning keeps the original labels. Test it separately: label checks will miss it. Also, keep effectiveness separate from detectability. A high ASR measures target behaviour, not how easily reviewers or detection methods can spot poisoning. Test whether triggers survive normal cropping, resizing and compression.[2][3][5]
| Attack family | Poisoning mechanism | Trigger characteristics | Visibility considerations | Required test conditions |
|---|---|---|---|---|
| BadNets-style patch | Add a fixed trigger and usually change poisoned labels to a target class | Local, fixed patch | Often visually obvious; useful as a baseline | Specify patch location, size, colour, target label and poisoning rate |
| Blended; SIG / Low Frequency | Blend a pattern into images or add a signal; record the label policy | Distributed or semi-transparent | Less conspicuous than a solid patch; test several blend strengths | Fix the blend coefficient or signal amplitude and frequency, plus image preprocessing |
| Input-aware / SSBA | Generate input-dependent or sample-specific perturbations | Varies between images | A single trigger template may miss it | Record generator access, perturbation settings, target mapping and test-time construction |
| WaNet-style | Apply a learned or designed spatial warp | Distributed geometric distortion | Can evade simple patch searches and may be subtle after resizing | Specify warp strength, grid or flow generation, interpolation and augmentation settings |
| Label Consistent | Poison samples while retaining their apparent labels | Trigger may be visible, blended or feature-based | Label audits alone are insufficient | Preserve original labels, define permitted data changes and test target behaviour separately |
Once attack behaviour is fixed, test only defences supported by the access you can provide.
Match Defences to Detection and Repair
Map each defence to data screening, training, post-training analysis or runtime detection. Check its availability and input requirements: not every implementation supports every pairing.
These categories describe different jobs. Sample detection is not repair; flagged data may still need filtering, followed by retraining. Mark a method not applicable when the required access is missing.[3][5][6]
| Defence category | Representative method | Required access or clean data | Output | Security metric | Utility cost | Deployment stage |
|---|---|---|---|---|---|---|
| Sample detection | Activation Clustering, SPECTRE | Suspected training samples and internal representations; calibration as required | Suspicion scores or flagged samples | Precision, recall, clean false-positive rate | Review, discarded data, possible retraining | Data screening |
| Trigger reconstruction | Neural Cleanse | Model access, candidate labels and optimisation inputs | Candidate triggers and anomaly scores | Label detection; reconstructed-trigger ASR | Per-label optimisation | Post-training analysis |
| Training-time mitigation | ABL, DBD | Suspected training data and control of training; method-specific inputs | Newly trained model | Residual ASR | Extra training and possible ACC loss | Training or retraining |
| Model repair | ANP, CLP, Fine-Pruning, NAD | Weights; clean data and training access where required | Pruned or fine-tuned model | Residual ASR; original-label recovery | Repair compute and possible ACC loss | Before deployment |
| Inference-time detection | STRIP | Model queries, reference images and clean threshold-calibration data | Input alert or rejection | Detection recall and clean false-positive rate | Extra inference work; rejected legitimate inputs | Runtime |
Neural Cleanse detection is not proof of removal. It optimises a candidate trigger for each target label, then checks for unusually small candidates. Report the suspected label, reconstructed trigger, optimisation settings and anomaly score.
After any repair, retest with the original attack trigger. A reconstructed patch may not represent an input-dependent, distributed or geometric backdoor.[5][9]
Measure Security, Accuracy and Compute Costs
Report clean accuracy (ACC), poisoning rate and ASR before and after defence. Define ASR as target-label predictions divided by eligible attacked inputs. Preferably exclude inputs already in the target class, and state whether you did so.
Report retained clean ACC and correct original-label predictions on the specified attacked inputs. Lower ASR alone can reflect a damaged classifier. For detection methods, also report precision, recall and the clean false-positive rate. Report rejected inputs separately; do not count them as correct predictions.
Include runtime, accelerator, peak memory, extra epochs, storage, retraining needs and variation across seeds. For missing metrics, use not applicable or not reported, never zero.[6][7][8]
Carry these results into the acceptance limits and deployment controls in the next section.
Use Results to Make Deployment Decisions
Run Paired Tests and Set Acceptance Limits
After measuring ACC, ASR and compute cost, turn the benchmark results into release criteria.
Use ACC, ASR and cost to set release rules, not rankings. Before testing, agree the maximum ASR, minimum clean accuracy, maximum false-positive rate, remediation time and compute budget in £. Label each limit as either a release blocker or a warning that needs approval. Base these limits on your harm assessment, review capacity and measured costs - not universal pass marks. Require repeatable evidence for every hard limit.
Pair clean-only training with controlled poisoned training. Test each defence separately and include a clean-only control. After remediation, retest clean, triggered and relevant cross-test inputs. Repeat testing across the highest-risk combinations and seeds.
Base approval on individual high-impact failures and variation between runs, rather than averages that hide problems. Missing evidence should block approval if it leaves a material threat untested.
Turn Findings into Pipeline Controls
Use the agreed limits to set controls at intake, ingestion and quarantine.
Match each failure to a control: provenance checks at intake, integrity checks at ingestion, quarantine for suspicious samples and reproducible training before release. A screening flag should trigger review, not deletion. Provenance checks reduce risk, but anomaly checks can still miss subtle triggers.
Run new tests whenever data, training code, model architecture or defence changes. Keep configurations, approved poisoned test sets, attack artefacts, checkpoints and logs under restricted access.
For the e-commerce classifier, treat targeted misrouting, ordinary misclassifications and excessive review load as separate release risks. High ASR can block release even when clean accuracy looks normal; a defence can also block release if clean accuracy loss breaches the agreed floor or false positives overwhelm reviewers.
Conditional release needs explicit risk acceptance, restricted exposure where appropriate, a remediation deadline and a named rollback owner. A better aggregate score is not enough.
State Test Limits and Assign Owners
Once the controls are set, record who owns the remaining risk and who can approve release.
Image-classification results do not prove safety for other model types, untested attacks or adaptive attackers. Record dependencies on trusted data, model access and attacker assumptions. Keep observed benchmark results separate from your organisation’s deployment judgement.
Give engineering ownership of tests and artefacts. Require data-owner approval for quarantine and restoration, make the model owner responsible for repair, and assign threat assessment to security. Name the release authority responsible for accepting residual risk and setting follow-up deadlines. Define who owns each follow-up action and how often it will be reviewed.[10][11]
Conclusion: Backdoor Testing and Release Checklist
Use the measured limits to complete the release review. BackdoorBench gives teams a repeatable way to test image-classification backdoors. Include dirty-label, clean-label and input-dependent attacks where relevant, and assess ASR, clean accuracy and compute cost together. Treat detection as triage. Accept a repair only if it lowers ASR without breaching the clean-accuracy limit.
Before approving release, check the following:
- Environment and assumptions: Record software versions, hardware, seeds, attacker capabilities, trigger type, target label and poisoning rate.
- Baselines and tests: Keep evaluation splits separate. Compare clean, poisoned and defended models under the same settings, and test detection and repair separately.
- Metrics and limits: Report clean accuracy, ASR, detection errors, run-to-run variation and compute cost in £ against pre-agreed limits.
- Evidence and approval: Retain dataset hashes, configurations, checkpoints, logs and results so technical and risk owners can reproduce and approve the result. Approve release only when it meets the agreed limits.
- Re-testing and scope: Document any reassessment after a material change. Limit conclusions to the tested data, architecture, training recipe, attacks and defence settings. Validate material findings in your own pipeline.
FAQs
Which backdoor tests should my team prioritise?
Start with read-only pilots of spectral signatures, activation clustering and deep k-NN on your datasets. Use them to support human review, not automatic deletion. Calibrate thresholds using clean validation data, then measure precision, recall and false-positive rates.
Audit flagged records and make sure any quarantine can be reversed. Retrain with and without filtered data, then compare clean accuracy and attack success rates. Include adaptive, detector-aware tests, and assess compute costs, review costs and harm to rare classes or subgroups.
How can I adapt BackdoorBench to my own images?
Pilot BackdoorBench-style testing by extracting stable image embeddings, then score training samples for possible poisoning based on label mismatches, feature outliers or clustering. Apply label-preserving perturbations to flag unstable, trigger-like responses for human review - not automatic deletion.
Set thresholds using clean validation data. Quarantine suspect samples so they can be restored, then retrain. Measure clean accuracy and residual attack success with trusted trigger-bearing tests. Log sample IDs, scores, thresholds and review decisions to support rollbacks.
How do I set acceptable backdoor risk limits?
Run a controlled pilot using your own datasets and model families before moving to production. Compare performance against clean baselines and defined risk targets. Use historical data, unsupervised anomaly detection and rule-based thresholds to flag suspicious samples.
Set exclusion criteria upfront. Quarantine flagged samples for human review rather than deleting them automatically, and make sure they can be restored. Balance poison recall, benign sample removal, accuracy on clean validation data and costs (£), including compute and reviewer time. Document decisions for compliance.